


richboy2307
Staff
-
Joined
-
Last visited
Everything posted by richboy2307
-
Thanks we'll investigate. Its more likely SU5 as it changed emissive properties of materials again.
-
Yes as of v1.0.6 you can now. The FAQ item has been updated to reflect this:
-
Now you can via RMT Entry Function. For more info see this: https://forum.inibuilds.com/topic/36719-how-to-ins-remote-entry-function/
-
Should be fixed in 1.0.6 but please check and let us know. The issue was already identified before it was reported here :)
-
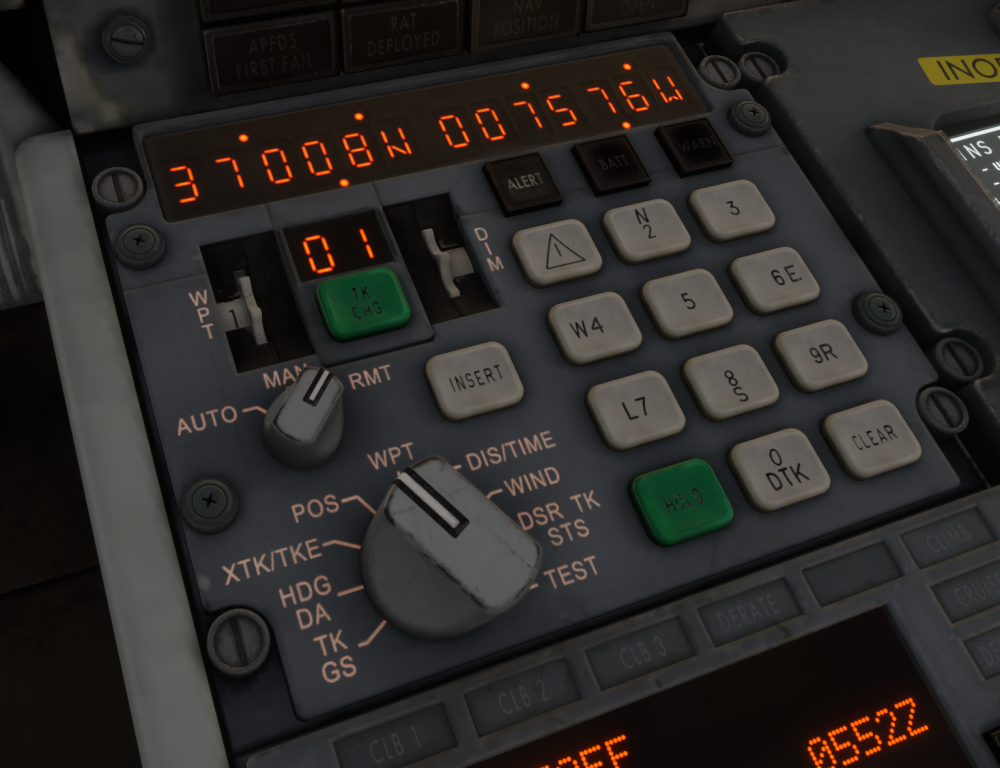
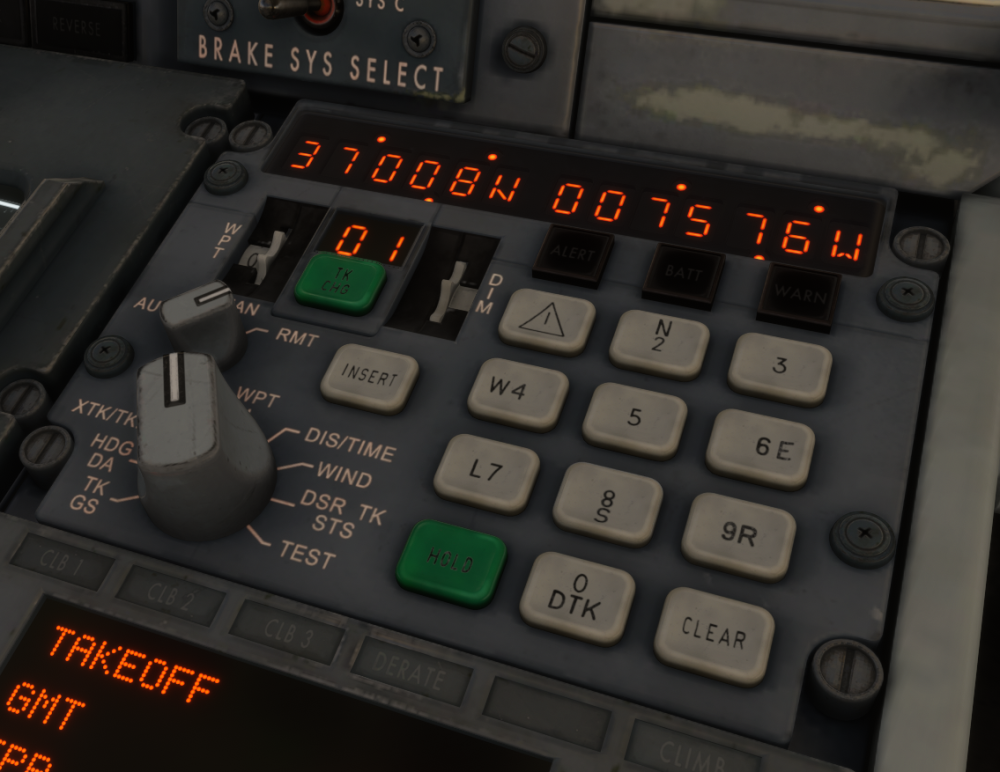
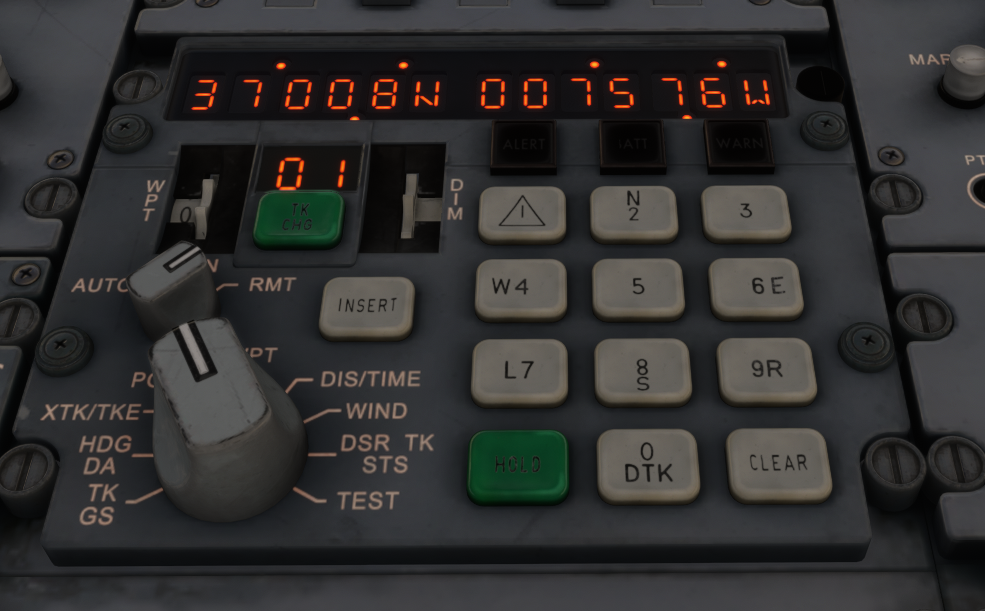
As of v1.0.5 Update, you can now remotely enter waypoints across all three INS units manually or via Simbrief Import from the Paper Flight Bag (PFB) - OFP Page. Remote Entry Function (RMT)Due to the complexity of the original autofill procedure and common user difficulties when operating the INS, this feature has been simplified to provide a more intuitive user experience while preserving the intent of the real system. The process generally works as follows: Set the desired units to RMT mode (at least 2 required for this operation). Enter waypoints manually or import them from Simbrief into the transmitting (TX) unit using the standard procedures. Each time a latitude or longitude is inserted (by pressing INSERT) or when an Simbrief import is completed, the TX unit will automatically transfer the data to all receiving (RX) units. Remote Manual Entry (v1.0.5+)Procedure Set INS 1, 2 and 3 MSU to STBY , ALIGN or NAV on the overhead panel Set INS 1, 2 or 3 Mode to RMT (at least 2 units required for this function) Set the Display Selector Switch to WPT on the Transmitting (TX) unit Set WPT Selector Switch to any number from 1-9 on the TX unit Enter Waypoint Coordinates on the TX unit The entered waypoint LAT and LON will update automatically on your TX unit and any other Receiving (RX) unit set to RMT as you press INSERT. Note: The waypoint will be entered into the same WPT number as selected on the main unit (i.e. if you populate WPT 3 on TX Unit, any other RX Unit will also populate its WPT 3 position) Set INS 1, 2 and 3 Mode to AUTO or MAN for navigation. Example In the example video we have remotely entered N3701.0 W00758.0 into WPT 3 from INS 2 (TX) to INS 1+3 (RX) at the same time via RMT function. 2026-05-12 04-52-20.mp4 Remote SB Import (v1.0.6+)Procedure Set INS 1, 2 and 3 MSU to STBY , ALIGN or NAV on the overhead panel Set INS 1, 2 or 3 Mode to RMT (at least 2 units required for this function) Use Captain's PFB to import to INS 1 (or First Officer's PFB to import to INS 2) The waypoints will be imported to INS 1 (or INS 2) and the other INS units set to RMT. The auto-batch logic (if more than 9 waypoints on SB import), will apply to the main and any other RMT unit as well. Set INS 1, 2 and 3 Mode to AUTO or MAN for navigation. Example In the example video below we have remotely imported from the FO PFB to INS 2 (TX) and INS 1+3 (RX) at the same time via RMT function. 2026-05-12 04-13-23.mp4
-
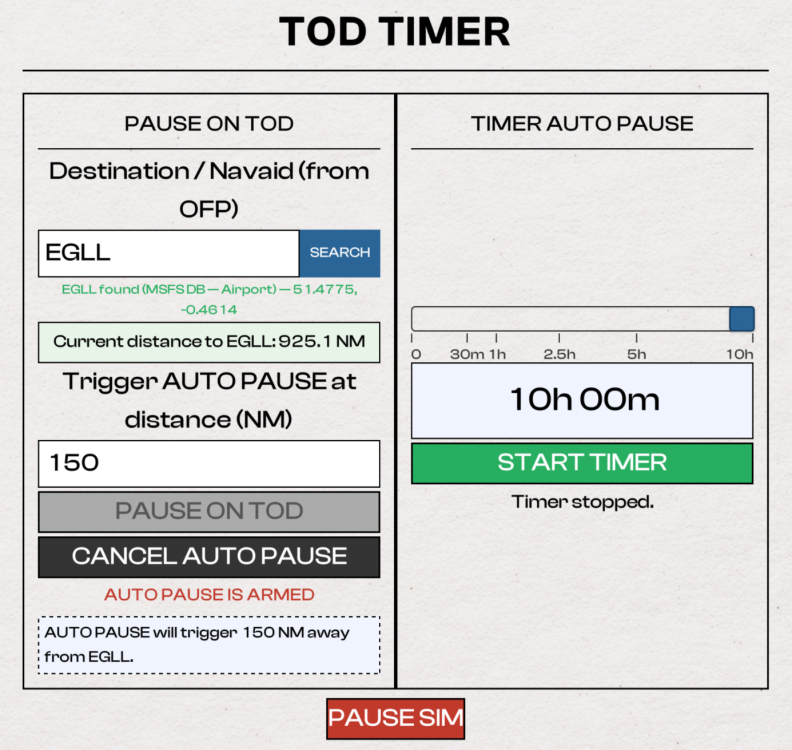
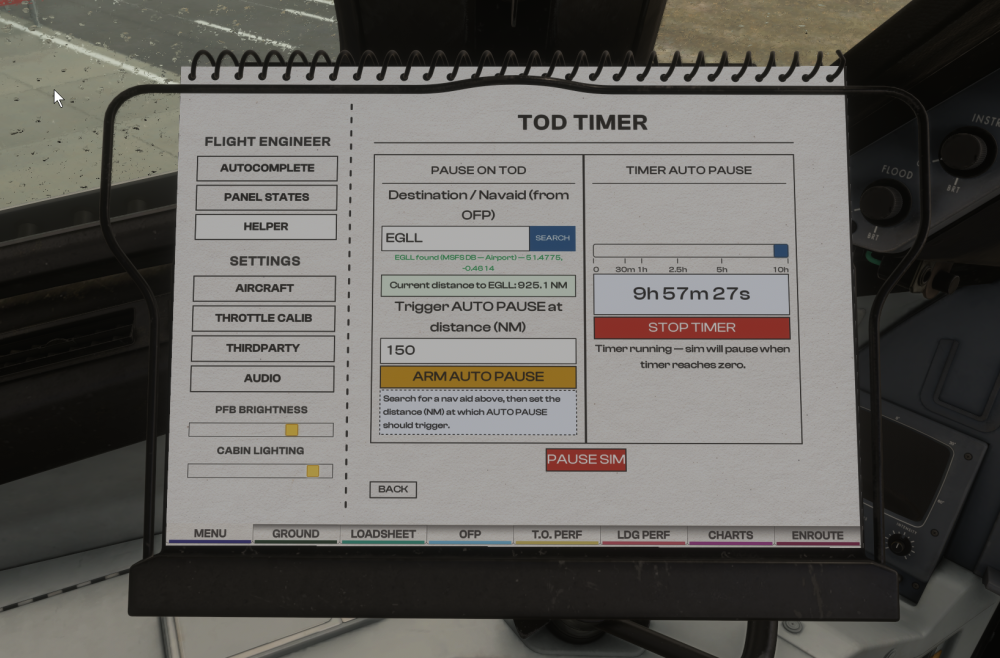
Since v1.0.6 Update, the Paper Flight Bag (PFB) comes with a variety of additional quality-of-life features such as TOD Timer. This feature allows the simulator to automatically pause either at a set distance from your destination or after a selected timer countdown. (Click to enlarge image) Accessing TOD TimerOn the Captain or First Officer's PFB, Go to Menu Select Helper Click TOD Timer Set up Distance-Based Auto PauseSearch for a reference position Airport using its ICAO code Navaid using its IDENT Set the desired trigger distance in NM (Nautical Miles) Click ARM AUTO PAUSE The simulator will automatically pause once the aircraft reaches the set distance from your reference point. You will receive a pop-up on your PFB when this pause triggers. Click UNPAUSE SIM to continue. Press CANCEL AUTO PAUSE to make any changes to distance or reference point. Example Airport: EGLL Distance: 150 NM The sim will pause automatically 150 nautical miles before reaching Heathrow. (Click to enlarge image) Set up Timer-Based Auto PauseClick and drag the slider to choose a time value in HH:MM Click START TIMER to begin the countdown immediately. The simulator will automatically pause when the timer reaches zero. You will receive a pop-up on your PFB when this pause triggers. Click UNPAUSE SIM to continue. Press STOP TIMER to make any changes. Example Timer: 10h 00m The sim will pause automatically 10 hours from when you start the timer. (Click to enlarge image) FAQ
-
That would make sense, thanks will pass it on to the team.
-
Thanks passed on to the team.
-
Hi thanks we'll have a look. I can reproduce the same on my flights.
-
As of 1.0.5 - no, only manual remote entry is supported across units. In v1.0.6 - yes SB import remote entry to INS 1 / 2 / 3 is coming. That update is estimated to go live this week. We appreciate the feedback and are working to add these to the manual as well as FAQ. Remote Entry Function (RMT) Due to the complexity of the original autofill procedure and common user difficulties when operating the INS, this feature has been simplified to provide a more intuitive user experience while preserving the intent of the real system. The process generally works as follows: Set the desired units to RMT mode (at least 2 required for this operation). Enter waypoints manually in the transmitting (TX) unit using the standard procedure. Each time a latitude or longitude is inserted (by pressing INSERT), the TX unit will automatically transfer that entry to all receiving (RX) units. Remote Manual Entry Procedure (v1.0.5+) Set INS 1, 2 and 3 MSU to STBY , ALIGN or NAV on the overhead panel Set INS 1, 2 or 3 Mode to RMT (at least 2 units required for this function) Set the Display Selector Switch to WPT on the Transmitting (TX) unit Set WPT Selector Switch to any number from 1-9 on the TX unit Enter Waypoint Coordinates on the TX unit The entered waypoint LAT and LON will update automatically on your TX unit and any other Receiving (RX) unit set to RMT as you press INSERT. Note: The waypoint will be entered into the same WPT number as selected on the main unit (i.e. if you populate WPT 3 on TX Unit, any other RX Unit will also populate its WPT 3 position) Set INS 1, 2 and 3 Mode to AUTO or MAN for navigation. In the example video I have remotely entered N3701.0 W00758.0 into WPT 3 from INS 2 (TX) to INS 1+3 (RX) at the same time via RMT function. 2026-05-12 04-52-20.mp4 Remote SB Import Procedure (v1.0.6+) Set INS 1, 2 and 3 MSU to STBY , ALIGN or NAV on the overhead panel Set INS 1, 2 or 3 Mode to RMT (at least 2 units required for this function) Use Captain's PFB to import to INS 1 (or First Officer's PFB to import to INS 2) The waypoints will be imported to INS 1 (or INS 2) and the other INS units set to RMT. The auto-batch logic (if more than 9 waypoints on SB import), will apply to the main and any other RMT unit as well. Set INS 1, 2 and 3 Mode to AUTO or MAN for navigation. In the example video below I have remotely imported from the FO PFB to INS 2 (TX) and INS 1+3 (RX) at the same time via RMT function. 2026-05-12 04-13-23.mp4
-
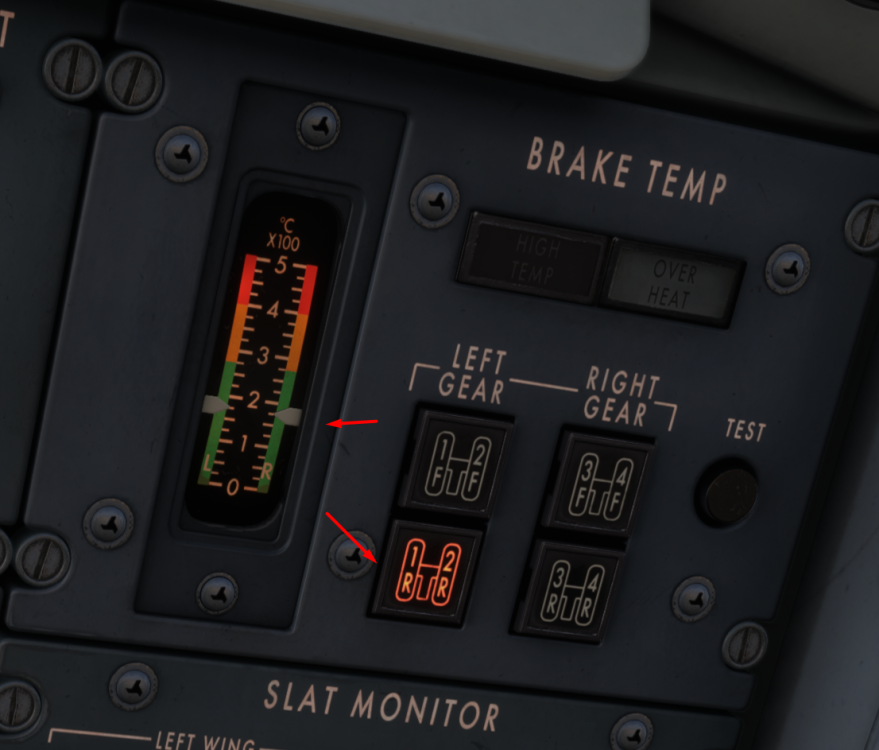
Hi, can you please elaborate on the issue and provide any screenshot/video reference for what you're observing? Also note you have to depress one of the 4 gear buttons (Left-Front, Left-Rear, Right-Front or Right-Rear) in order to see the temperature of the selected section. The sensor can only display temperature for one selection at a time. The same is required for when conducting the TEST to see a rise by 100c for selected sensor.
-
Thanks passed on to the team for further investigation.
-
Yoke AP Disconnect The Autopilot Disengage button on the yoke is actuated via the AUTOPILOT OFF keybind. You need to press it a second time to cancel any AP DISC warnings. Please verify the button you are using is mapped only to that keybind. AP 1 Master Switch on Glareshield The TOGGLE AUTOPILOT keybind is used to toggle the AP 1 Master Switch between the CMD and OFF positions. Note turning AP 1 Master to OFF via this keybind will trigger AP DISC warnings that must be further cancelled via the AUTOPILOT OFF keybind which actuates the Yoke AP Disconnect. See for reference this post: https://forum.inibuilds.com/topic/36540-tm-mode-goes-to-000-epr-if-ap-is-off/#findComment-89422
-
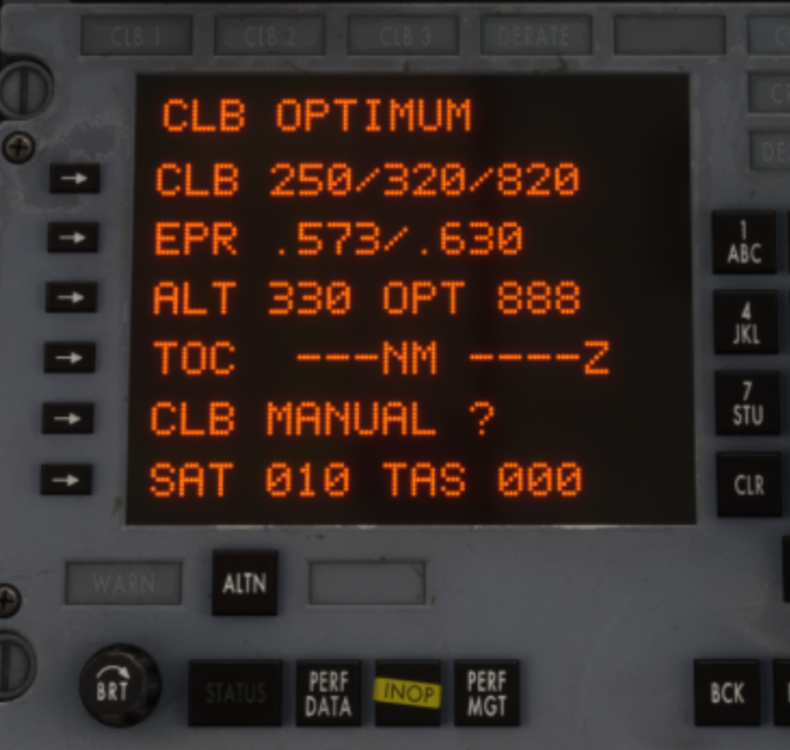
As of 1.0.5, Using TM+VNAV in climb will target either the OPT or MAX EPR values shown on the PMS CLB page depending on whether your current weight and TAT fall within the OPT range. If its within, it will use OPT power settings, else it will go for MAX values until back in OPT range. The fallback to MAX EPR is a failsafe to avoid users getting stuck in a very slow climb outside of OPT table parameters. So from the example below, it will target either .573 (OPT) or .630 (MAX) EPR depending on whether within OPT CLB parameters, and will automatically alternate between the two depending on atmospheric conditions and weights. For initial climb out, manually manage throttles (coupled with VS Mode if using autopilot) until you are in clean configuration before engaging TM+VNAV. If you want you can manually manage throttles per OPT values all the way to TOC to experience the slower climb rates that it will do at those OPT EPR values specifically.
-
As Agfors said, the HSI DIS/TIME Readouts are only driven by the INS Computers and are NOT coupled to the DME on the Tristar based on all the refs we have.
-
Hi @agfors @Prof_Plumpy Please check again on v1.0.6 and advise. Refinements have been made to the TM+VNAV / IAS / MACH mode controllers that we hope will alleviate the delay in response in maintaining pitch/speed in the various modes. As for TM+VNAV specifically for step climbs under 10,000ft, this actively being worked on by the team for 1.0.7 specifically. Some of the improvements may be noticeable on 1.0.6 itself, particularly on CPT PMS coupled with AP1 but overall work continues on this.
-
Thanks suggestion is noted.
-
Thanks logged for the team.
-
As MD82 has said, Both Rudder (Rudder Axis) and Tiller (Nosewheel Steering Axis) will control the nosewheel. That is how it is on the real aircraft as well and this is what is simulated now since v1.0.4 The difference between the two is in the degree of travel. The rudder alone has limited movement of nosewheel, while the tiller can move the wheel much further/sharply. So even if you set RUDDER CONTROLS TILLER to NO, you will see some limited nosewheel steering with rudder axis input alone. Then try giving tiller axis input (to either left/right extreme) and you'll note it goes much further. If you're having any other issue, please provide video/screenshots of what you're seeing and also of your keybinds for both Rudder Axis and Nosewheel Steering Axis. ---- Moderation Note: I have deleted the irrelevant messages that had no bearing on the issue at hand. Thanks!
-
Hey Glad its sorted. For the benefit of other WinCtrl hardware users that may suffer from same in future, could you list exactly what was the issue and what you did to fix it? Thanks!
-
The GNS530 getting stuck on initialisation is a sim bug as far as we can tell. It's all WT code and we're not doing much our side with it besides giving it power (without which the display wouldn't turn on at all). If you do get stuck in this situation, you can as Jake suggested, try to recycle power (Trip the APU GEN or disconnect EXT Power) as that usually resets it. Alternatively you can try to restart your flight though that is rarely necessary. This issue is reported on other aircraft using WT GNS as well and we're hopeful it will be resolved eventually.
-
Hey Randomised from doors open to doors close on the ground Random 10-15 mins after seat belt sign turned on above FL200 Randomised on ground after doors open again for arrival
-
Thanks, there were many different cabin configurations for the L1011, but the version we’ve modelled is based on the best references available to us. At this time, we don’t have plans to add additional cabin layouts, and we believe the existing variants already offer a good range of options to capture the feel of this era of aviation.
-
We're not seeing this our end. Try the following maybe? If you locally installed the addon via My Library, try deleting and revert to streamed version? Check under "My Library" if these liveries show up and are not "disabled"? Delete your Content.xml file and restart the sim after to let it build fresh. NOTE: This will reset any addons you may have previously disabled manually via My Library. Keep a backup of the original file and re-disable the addons after if needed.
-
Is a livery-side issue. Already reported elsewhere, the relevant livery artists will work on it when possible. Expect livery updates via iniManager or Marketplace Livery packs for this. Thanks!


