


richboy2307
-
Posts
1704 -
Joined
-
Last visited
-
Days Won
83
Content Type
Profiles
Forums
Downloads
Posts posted by richboy2307
-
-
Are you using 'SIM DEFAULT' navdata or 'NAVIGRAPH' on the OIS OPTIONS - THIRD PARTY page?
For the 'SIM DEFAULT' navdata, the ILS autotune feature is dependent on the scenery add-on used having properly defined the ILS frequencies for each runway. The ILS itself will exist and function, but as its not tied to the runway, it will simply not be autotuned.
Best Practice - Approach Preperation
As part of your descent preparation,
-
MFD FMS NAVAIDS page
Verify the correct ILS station identifier (IDENT) is shown.
- Refer to charts to find the IDENT of your specific ILS.
- If the field is not properly populated, manually input the desired IDENT.
- The FREQ and CRS fields will update automatically upon entering the IDENT.
E.g. For FACT ILS Z RWY 19 approach, we'd enter the ILS IDENT of 'KSI'.
-
EFIS Control Panel - LS push button
Verify that the LS button is pressed in and lit up green when passing 10,000ft. This will help ensure that approach guidance is shown on the PFD.
When you are in range, the the tuned ILS IDENT, FREQ, CRS and DME (where coupled to the same station) will be shown on the bottom left corner of your PFD. You will also see the LOC/GS guidance diamonds.
Thanks!
-
MFD FMS NAVAIDS page
-
You can click on the doors on the diagram directly of the OIS GROUND page to toggle them.
Thanks!
-
9 hours ago, SAS274 said:
Seems like navigraph subscription is required for this to work ?
Navigraph is required for ANF yes. Mentioned on the store page, streams and differences chart we put out.
Once you have ANF, you can use it for BTV via exit selection.
If you don't have a Navigraph subscription, you can still use BTV via manual distance entry.
Guide is here, see 2. Manual Distance Entry section.:On 2/28/2025 at 9:21 AM, ekosif said:I am getting 'ARPT NAV NOT AVAIL (NAVIGRAPH)' error when I try to set BTV even though I have Navigraph subscription and it is not showing the airport thus unable to select BTV and see the airport map during taxi to gate. I have tried this on couple of airports, one of them is Munich (EDDM) but no luck. I can see the airport map during taxi to runway before take off, but not for landing.
You may need to manually load the airport if you're too far from it. Sometimes going out of ZOOM mode and back can help re-cycle it as well.
See the ARPT SEL FUNCTION- CHANGING DISPLAYED AIRPORT MAP section of the guide below:
Thanks
-
Hi @Delta_A350
You need to choose the correct winglet type from the OIS Equipment settings. Thanks! -
What is WASM?
The WebAssembly Module (WASM) is a container for running programmes written in other langauges (eg C/C++) that is then converted to native code ahead of time (as DLLs) during first launch (WASM Compilation). This helps improve performance for subsequent uses but causes longer load times on first launch. See for more info:
This improves security of the sim and portability of projects across PC/Xbox. In case of issues, only the WASM crashes instead of the rest of the sim along side with it. This is why the sim and some functions may continue to work, however other systems and displays that use WASM on the aircraft become unresponsive or "freeze" in place.
So what to do in case of WASM crash?- Do not close the sim/restart flight immediately
- Verify the WASM error message
- Report the WASM error message with reproduction steps using the guide below.
Verify WASM Crash in Sim
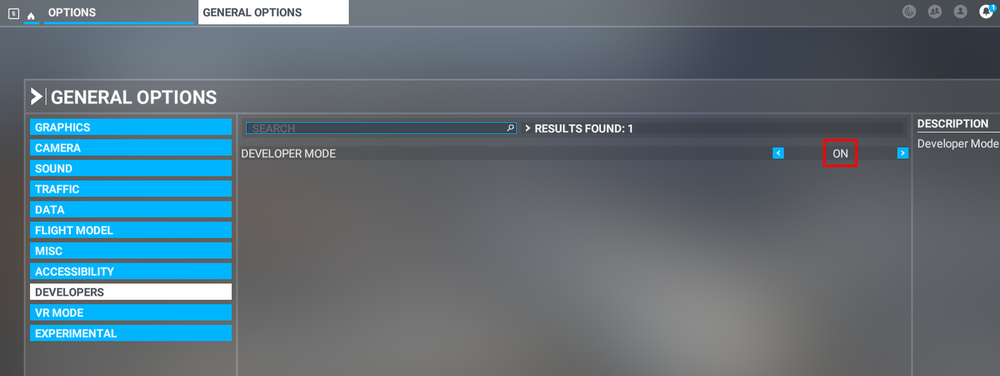
Step 1. Enable Developer Mode
(FS20) Options > General Options > Developers
(FS24) Settings > General > Advanced OptionsStep 2. Enable the Console by pressing "~" key on your keyboard or using the Dev Toolbar at the top of the screen
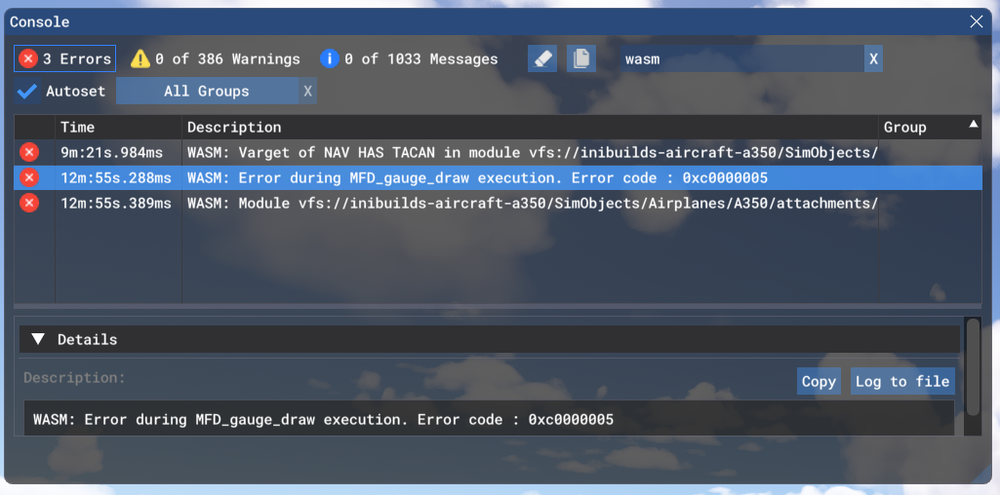
Step 3. Filter the Console by ❌Error messages only by clicking on ⚠️Warning and ℹ️Messages to disable them
(remove blue box border around them).Step 4. Type 'WASM' in the search box. Find the WASM Error and Copy the message. Also take a screenshot of this console window for making a report.
Report WASM Crash on Forum
Step 5. Paste the WASM Error message and screenshot of the Console obtained in Step 4 above into a forum post WASM Crash Report.
Step 6. Take note of what you pressed or things you did, just before you noticed this crash happen.
Step 7. Verify if you are able to repeat the crash by following those same steps.
Step 8. Please provide the following information
- Aircraft: A350-900 or -1000
- Simulator: FS2020 or 24
- Navdata Method: SIM DEFAULT or NAVIGRAPH
- OFP: Include a PDF of your Operational Flightplan (OFP) if related to FMS/Route Procedures crashes
- WASM Error: The error you copied in Step 4 above
- Specs: CPU, GPU and RAM of your system.
- Autosave File: Please include the latest ".bin" autosave file prior to your crash.
Step 9. Where possible, include on your report
- a Screenshot / Video showing what you pressed/did just before the crash happened to give us more clues.
- steps on how to reproduce the crash so that we can try ourselves with debugging tools to identify the cause of crash.
-
the ".bin" Autosave File which is the latest save from prior to your crash to help us reload into same scenario.
FS24 Autosave Folder Paths
- Steam: %APPDATA%\Microsoft Flight Simulator 2024\WASM\MSFS2024\inibuilds-aircraft-a350\work\autosaves
- MS Store: %LOCALAPPDATA%\Packages\Microsoft.Limitless_8wekyb3d8bbwe\LocalState\WASM\MSFS2024\inibuilds-aircraft-a350\work\autosaves
FS20 Autosave Folder Paths
- Steam: %APPDATA%\Microsoft Flight Simulator\Packages\inibuilds-aircraft-a350\work\autosaves
- MS Store: %LOCALAPPDATA%\Packages\Microsoft.FlightSimulator_8wekyb3d8bbwe\LocalState\Packages\inibuilds-aircraft-a350\work\autosaves
These types of WASM crashes are actionable depending on your reports of the steps taken immediately before the crash happened. If reproducible on our end by following the same steps, can be debugged and resolved more efficiently.
QuoteExample WASM Crash Report
I had this WASM crash when I clicked the VIDEO button on the center pedestal.
To reproduce
- Load at gate
- Power on aircraft (Battery, GPU)
- Click VIDEO button
- Systems freeze
Information
- Aircraft: A350-900
- Simulator: FS24
- Navdata Method: NAVIGRAPH
- OFP: Not required, happens on any route
- Specs: Ryzen 5800X, RTX 3070, 16GB RAM
- Autosave: Attached latest .BIN file before crash
- WASM: Error during MFD_gauge_draw execution. Error code : 0xc0000005
-
What is WASM?
The WebAssembly Module (WASM) is a container for running programmes written in other langauges (eg C/C++) that is then converted to native code ahead of time (as DLLs) during first launch (WASM Compilation). This helps improve performance for subsequent uses but causes longer load times on first launch. See for more info:
This improves security of the sim and portability of projects across PC/Xbox. In case of issues, only the WASM crashes instead of the rest of the sim along side with it. This is why the sim and some functions may continue to work, however other systems and displays that use WASM on the aircraft become unresponsive or "freeze" in place.
So what to do in case of WASM crash?- Do not close the sim/restart flight immediately
- Verify the WASM error message
- Report the WASM error message with reproduction steps using the guide below.
Verify WASM Crash in Sim
Step 1. Enable Developer Mode
(FS20) Options > General Options > Developers
(FS24) Settings > General > Advanced OptionsStep 2. Enable the Console by pressing "~" key on your keyboard or using the Dev Toolbar at the top of the screen
Step 3. Filter the Console by ❌Error messages only by clicking on ⚠️Warning and ℹ️Messages to disable them
(remove blue box border around them).Step 4. Type 'WASM' in the search box. Find the WASM Error and Copy the message. Also take a screenshot of this console window for making a report.
Report WASM Crash on Forum
Step 5. Paste the WASM Error message and screenshot of the Console obtained in Step 4 above into a forum post WASM Crash Report.
Step 6. Take note of what you pressed or things you did, just before you noticed this crash happen.
Step 7. Verify if you are able to repeat the crash by following those same steps.
Step 8. Please provide the following information
- Aircraft: A350-900 or -1000
- Simulator: FS2020 or 24
- Navdata Method: SIM DEFAULT or NAVIGRAPH
- OFP: Include a PDF of your Operational Flightplan (OFP) if related to FMS/Route Procedures crashes
- WASM Error: The error you copied in Step 4 above
- Specs: CPU, GPU and RAM of your system.
- Autosave File: Please include the latest ".bin" autosave file prior to your crash.
Step 9. Where possible, include on your report
- a Screenshot / Video showing what you pressed/did just before the crash happened to give us more clues.
- steps on how to reproduce the crash so that we can try ourselves with debugging tools to identify the cause of crash.
-
The Autosave File, include the latest ".bin" autosave file prior to your crash to help us reload into same scenario.
FS24 Autosave Folder Paths
- Steam: %APPDATA%\Microsoft Flight Simulator 2024\WASM\MSFS2024\inibuilds-aircraft-a350\work\autosaves
- MS Store: %LOCALAPPDATA%\Packages\Microsoft.Limitless_8wekyb3d8bbwe\LocalState\WASM\MSFS2024\inibuilds-aircraft-a350\work\autosaves
FS20 Autosave Folder Paths
- Steam: %APPDATA%\Microsoft Flight Simulator\Packages\inibuilds-aircraft-a350\work\autosaves
- MS Store: %LOCALAPPDATA%\Packages\Microsoft.FlightSimulator_8wekyb3d8bbwe\LocalState\Packages\inibuilds-aircraft-a350\work\autosaves
These types of WASM crashes are actionable depending on your reports of the steps taken immediately before the crash happened. If reproducible on our end by following the same steps, can be debugged and resolved more efficiently.
QuoteExample WASM Crash Report
I had this WASM crash when I clicked the VIDEO button on the center pedestal.
To reproduce
- Load at gate
- Power on aircraft (Battery, GPU)
- Click VIDEO button
- Systems freeze
Information
- Aircraft: A350-900
- Simulator: FS24
- Navdata Method: NAVIGRAPH
- OFP: Not required, happens on any route
- Specs: Ryzen 5800X, RTX 3070, 16GB RAM
- Autosave: Attached latest .BIN file before crash
- WASM: Error during MFD_gauge_draw execution. Error code : 0xc0000005
-
The iniBuilds A350 Airliner simulates the MFD Controlled Backup EFIS and AFS Control panels which can be used in case of inoperational buttons/equipment.
If you find yourself with your EFIS CP displays blank as above, ensure that on the MFD FCU BKUP page that EFIS CP BACKUP is disabled as follows:
-
On the MFD Menu Dropdown select the FCU BKUP option
-
Ensure you are on the EFIS CP page and verify that the the EFIS CP BACKUP button light is off (not green)
-
 1
1
-
On the MFD Menu Dropdown select the FCU BKUP option
-
The iniBuilds A350 Airliner simulates the MFD Controlled Backup EFIS and AFS Control panels which can be used in case of inoperational buttons/equipment.
If you find yourself with your EFIS CP displays blank as above, ensure that on the MFD FCU BKUP page that EFIS CP BACKUP is disabled as follows:
-
On the MFD Menu Dropdown select the FCU BKUP option
-
Ensure you are on the EFIS CP page and verify that the the EFIS CP BACKUP button light is off (not green)
-
On the MFD Menu Dropdown select the FCU BKUP option
-
Changing Weight Measurement Units (LBS / KGS)
QuoteNote: Changing units will clear all weights from the FMS and can affect VNAV calculations, so you should only change these units whilst on the ground or whenever safe to do so.
The aircraft weight measurement units (LBS / KGS) are changed on the OIS Settings Page which can be reached via FLT OPS MENU > OPTIONS > OIS SETTINGS. Select your desired unit by clicking on its respective button.
(Click to enlarge image) -
The iniBuilds A350 Airliner simulates the realistic boot time for the On-board Information System (OIS) by default. During the boot-up the computer that powers the OIS is turning on and running through its system checks.
QuoteNote: This process may take upto 10 minutes and you will see an OIS NOT AVAIL alert whilst that happens.
Change OIS Boot Time
You can change the OIS Boot Time via the OIS Settings page (FLT OPS MENU > OPTIONS > OIS SETTINGS)
- REAL: Set by default - can take up to 10 minutes.
- FAST: Can take up to 5 minutes
- INSTANT: Will boot up instantly upon availability of GPU/APU power.
-
The iniBuilds A350 Airliner for MSFS 2020 and 2024 uses Web-Assembly Module (WASM) to run its code in the simulator environment.
As with all other WASM aircraft, the simulator needs to compile the necessary WASM files on first launch. However it will be much faster to load on subsequent launches.
QuoteNote: This may take upto 20 minutes on the first launch of the selected variant (depending on your hardware).
QuoteNote: Do not close your sim or return to menu whilst this is happening. Please be patient and wait for the WASM compilation to complete or else you risk having an incomplete WASM compile which may lead to instability/weird behaviours.
In case your sim crashes or you exit to menu during this initial WASM compile, please see the guide below to clear your WASM folder and try again:
-
Hi
For those of you experiencing these issues, first of all ensure all the assistances are disabled per below:
Also ensure you do not have any conflicting keybinds (keyboard or other controllers) related to RUDDER, AILERON or PITCH TRIM set in your control settings.Thanks!
-
Note: On the iniBuilds A350 Airliner (v1.0.0), please make sure that if you change SID/STAR/APP or RUNWAY that you have your ICAO of your airport shown on the F-PLN page with the expected runway.
Example if your flight plan page shows EGLL but you have inserted a runway and STAR along with ILS then reselect them until you have EGLL27L shown on the F-PLN page, this goes for all airports. If not done the aircraft can possibly not work out the VNAV path and cause a WASM crash.
-
 1
1
-
-
Note: On the iniBuilds A350 Airliner (v1.0.0), please make sure that if you change SID/STAR/APP or RUNWAY that you have your ICAO of your airport shown on the F-PLN page with the expected runway.
Example if your flight plan page shows EGLL but you have inserted a runway and STAR along with ILS then reselect them until you have EGLL27L shown on the F-PLN page, this goes for all airports. If not done the aircraft can possibly not work out the VNAV path and cause a WASM crash.
-
If your aircraft is not following the flight path correctly, please check your MSFS Assistance settings and ensure that the 4 options highlighted below in red below are switched to OFF.
-
1
-
-
If your aircraft is not following the flight path correctly, please check your MSFS Assistance settings and ensure that the options highlighted below in red below are set to OFF.
-
Our aircraft are best used with linear sensitivity settings for your axis, with deadzones as necessary for your hardware. To set this, go to your Settings > Controls > Select your controller > Hardware settings and set it up as shown below.
-
3
-
-
Attached below is the Aircraft Manual for the iniBuilds A350 Airliner for your reference.-
3
-
-
On the iniBuilds A350 Airliner you can set the visual weathering on the aircraft exterior via the On-board Information System (OIS) display. This adds affects of weathering around rivets and general dirt/grime over various components of the exterior that is persistent per variant.
OIS Weathering Slider
You can control the various levels of weathering on the OIS Aircraft settings page which can be reached via FLT OPS MENU > OPTIONS > AIRCRAFT.
(Click to enlarge image)Fixed vs Dynamic Weathering
The weathering behaviour differs depending on the simulator in use as follows
-
MSFS 2024 - Dynamic: The initial weathering state is set by the OIS Weathering slider and continues to dynamically increase over time. It will be manually "reset" by adjusting the slider.
Quote
Note: The OIS Weathering slider itself does not dynamically move over time. It is only used to set the initial weathering state whenever moved. However you will notice the dirt, grime and weathering of rivets change over time externally.
-
MSFS 2020 - Fixed: The weathering state is set by the OIS Weathering slider and remains at that that setting until until manually "reset" by adjusting the slider.
Quote
Note: The weathering state is persistent, per variant, over different sim sessions until manually "reset" by adjusting the slider.
-
1
-
MSFS 2024 - Dynamic: The initial weathering state is set by the OIS Weathering slider and continues to dynamically increase over time. It will be manually "reset" by adjusting the slider.
-
The iniBuilds A350 Airliner for MSFS 2024 has optional interior and exterior components that can be predefined with the livery. Below is a brief set of instructions on how to do this via the A350 Livery Configuration Generator.QuoteNote: For MSFS 2020 users, these are setup using the Onboard Information System (OIS) display from within the simulator. For more information see the below post:
Instructions-
Add the following to the package definitions xml:
		<AssetGroup Name="LiveryConfig">
			<Type Version="0">Copy</Type>
			<Flags>
				<FSXCompatibility>false</FSXCompatibility>
			</Flags>
			<AssetDir>PackageSources\Config</AssetDir>
			<OutputDir>Config\</OutputDir>
		</AssetGroup>
-
In the
PackageSourcesfolder add the following folder structure:\\PackageSources\\Config\\MyAirline(where MyAirline = the airline livery you are creating)
QuoteNote: This must be as unique as possible as it will potentially override existing livery configurations without warning.
-
Create the required config file based on the livery you are creating using the A350 Livery Configuration Generator available for download here:
To add an element select the desired option. There are some exceptions such as winglets (only configurable on -900) and the language pack, which is a drop down list.
QuoteNote: The Generated Configuration section at the bottom updates automatically as you change options.
-
Click the Copy button and paste the result into a
LiveryConfig.cfgfile which you can create at this location:\\PackageSources\\Config\\MyAirline(where MyAirline = the folder name you created in step 2)
QuoteNote: It MUST be named
LiveryConfig.cfg exactly.Using any other name will prevent the file from being read by the aircraft. -
Add the following to your livery.cfg file:
[Panel_DynamicParameters]
param.0 = "airline,MyAirline"
(where MyAirline = the folder name you created in step 2)
-
Export the livery as normal.
-
-
SYSTEM OVERVIEWOn the iniBuilds A350 Airliner for MSFS 2024 you can use the Flight Attendant Panel (FAP) to manage and monitor:
- Cabin Lighting
- Avionics Bay Lighting
- Cargo Bay Lighting
- Cabin Temperature
- Cabin Doors
- Water and Waste Tanks Capacity / Status
There are a total of 2 touchscreen FAPs installed on the aircraft located at
- FWD galley near door L1
- AFT galley near door L4
(Click here to enlarge image)CABIN STATUS
The Cabin Status page gives you a quick overview of the Lights, Temp and Door status of the aircraft.
Buttons & Controls
- Cabin Ready: Press to send the CABIN READY ECAM alert to the cockpit. Press again to reset.
- Lights Graphic: Press to access the Lights page.
- Temp Graphic: Press to access the Temperature page.
- Door/Slides Graphic: Press to access the Doors page.
- Waster/Waste Graphic: Press to access the Water/Waste page.
(Click here to enlarge image)LIGHTS
The Lights Status page allows you to quickly toggle light modes for all or individual zones.
Buttons & Controls
- Night Mode: Sets CABIN to the LOW DIM state
- Main On: Sets CABIN to the BRIGHT state
-
Zones: Allows you to set the lighting of the Cabin, Avionics Bay or Cargo Bay zone individually.
The current status of that zone is shown in text below it (Bright , Medium Dim, Low Dim) - Local: Allows you to set the desired status of the selected zone (highlighted in green)
To manually adjust the brightness of a selected zone
- Click on the desired zone button (Cabin / Avionics Bay / Cargo Bay)
- The active zone will be highlighted in green
- Click on the desired status for the selected zone in the Local section (Bright / Medium Dim / Low Dim)
- The current status of that zone is shown in text below it.
(Click here to enlarge image)TEMPERATURE
The Temperature Status page allows you to manually adjust the target temperature for the cabin.
Buttons & Controls
- Zones: Allows you to view the temperature of the Zones A, B or C individually. The current temperature of that zone is shown in text next to it.
- Local: Allows you to set the desired temperature target for all the zones via the +/- buttons.
To manually adjust the temperature of a selected zone
-
Click on the + or - button to set the target temperature for the selected zone in the Local section
a. The current target value is shown by the number and graphic scale in the Local section.
b. The actual current temperature of each zone is shown on the number in the Zones section.
(Click here to enlarge image)DOORS/SLIDES
The Doors Status page allows you to open/close doors and monitor their current status.
Buttons & Controls
- Door 1 Left: Click on the door icon to open/close the door
- Door 2 Left: Click on the door icon to open/close the door
- Door 3 Left: Click on the door icon to open/close the door
- Door 4 Left: Click on the door icon to open/close the door
- Door 1 Right: Click on the door icon to open/close the door
- Door 2 Right: Click on the door icon to open/close the door
- Door 3 Right: Click on the door icon to open/close the door
- Door 4 Right: Click on the door icon to open/close the door
The legend on the left shows what status is reflected by each of the colours.
(Click here to enlarge image)WATER/WASTE
The Water and Waste Status page allows you to manage and monitor the status of the respective tanks.
Buttons & Controls
- Refill Water: Sets the Water tank to 100% capacity
- Empty Waste: Sets the Waste tank to 0% capacity
The Waste tank fills up, whilst the Water tank drains throughout the duration of your flight. The Water and Waste Quantity graphic reflects the current % value of the tanks.
(Click here to enlarge image)


No ILS Capture
in Systems
Posted
@RTK1972
That sounds like your installed scenery is having a conflict with the default Navdata.
The iniBuilds A350 Airliner comes bundled with an older Navigraph AIRAC data (2303) by default as part of your purchase. The subscription is required to update to the latest, however without one you can still use the older cycle.
Thanks!