





IniSteve
Staff
-
Joined
-
Last visited
Everything posted by IniSteve
-
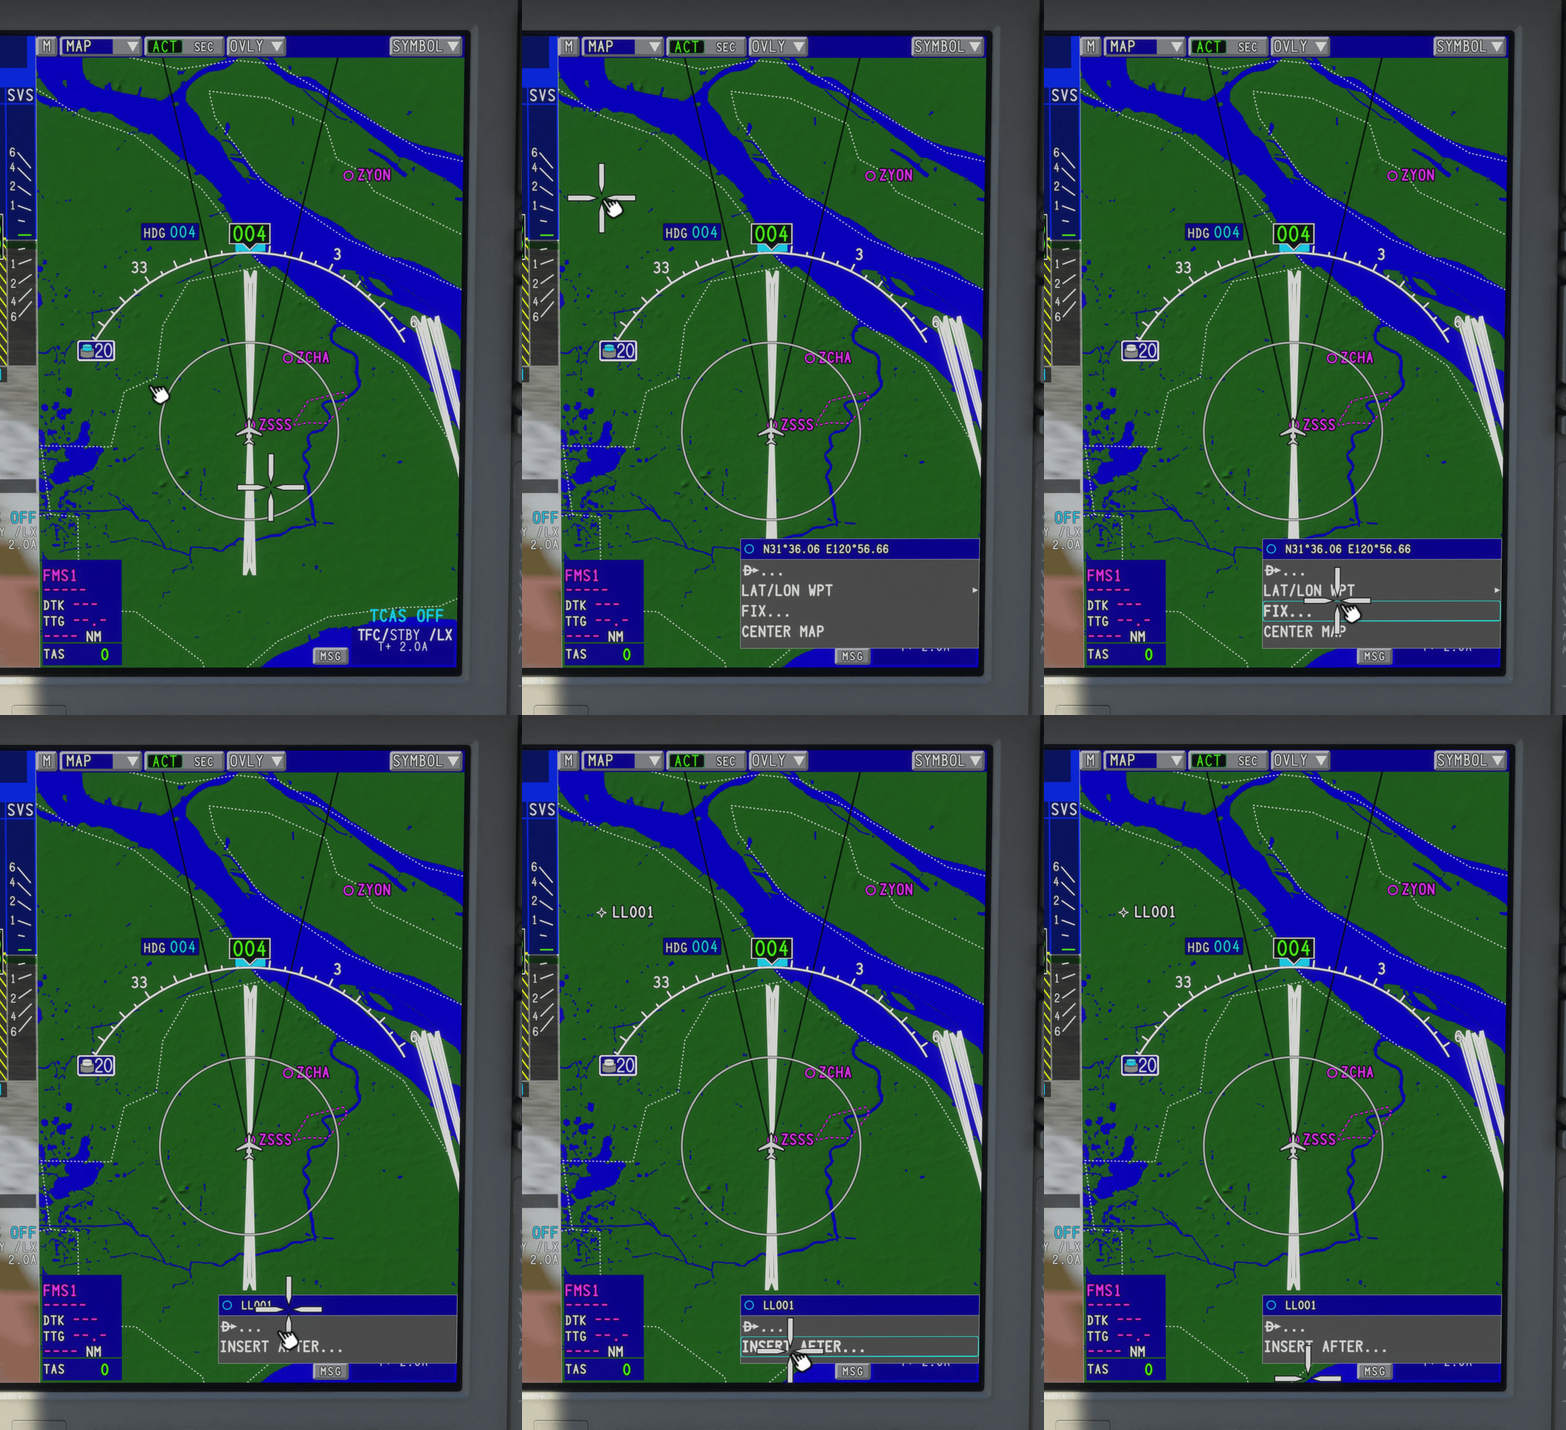
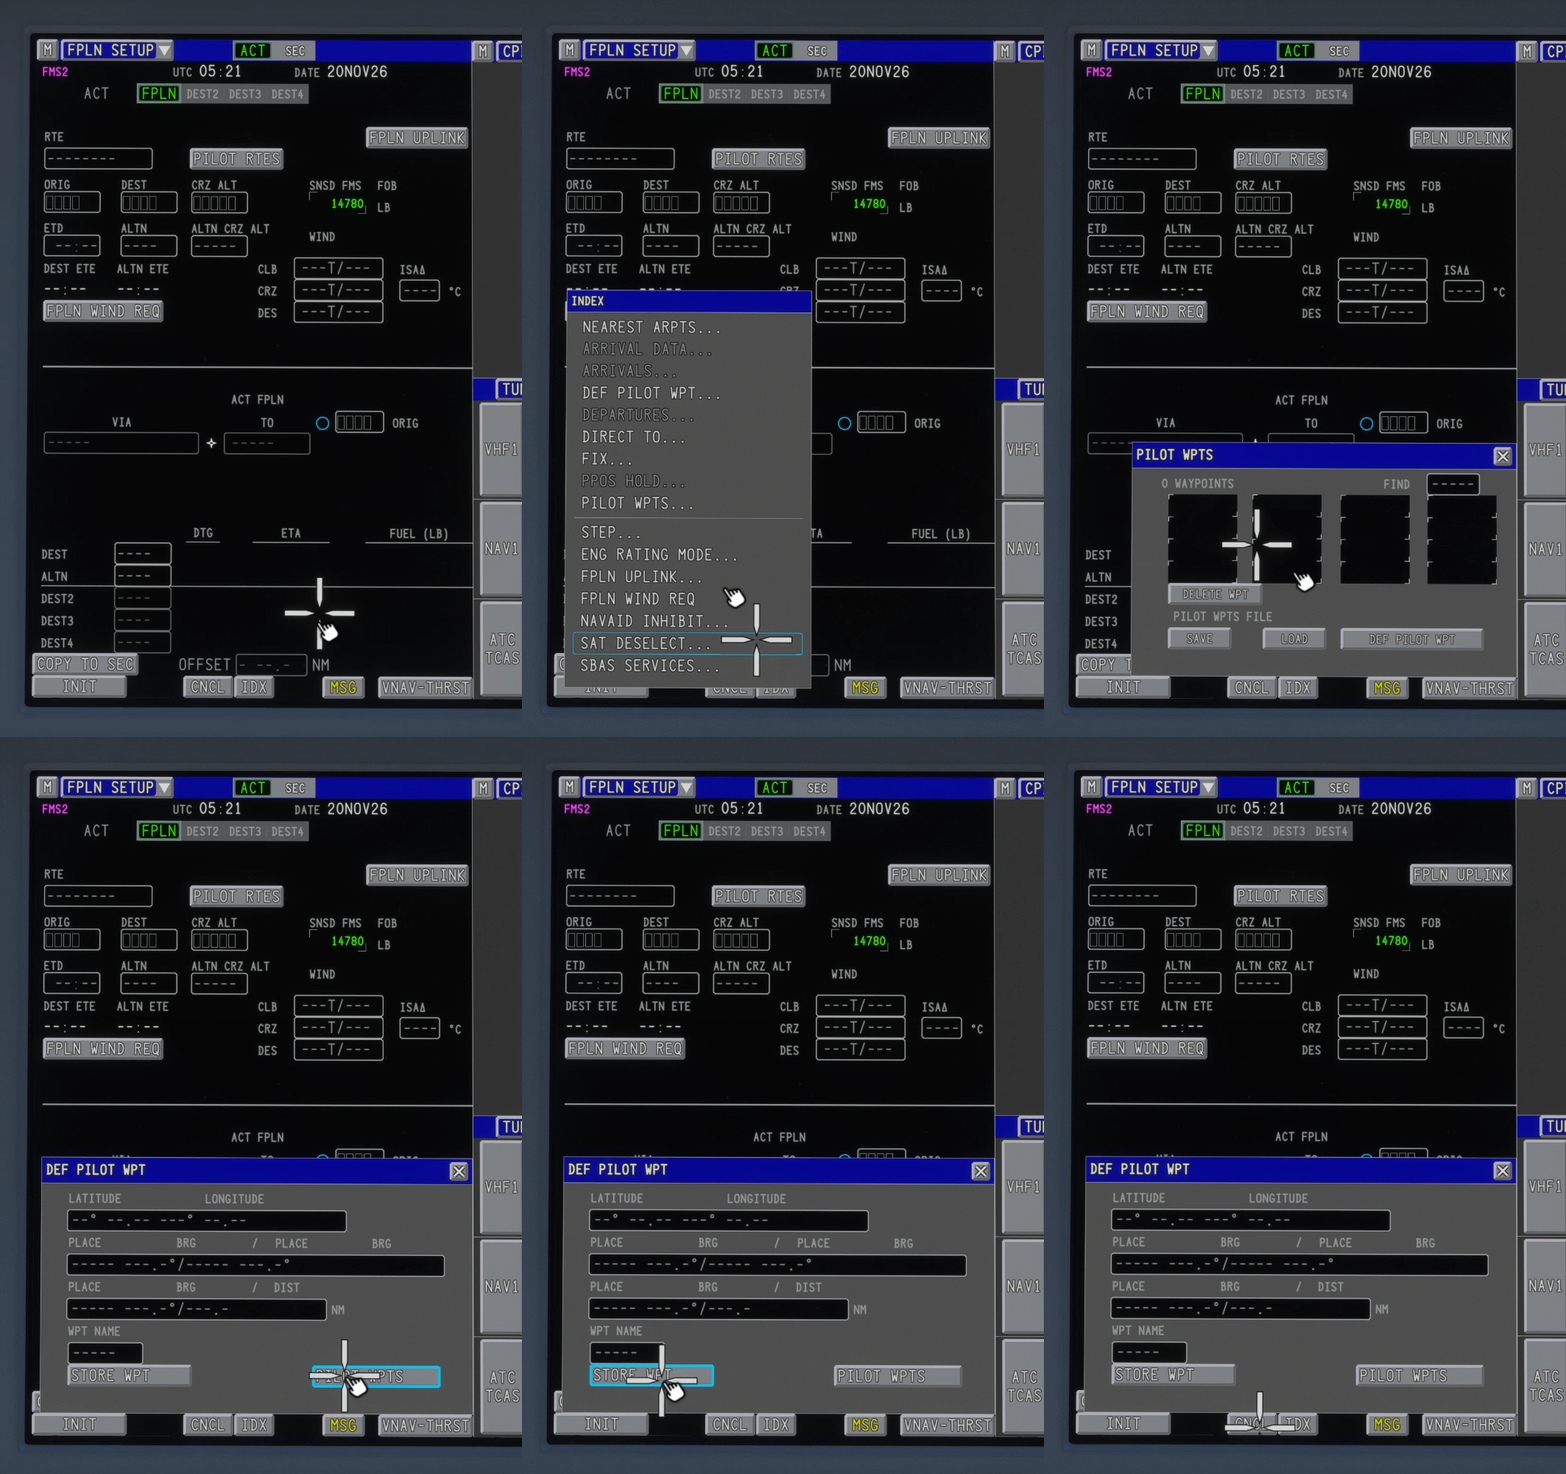
There are multiple methods to create custom waypoints in the iniBuilds Global Jet. Via the Map:Clicking anywhere on the map will create a Lat/Long waypoint at the location you click. (Click to enlarge image) Via the PILOT WPTS page:You can access the PILOT WPTS dialogue box from the FMS by pressing IDX -> PILOT WPTS... -> DEF PILOT WPT (Click to enlarge image) From here, new waypoints can be defined via: Latitude/Longitude Place/Bearing + Place/Bearing Place/Bearing/Distance The PILOT WPTS dialogue box also allows you to view all pilot-defined waypoints, edit waypoints you've already created, or delete waypoints.
-
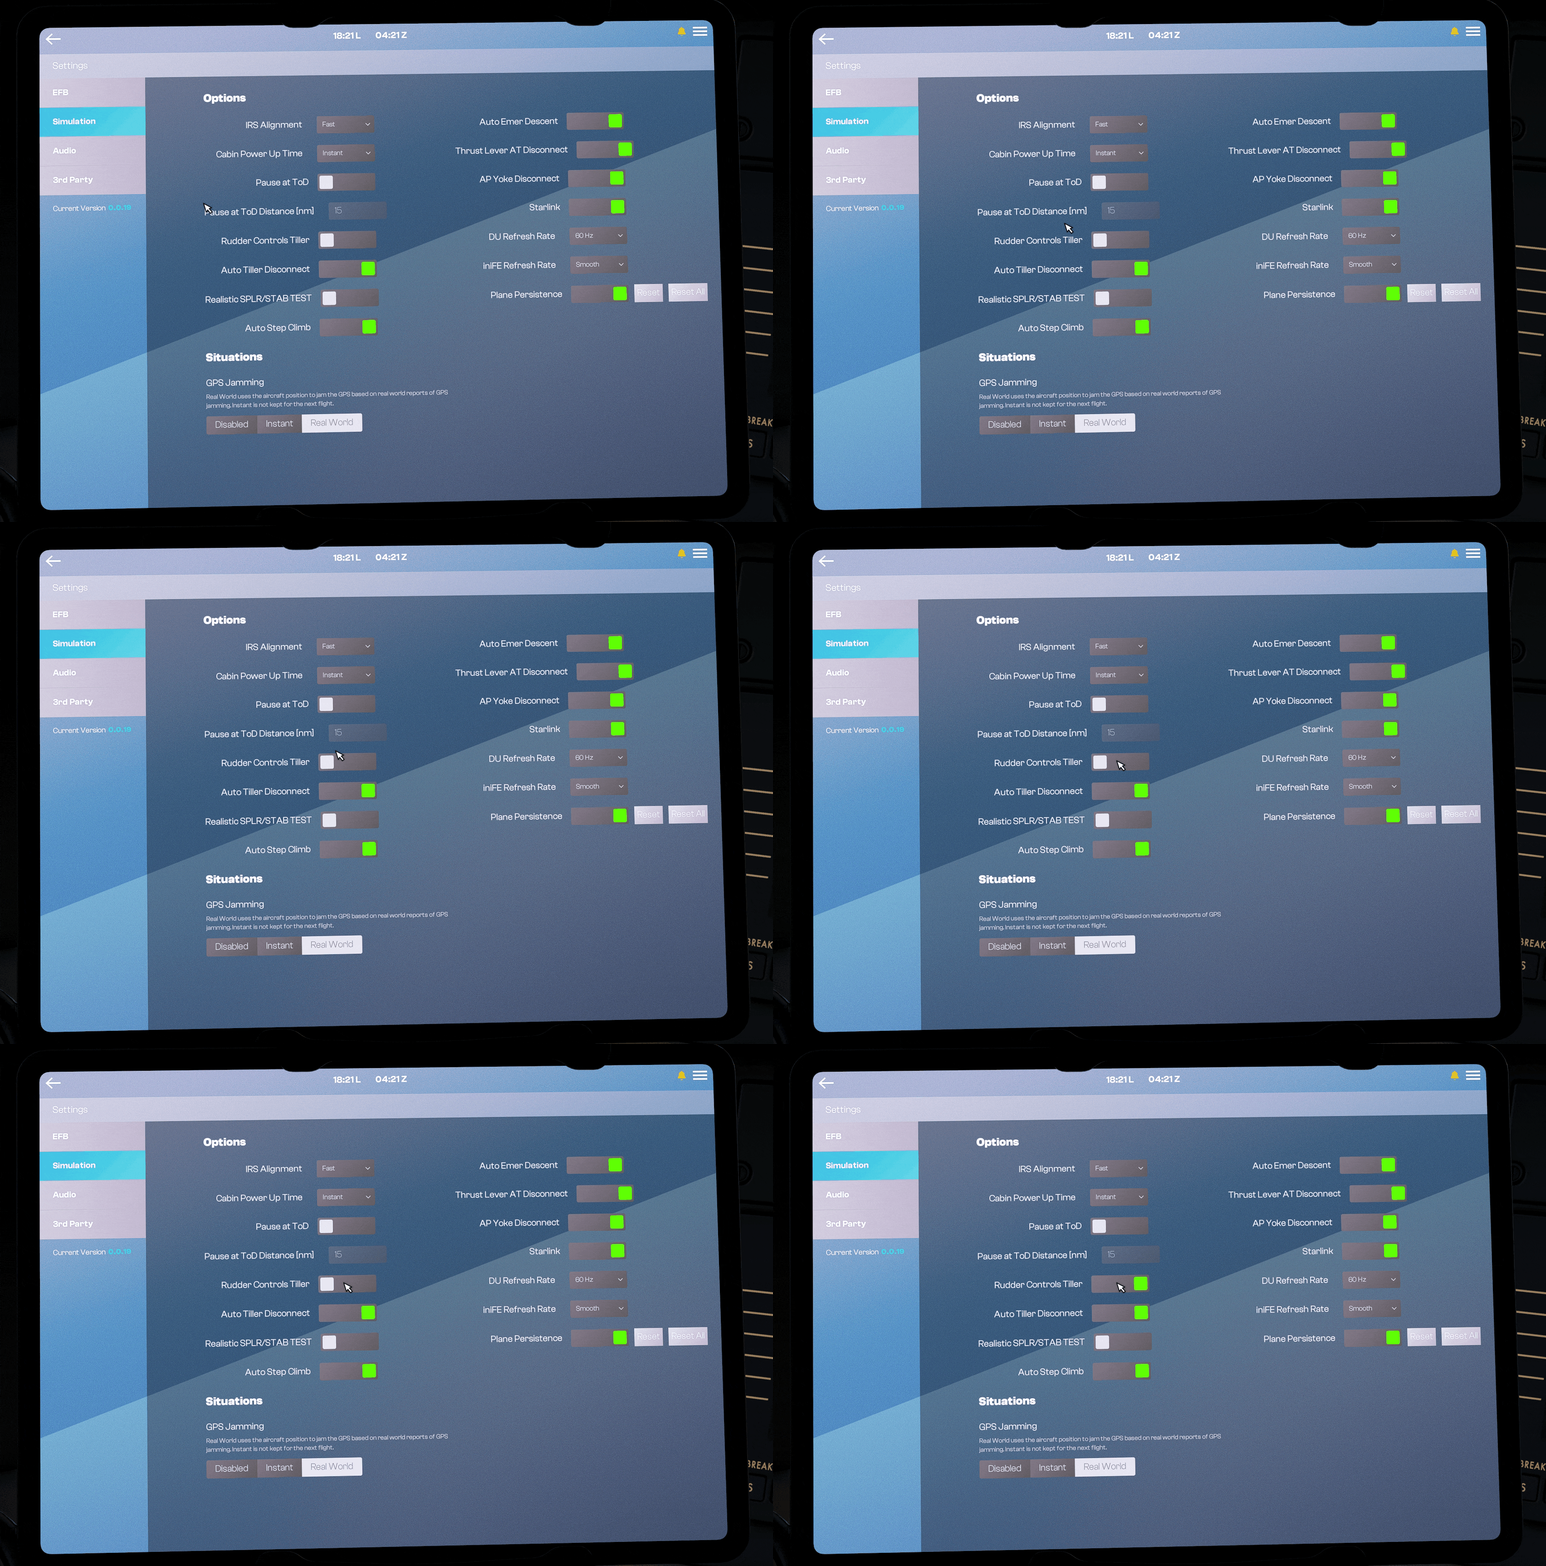
The Nose Wheel Steering is usually conducted using the tiller located on the side console. The tiller is bound to the 'NOSE WHEEL STEERING AXIS'. For simulation purposes, this can also be linked to your rudder axis for ease of use. This is done on the EFB simulations settings page EFB SIMULATION SETTINGS Set the RUDDER CTRL TILLER option to YES to couple the Rudder Axis to the Nose Wheel Steering Axis. (Optional) Set the AUTO TILLER DISCO option to YES to automatically de-couple the Rudder Axis to the Nose Wheel Steering Axis when N1% > 70% for better directional control on the runway. (Click to enlarge)
-
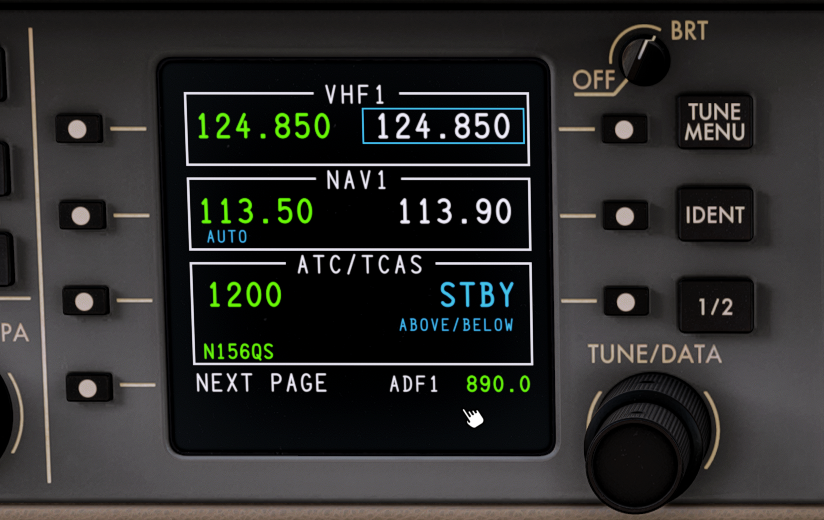
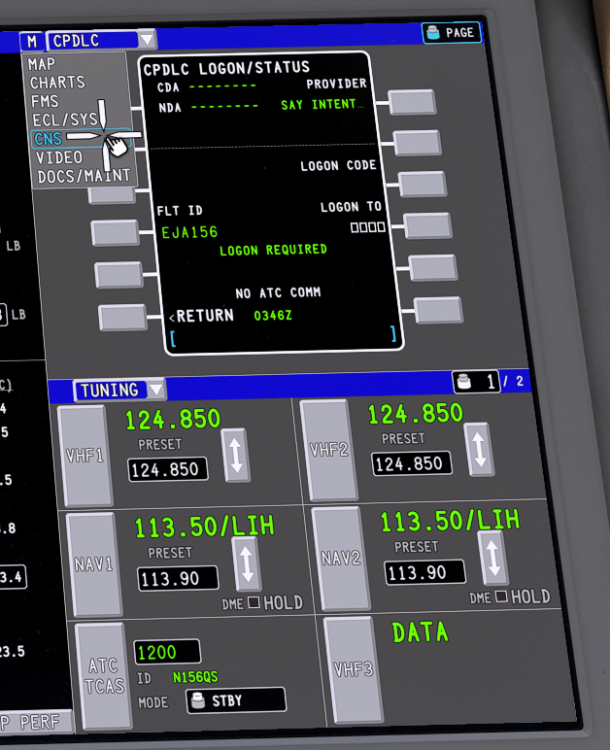
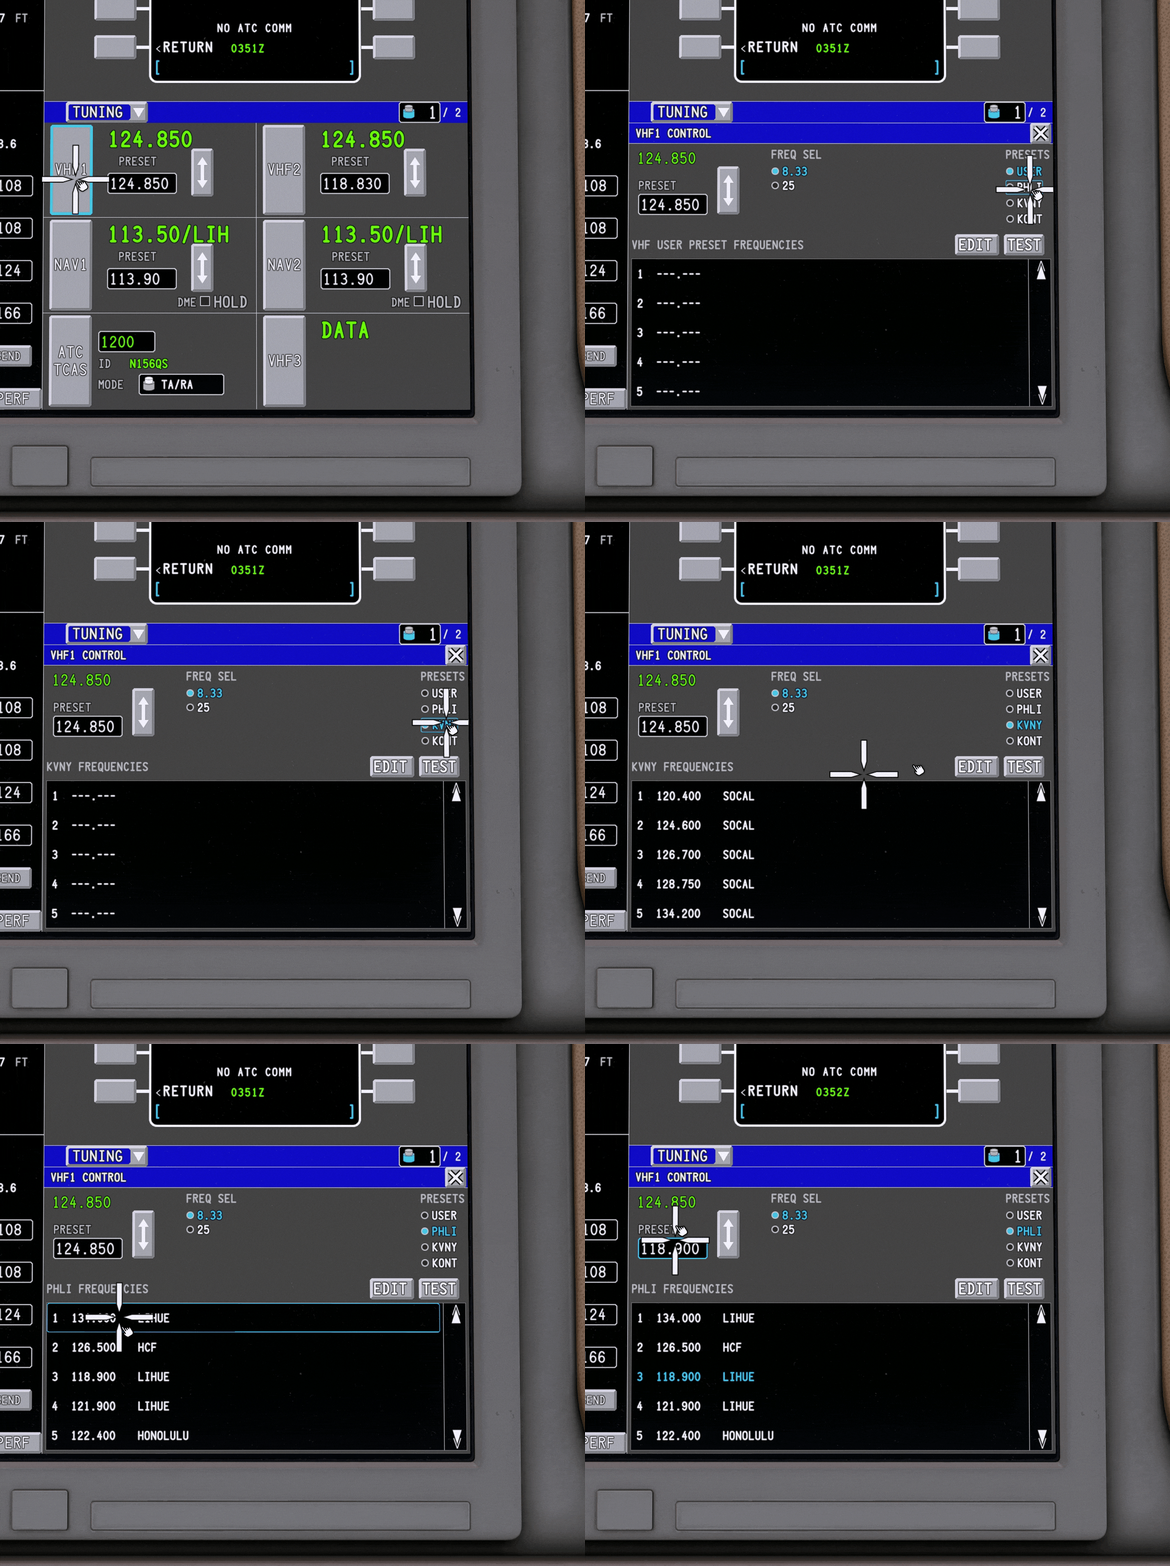
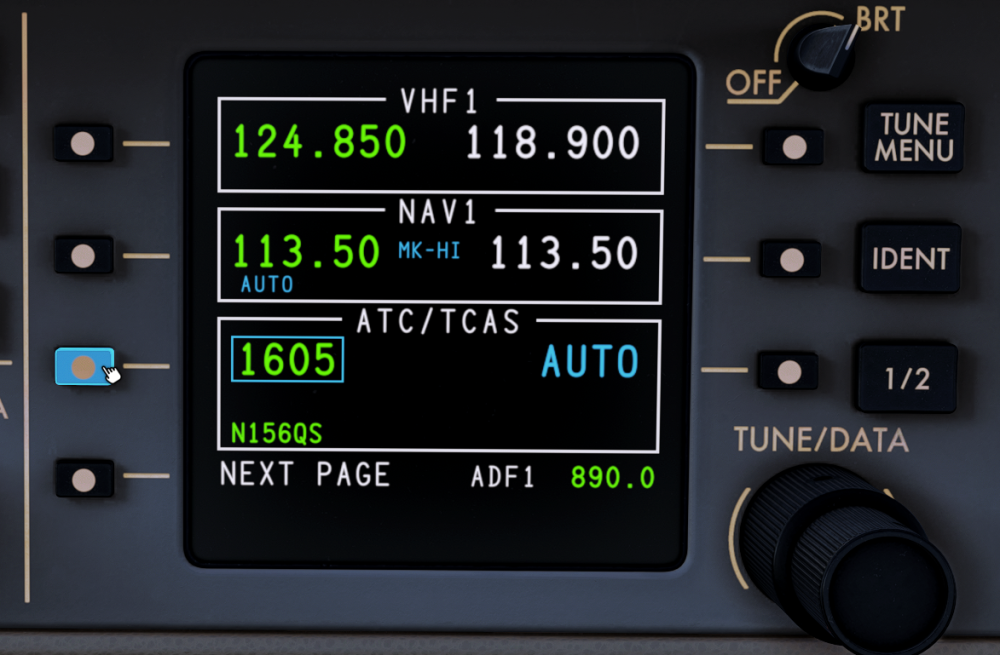
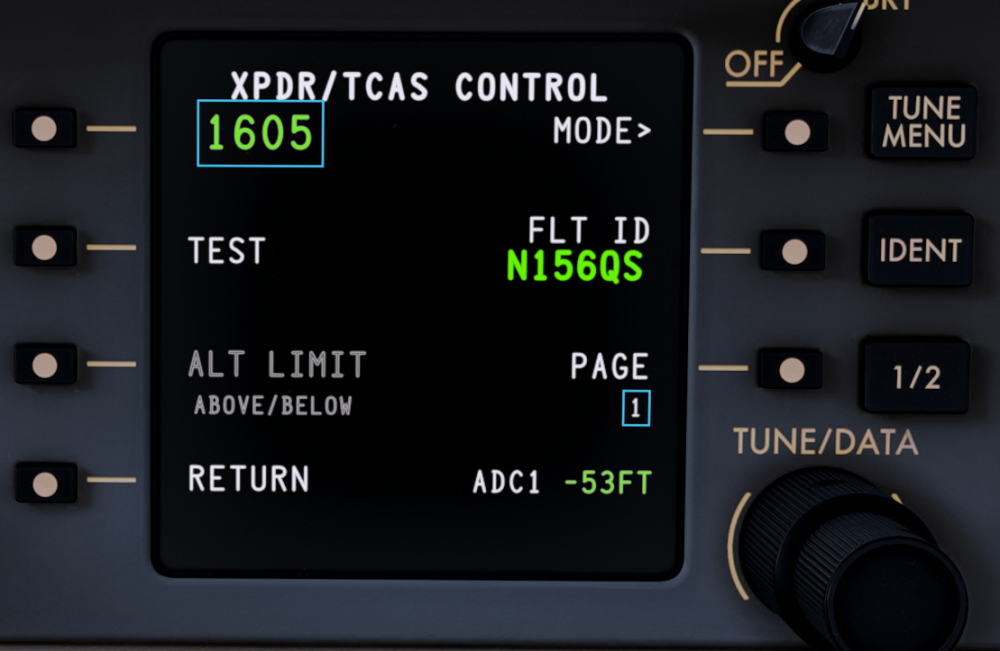
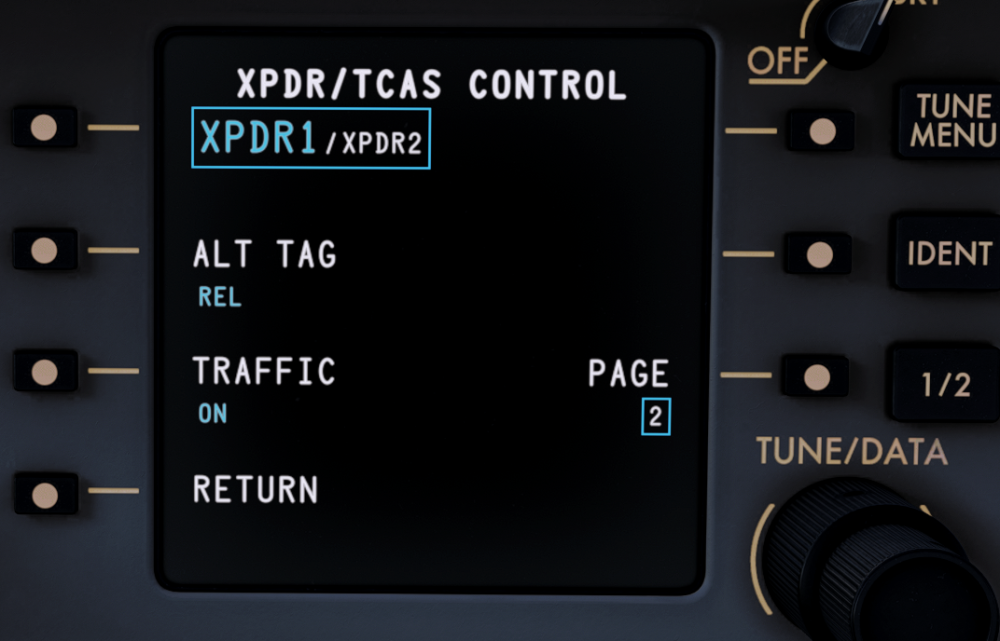
SYSTEM OVERVIEWCTP – Control Tuning Panels CNS – MFD CNS Page VHF – VHF Communication Radios (COM) NAV – VOR / ILS Navigation Radios ATC/TCAS – Transponder and Traffic Collision Avoidance System The cockpit has two Control Tuning Panels (CTP). Radios can also be tuned from the "CNS" page on the MFD. Both let you: Tune VHF frequencies (COM radios) Tune VOR and ILS frequencies (NAV radios) Enter the transponder (squawk) code and squawk IDENT RADIO TUNING - CONTROLS AND INDICATORSCTP – one on each side of the cockpit CNS Display under CNS on the DU drop down drop menu Control Tuning Panel (CTP) (Click to enlarge image) VHF1: Shows the active frequency on the left and the preset frequency on the right. NAV1: Shows the active frequency on the left and the preset frequency on the right. (AUTO indicates nav radios are being automatically tuned by the FMS) ATC/TCAS: Shows the squawk code, the transponder mode (STBY), the TCAS display mode (ABOVE/BELOW) and the Aircraft ID. NEXT PAGE: Opens more radios, such as ADF1. TUNE MENU / IDENT / 1/2: The function keys on the right side of the panel. TUNE/DATA: The knob for changing the selected value. BRT / OFF: Display brightness and power. Note: Press the line select key next to a field to select it. The selected field is shown in a blue box. MFD Tuning Page (TUNING)VHF1 / VHF2: Active frequency in green, with an editable PRESET field below it. NAV1 / NAV2: Active frequency and station ident (such as 113.50/LIH), with a PRESET field and a DME HOLD checkbox. ATC TCAS: Squawk code, flight ID, and transponder MODE selector. Swap (↕): Swaps the active and preset frequencies. (Click to enlarge image) The CNS facilitates preset frequencies for both COM and NAV radios. To access the preset menus, click on the VHF1 or NAV1 buttons and follow the screen prompts - If available, commonly used frequencies for both departure and arrival airports will be avail to quickly pre-select. (Click to enlarge image) CHANGING TRANSPONDER CODE / SQUAWKING IDENT - ATC/TCAS (Click to enlarge image) Enter Squawk Code: Turn the TUNE/DATA knob (outer and inner) to set the code (for example, 1200 → 1605). Select Mode: Press the right line select key next to the transponder mode. (The mode is shown in a blue box) Change Mode: Turn the TUNE/DATA knob to change the mode (STBY, TA/RA, AUTO). IDENT: Press the IDENT key on the CTP to squawk IDENT when ATC asks for it. XPDR/TCAS CONTROL PAGE (Click to enlarge image) Press the ATC/TCAS left line select key again while the code is selected to open the XPDR/TCAS CONTROL page. Page 1 Squawk Code: The current code, which you can edit with the TUNE/DATA knob. MODE>: Opens the transponder mode selection. TEST: Runs a TCAS self-test. TCAS TEST is shown on the page and on the flight displays during the test. FLT ID: The aircraft flight ID (such as N156QS). ALT LIMIT: Sets the TCAS display altitude band (ABOVE/BELOW). PAGE: Switches between page 1 and page 2. RETURN: Goes back to the main CTP page. ADC1: Shows the altitude source and the current pressure altitude. Page 2 XPDR1 / XPDR2: Selects the active transponder. ALT TAG: Sets the TCAS altitude tag display (REL shown). TRAFFIC: Turns the traffic display ON or off. PAGE: Goes back to page 1. RETURN: Goes back to the main CTP page.
-
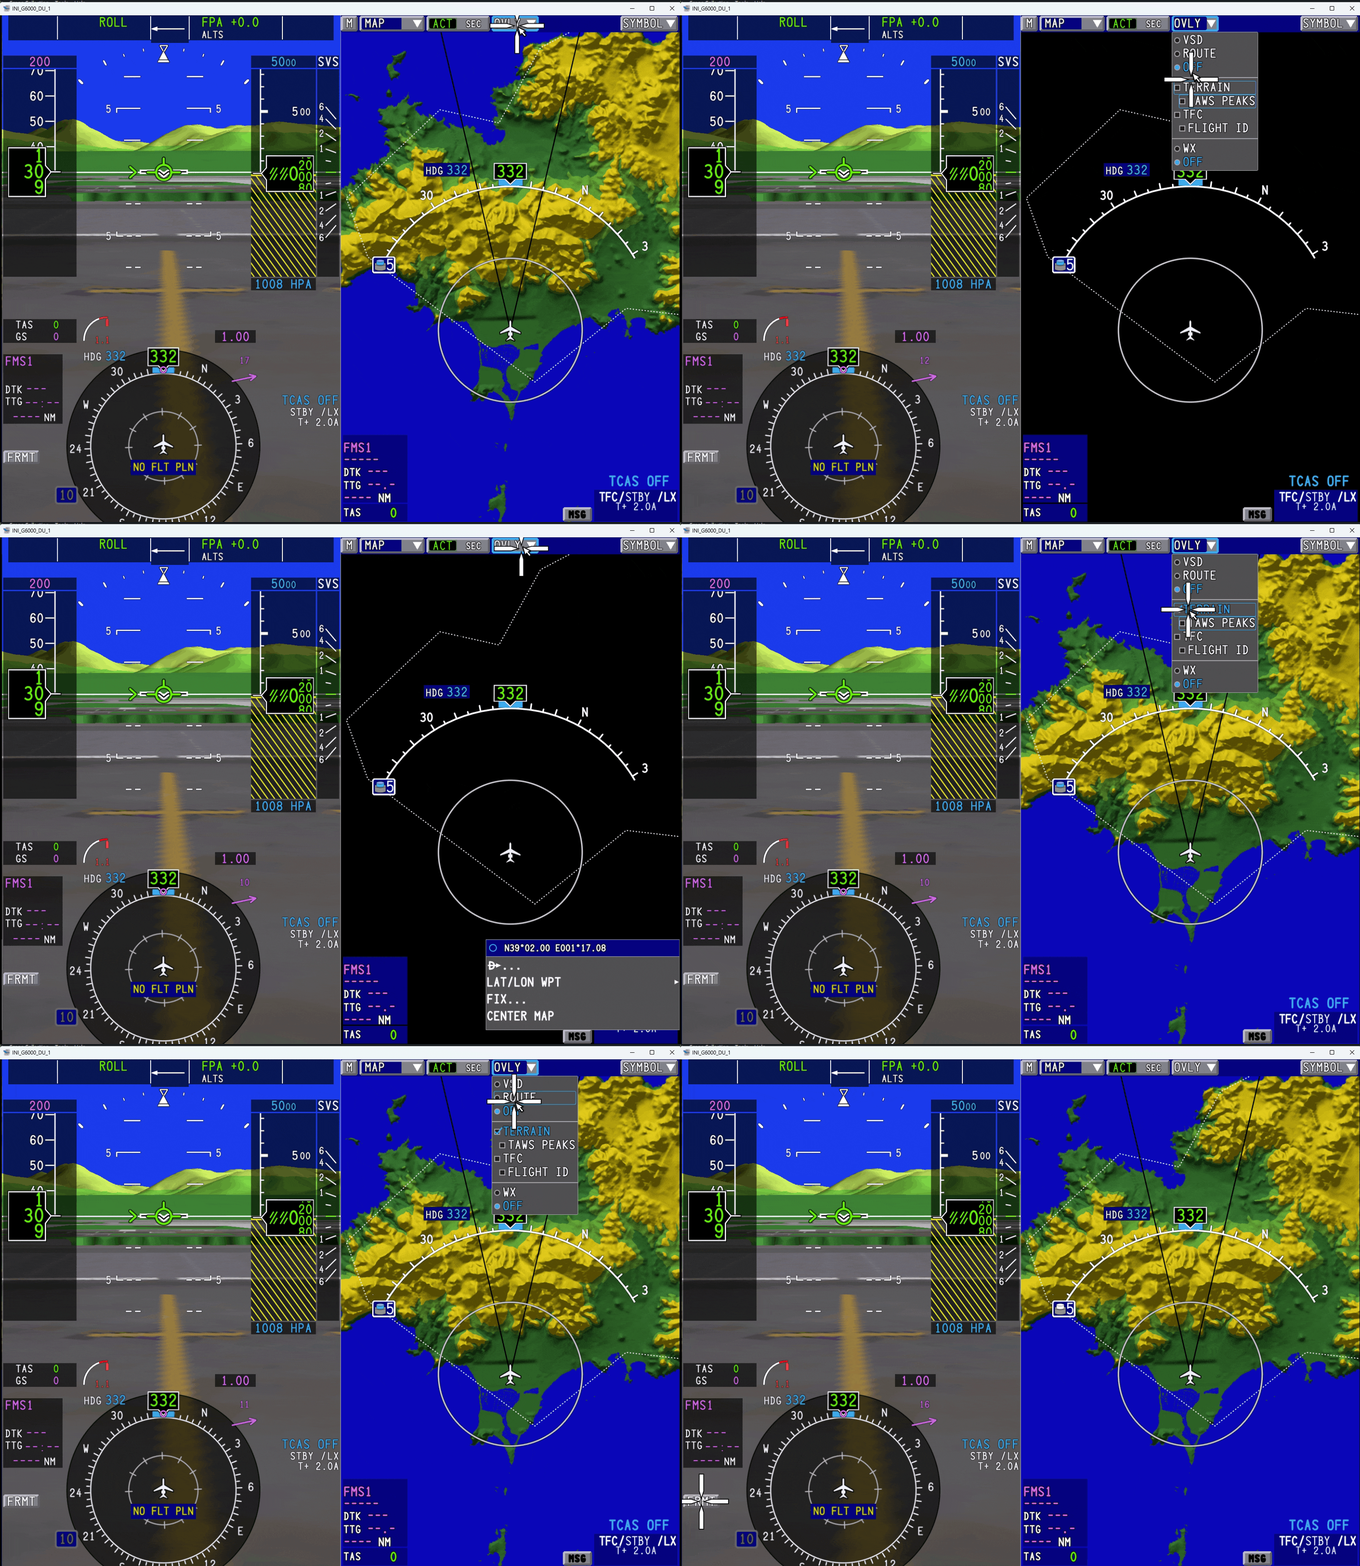
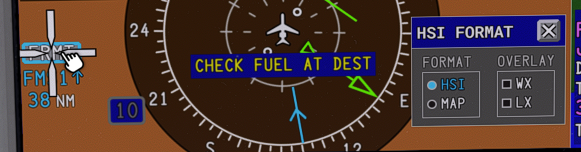
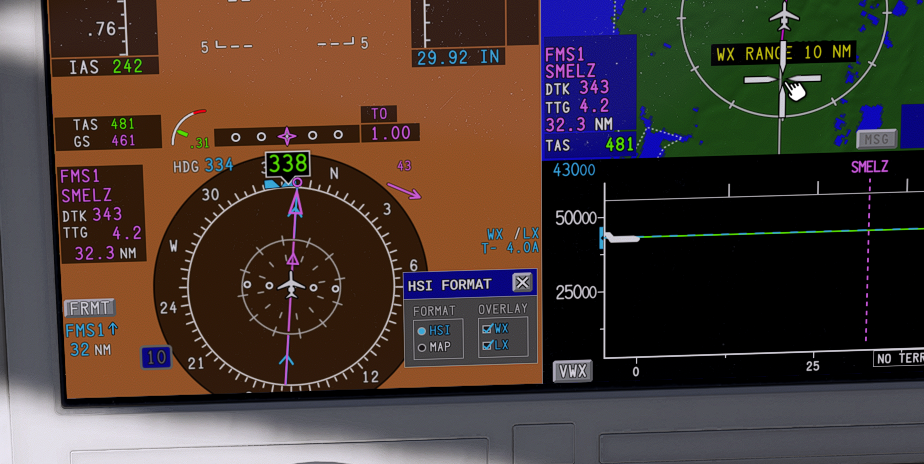
SYSTEM OVERVIEWThe iniBuilds Global Jet features integrated Terrain and Weather radar displays to aid the pilot's situational awareness. Both are turned on and off from the display menus. Weather can be shown on the MFD map and on the PFD HSI. Terrain is shown on the MFD map. CONTROLS AND INDICATORSThe radar displays are controlled from two places: OVLY (Overlay) menu: the drop-down at the top of the MFD MAP pane FRMT (Format) menu: the softkey at the lower left of the PFD OVLY Menu – MFD MAP PaneClick OVLY ▼ to open the overlay list: VSD / ROUTE / OFF: choose the lower display (one at a time) TERRAIN: checkbox that shows or hides the terrain display TAWS PEAKS: checkbox that shows or hides the TAWS peaks display TFC: checkbox that shows or hides traffic FLIGHT ID: checkbox that shows or hides traffic flight IDs WX / OFF: shows or hides weather radar Note: You can tick TERRAIN and WX at the same time. Weather returns are drawn over the terrain display. (Click to enlarge image) FRMT Menu – PFDClick FRMT on the PFD to open: PFD FORMAT... HSI FORMAT... NAV SOURCE... (Click to enlarge image) TERRAIN RADAR – MFD MAPOn the MFD MAP pane, click OVLY ▼. Tick or untick TERRAIN. When TERRAIN is on, the map shows terrain colored by height relative to the aircraft. When it is off, the map background is black. WEATHER RADAR – MFD MAPOn the MFD MAP pane, click OVLY ▼. Select WX to show weather returns, or OFF to hide them. When WX is on, WX appears in the status block at the lower right of the MFD (for example TFC/WX /LX). (Click to enlarge image) WEATHER RADAR – PFD HSIClick FRMT on the PFD and select HSI FORMAT.... Under OVERLAY, tick WX to show weather returns on the HSI, or untick it to hide them. Close the window with X. (Click to enlarge image) Note: When WX is selected on the HSI, the weather radar range on the PFD is limited to 10 NM, and WX RANGE 10 NM is displayed in Amber.

-
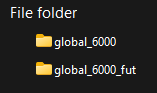
The iniBuilds Global Jet comes with two cabin variants - Classic and Futuristic. For ease of use, you can create custom camera configs (Cameras.cfg) on one variant, and then manually copy them over to other variants. Locate your Presets folder at the path listed below: There will be 2 folders. Your saved Camera config is stored in the '/config' folder within a variant. NOTE: The folder without "_fut" is the classic cabin Copy the Cameras.cfg from the '/config' folder of your loaded variant to the to the desired variant's '/config' folder respectively.


-
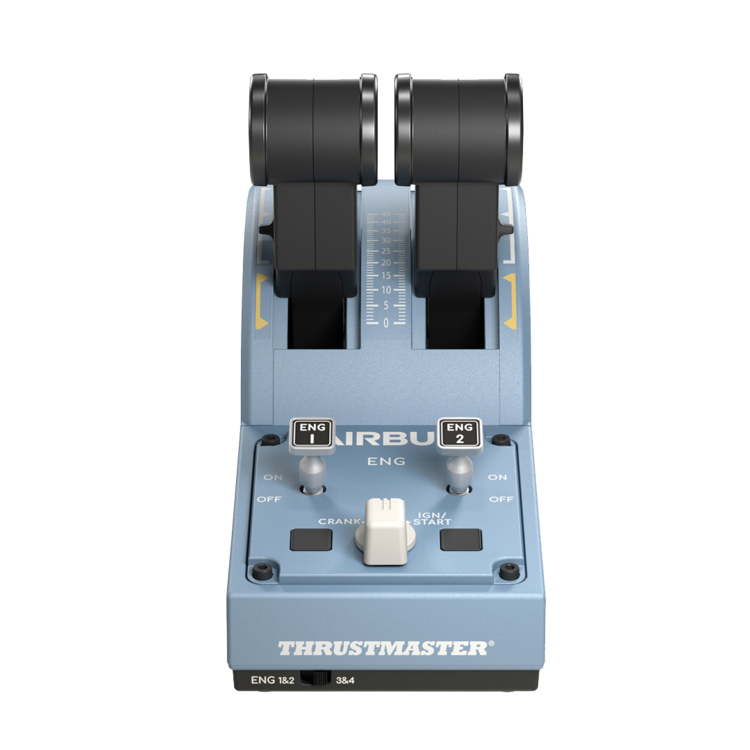
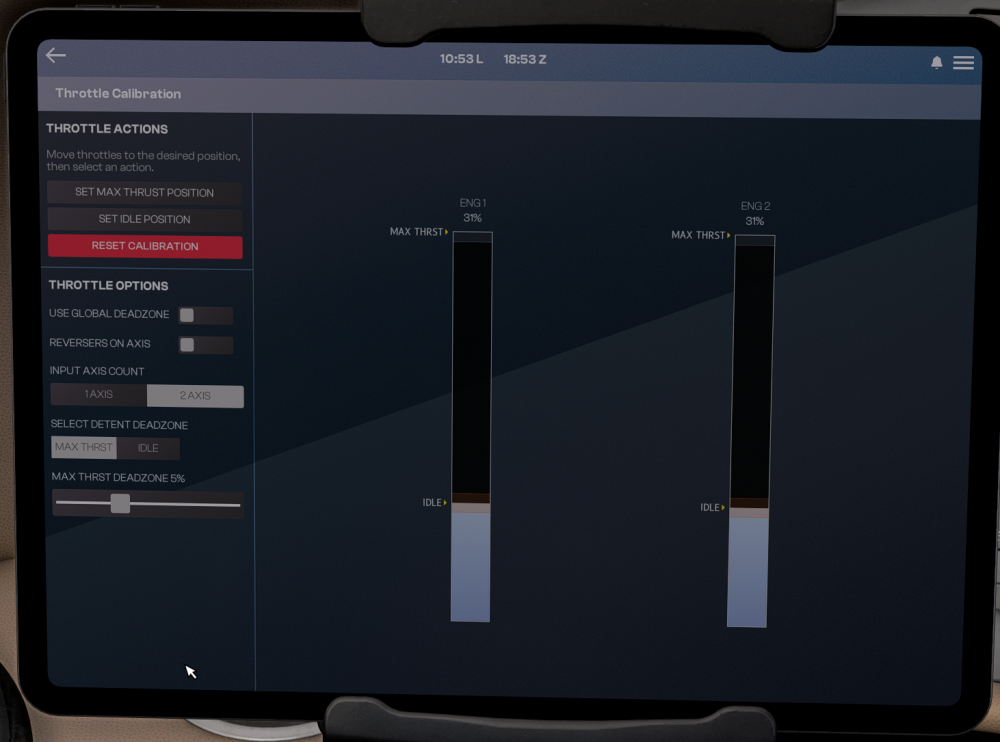
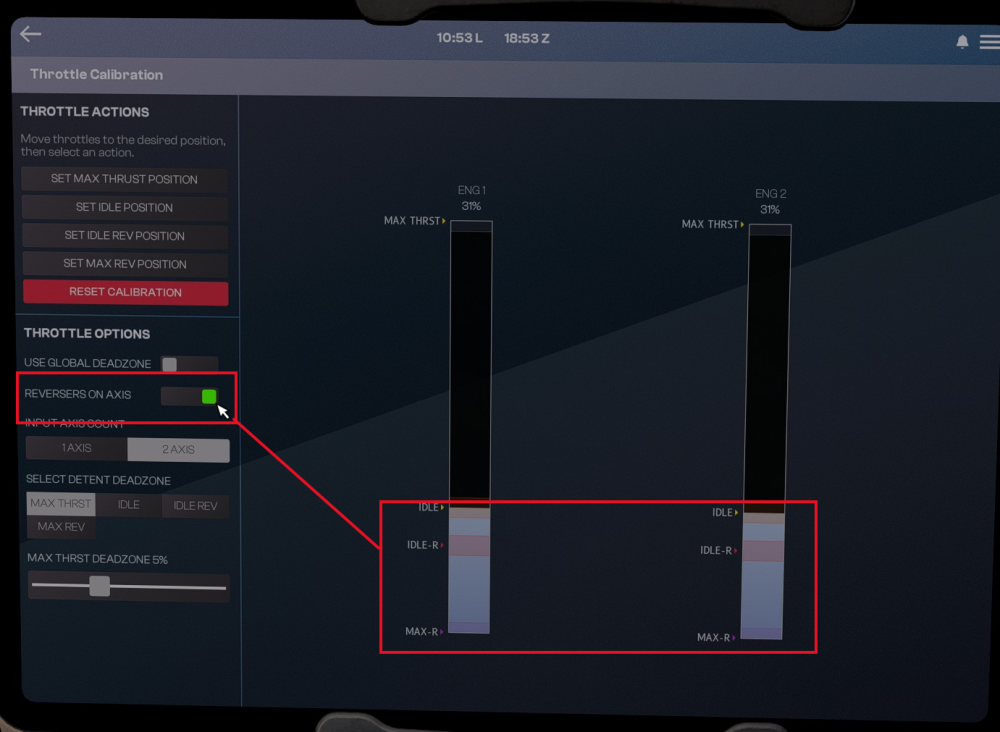
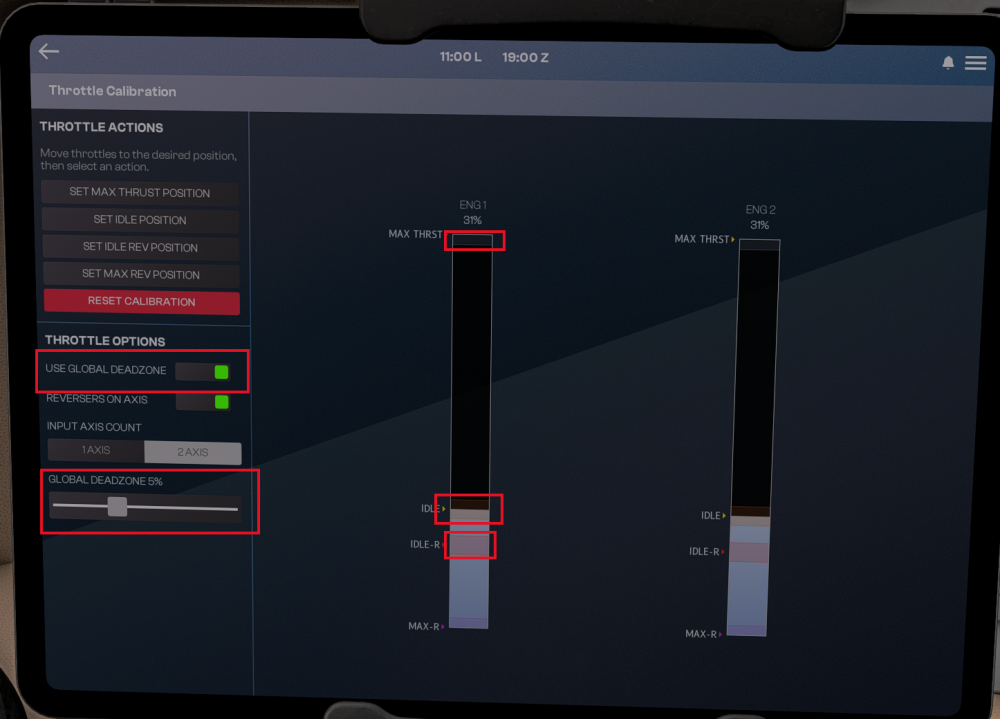
The IniBuilds Global Jet allows the user to custom calibrate throttle axis, reverser option, adjust deadzones, calibrate each detent with 3rd-party peripherals SYSTEM OVERVIEWTHR CAL – Throttle Calibration Page REV ON AXIS – Reverser on Axis Option DZ – Deadzone (Global and per-detent) THROTTLE CALIBRATION - CONTROLS AND INDICATORSCalibration page, opened from the aircraft's tablet/display (OIS/EFB) under Options > Throttle Calibration. Includes the (click to enlarge) Reverser on Axis OptionNO: The bottom of the axis (0%) is mapped to IDLE. Reverse thrust needs a separate button bound to the reverse thrust control. YES: The bottom of the axis is mapped to MAX REV. Separate IDLE and IDLE REV detents can be set on the axis. Note: You have to calibrate again after changing this option. Set this to NO for Xbox controllers and most common hardware. Set it to YES for hardware with a physical reverse range, such as the WinCtrl PAC32 or Thrustmaster TCA Airbus Throttle Quadrant. (click to enlarge) Global Deadzone OptionGlobal Deadzone %: Sets the same deadzone for every detent (default 2.5%). DZ %: Sets a deadzone for one detent only, overriding the global value. White lines: Show the active range of each detent on the axis diagram. Note: Changes to the Global Deadzone % or any DZ % only take effect after you calibrate again. (click to enlarge) CALIBRATING THROTTLES - THROTTLE CALIBRATION PAGEStep 1: Set Reverser on Axis to match your hardware. Step 2: Set the Global Deadzone % or the individual DZ % values. Step 3: Move the throttle axis to the position you want for the detent. Step 4: Press the matching detent button on the page (MAX REV, IDLE REV, IDLE, CLB, FLX/MCT, TOGA)*. * The detents shown depend on the aircraft and on the Reverser on Axis setting.

-
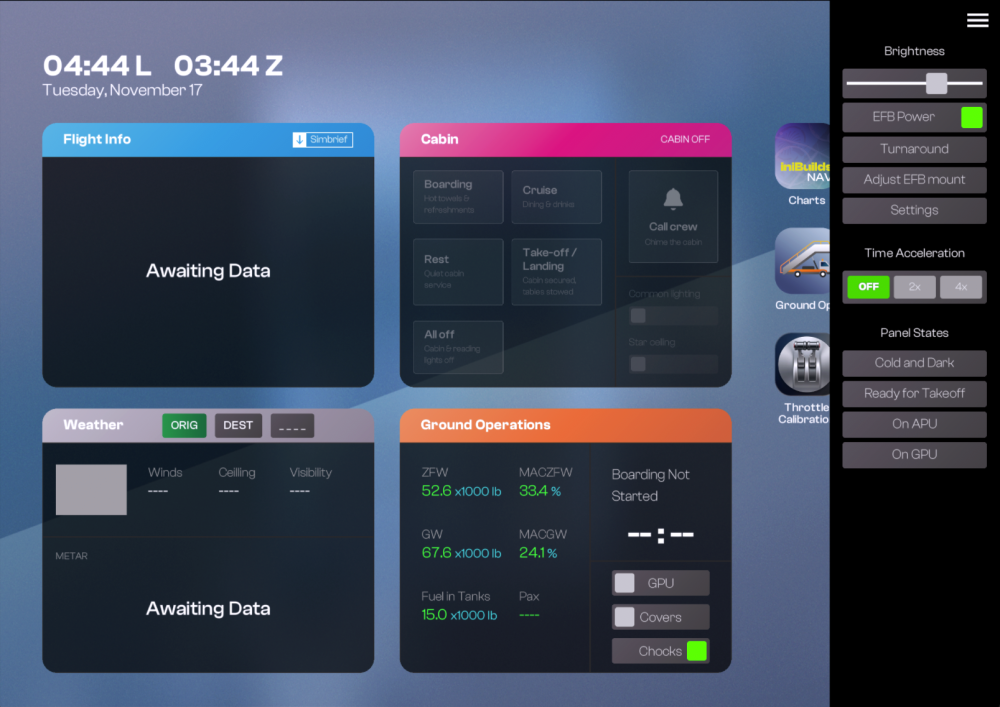
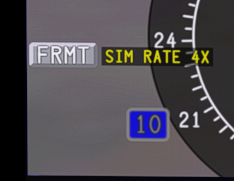
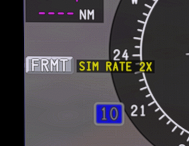
The iniBuilds Global Jet features up to 4x Time Compression which can be enabled via the Electronic Flight Bag (EFB) Tablety. This feature increases the simulation rate by up to 4x to allow you to conduct your flights faster, however it may come with a performance penalty depending on your hardware. EFB Time Compression SettingsThe Time Compression controls are in the EFB Options menu which is accessed via the Menu icon (☰) button at the top right corner of the EFB. Here you can choose between various options as follows OFF - disables time compression instantly 2x - enables max 2x time compression 4x - enables max 4x time compression The time compression is automatically disabled or downgraded in the following conditions Autopilot is disengaged Aircraft is above 80N (automatically downgraded to MAX 2X) Sim Pause at Top of Descent is triggered (Click to enlarge image) Current Simulation Rate IndicatorThe current simulation rate is shown on at the top of the EFB display when time compression is active. or It is also shown in the bottom left quadrant of the PFD next to the FRMT button. or Pitch/Roll Oscillations during Time CompressionAs the time compression feature increases the simulation rate, this also increases the CPU/GPU resource usage in tandem. Results will vary depending on your hardware and sim settings, however in some situations you may observe oscillations in the Pitch/Roll axis due to the performance degradation. If you are experiencing this regularly, please consider the following Use a lower time compression rate (e.g. 2X) Set a lower display refresh rate under EFB Simulation Settings (e.g. 20 or 30 FPS). Lower sim settings that affect CPU usage such as Object and Terrain LOD, Glass Cockpit Refresh Rate, Off-Screen Terrain Pre-caching or Ground/Air/Sea Traffic density. Lower sim settings that affect GPU usage such as Raytraced Shadows, Volumetric Clouds, Texture Resolution. Set Turbulence to "LOW" under the sim Assistances settings Temporarily disable any addons during time compression that may affect flight physics (e.g. RealTurb, FSRealistic etc.)
-
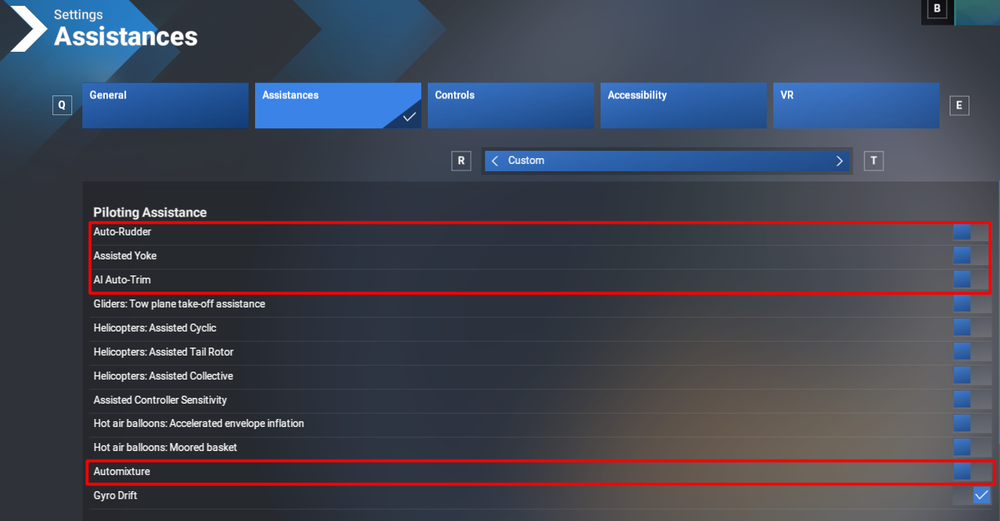
If your aircraft is not following the flight path correctly, please check your MSFS Assistance settings and ensure that the 4 options highlighted below in red below are switched to OFF.

-
Hi Julia, Welcome to both the flightsim hobby and to our forums. While we are huge fans of John Wick, we generally try to keep discussion here focused on flight simulation, with very casual forays into aviation and related interests. While we understand that our members enjoy plenty of things outside the virtual cockpit, we don't feel there's a particular need for separate entertainment threads or discussions about unrelated topics. (There are plenty of other online spaces for this) We appreciate you checking before posting, however, and there is zero harm in asking. Once again, welcome aboard! We look forward to hearing about your progress and seeing you around the community.
-
Hi, We've seen this light culling occur across a number of addons due to the sim's object limit being maxed out. Unfortunately there isn't much to be done without a major update unless Asobo increase the object limit.
-
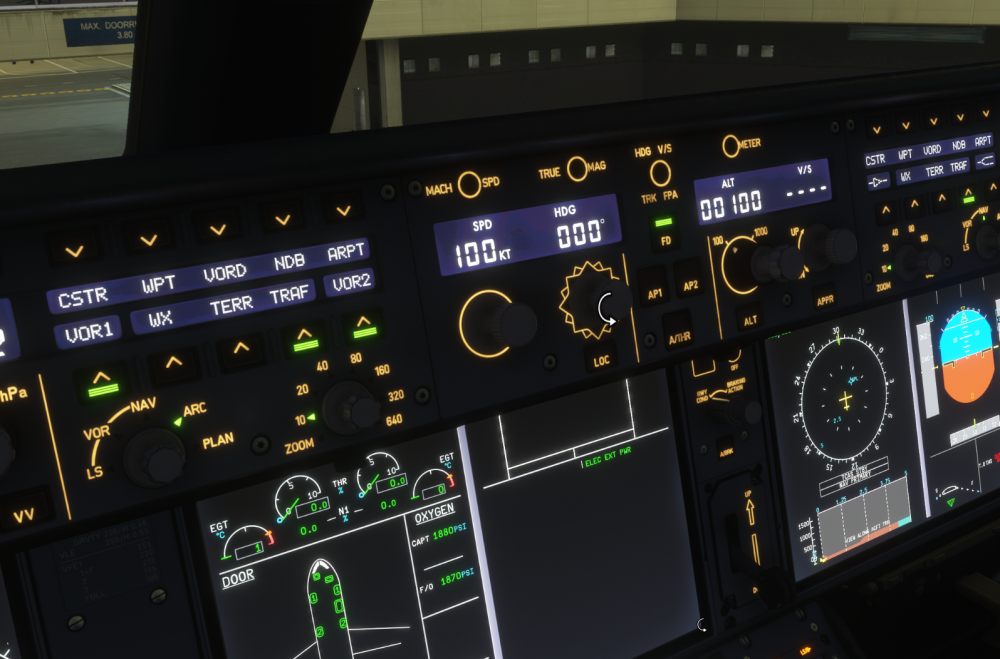
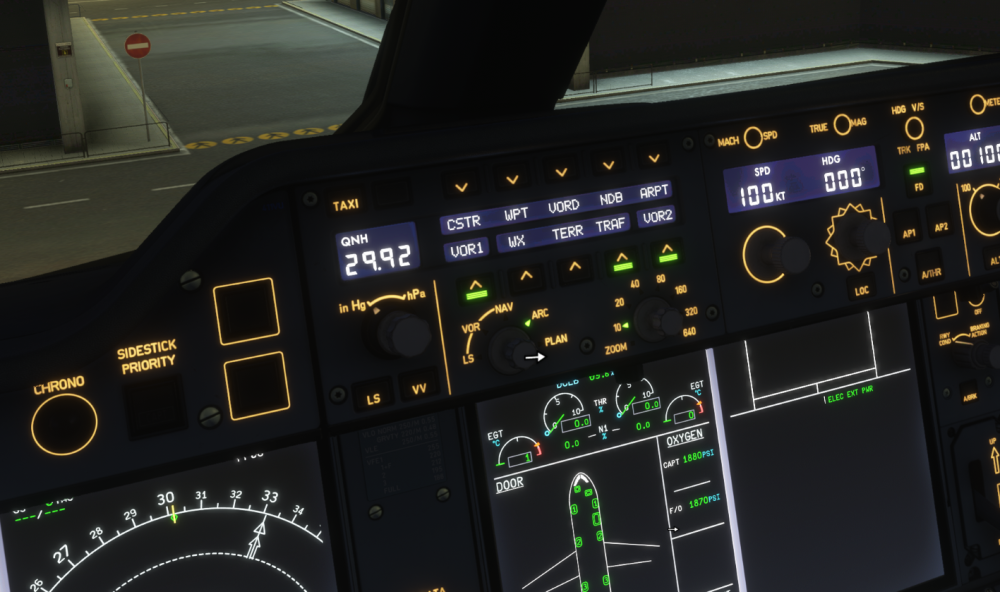
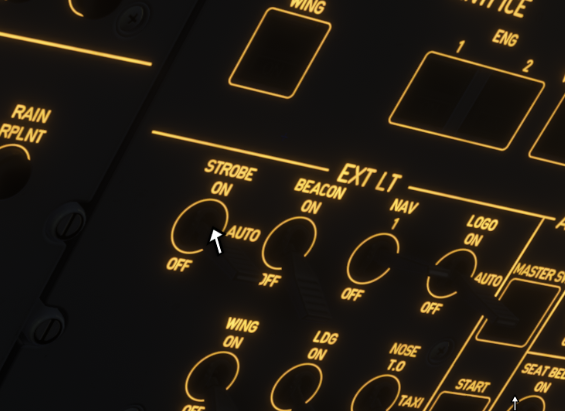
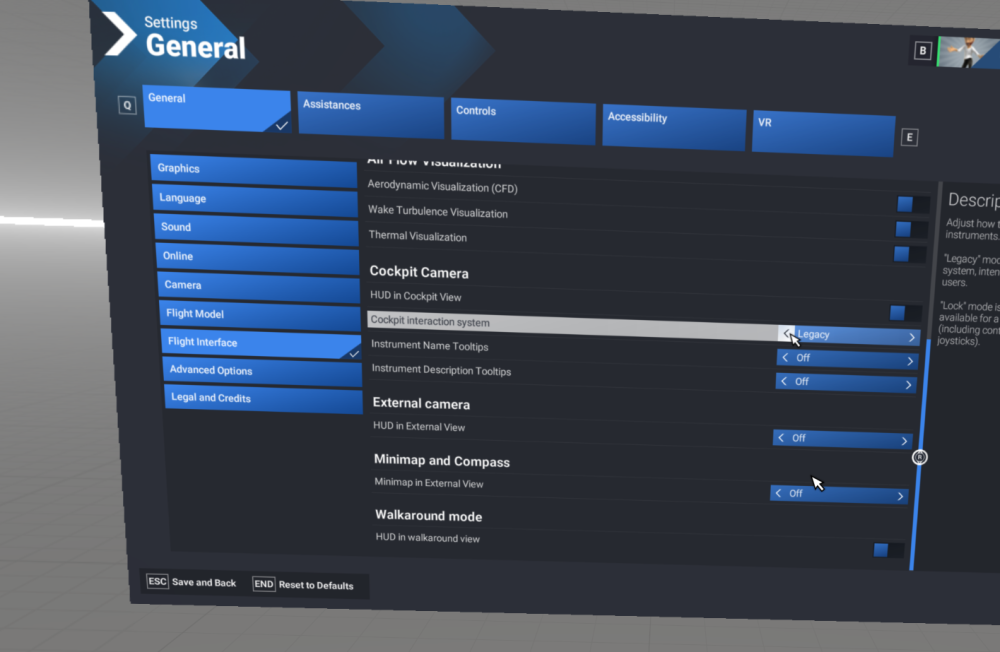
Legacy interaction mode works normally in VR in the A350 as shown in these images - (note the cursor is not highlighting and using the action arrows vs the drag method) Can you confirm you're in looking in the correct menu page - General>Flight Interface> cockpit interaction system. You shouldn't need to edit any .xmls or use a mod to remove this.
-
There is no fix on the horizon because we cannot reproduce this issue in testing or daily use. That being said, have you tried re calibrating your headset or ensuring your roomscale is correct for the POV?
-
This sound is occurring externally as we don't have this kind of ping in the A350. Are you using a VA ACARS or other sort of application that logs parameters alongside the aircraft?
-
This is almost certainly on the sim side and appears to be a byproduct of streaming and bandwidth limitation. I test in VR every day and have yet to see this in 380 or any of our other aircraft. What i would suggest is locally downloading the aircraft and see if you still see this occurring.
-
-
Hi @Bert Groner Try to resize the EFB to landscape mode and see if the issue persists. It may be due to scaling.
-
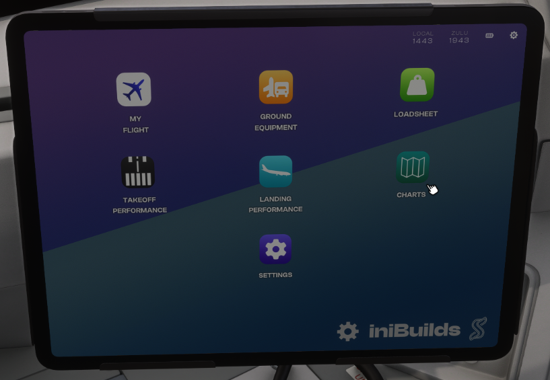
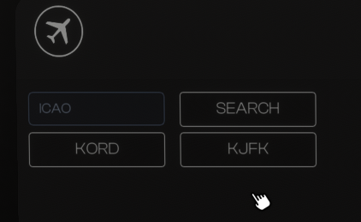
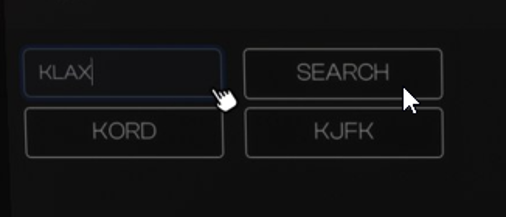
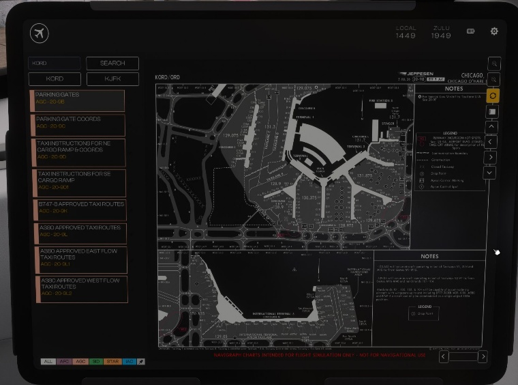
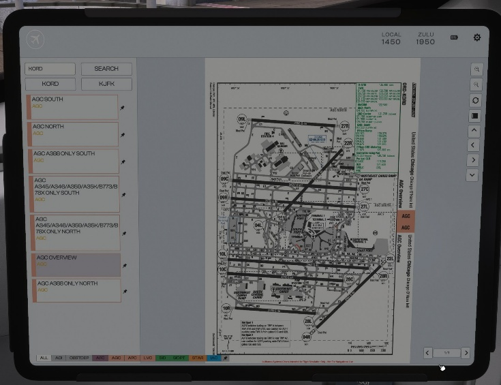
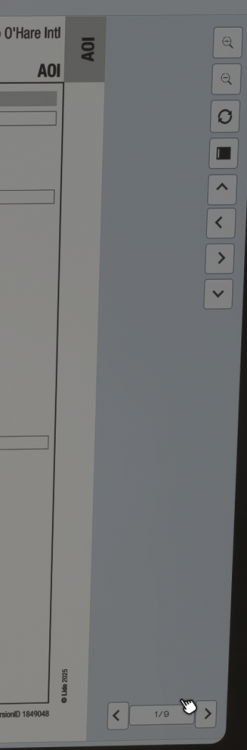
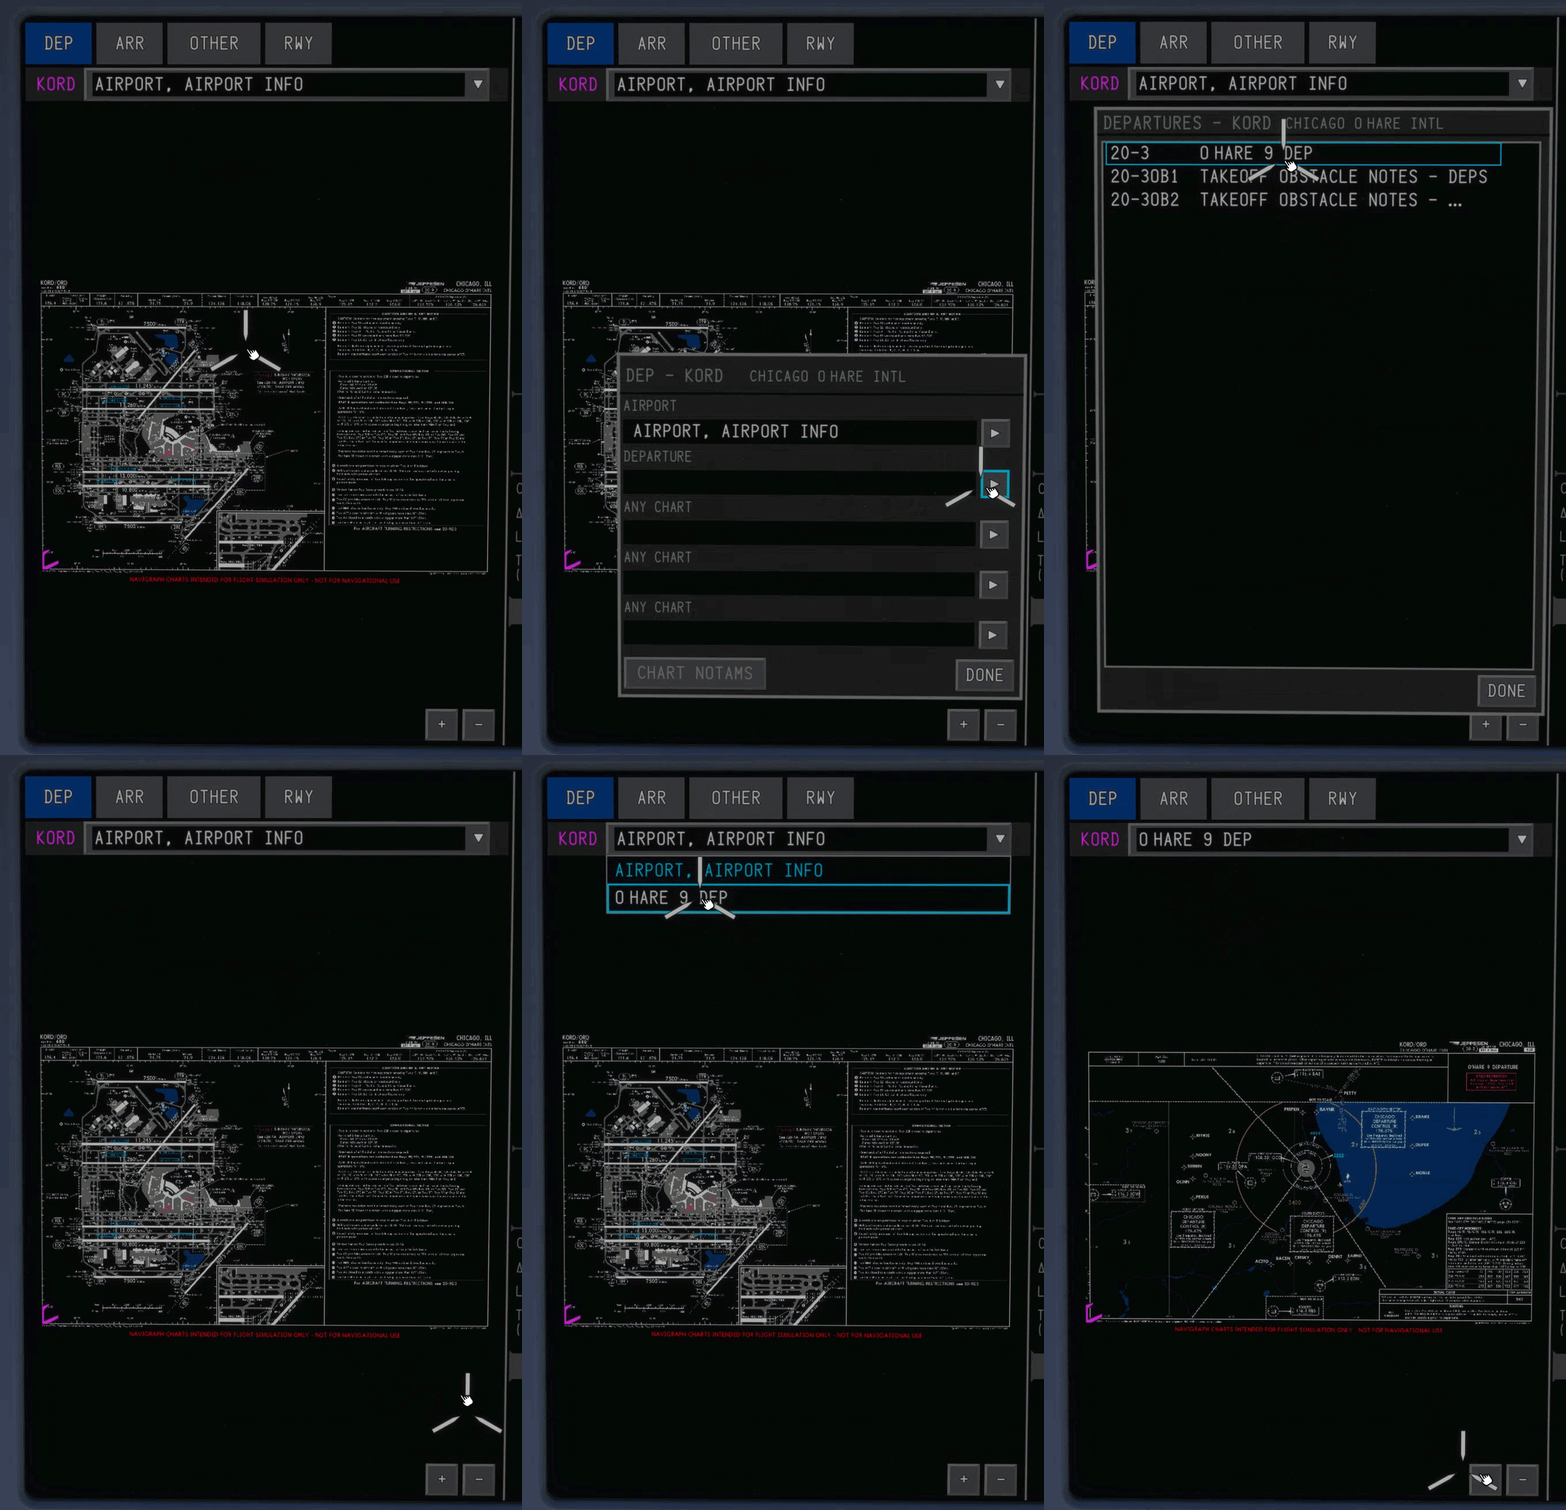
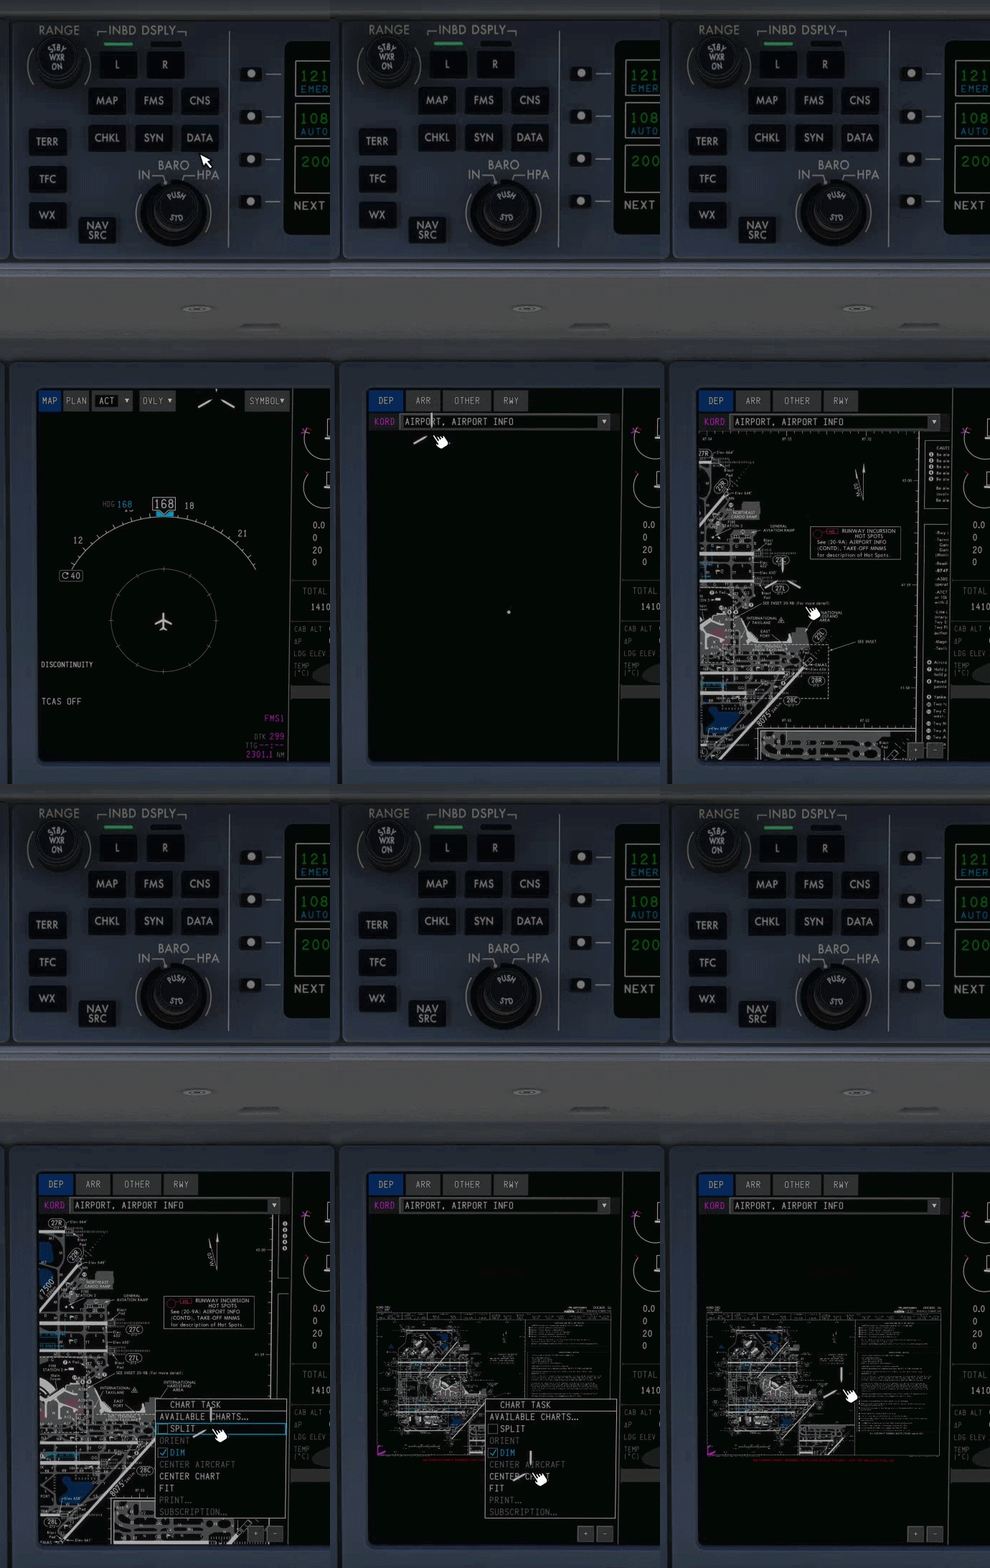
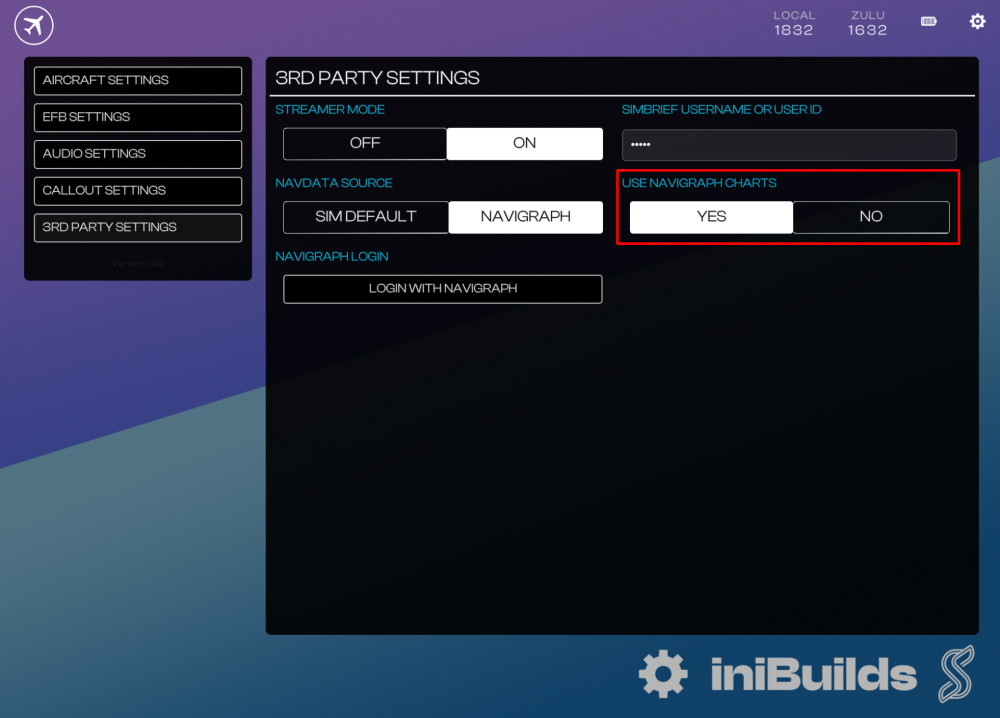
In MSFS 2024, the A220 EFB Charts app supports both default LIDO and Navigraph charts, which can be toggled on the EFB 3rd Party Settings page. Meanwhile MSFS 2020 supports Navigraph charts only. Navigraph Login - EFBConnecting Navigraph Scan or click on Open Browser to approve Navigraph integration. Refresh code will generate a new approval code. Window will close automatically once connected successfully Disconnecting Navigraph Pressing the logout button will reset the token. Purpose To connect your account and allow the EFB to access Navigraph API features such as Charts. Switching Charts Source - EFBMSFS 2024 Only: Toggle EFB Settings > 3rd Party Settings > 'Use Navigraph Charts'. Select YES for Navigraph or NO for default LIDO charts. Using Charts App - EFBSelect the “CHARTS” app from the home page. Select your desired airport. Automatic: If loaded via "My Flight," departure and arrival airports populate automatically. Manual Search: Type any airport ICAO code into the top-left box and press [Enter] to load its chart library. Once an airport is selected, the chart category selector and pinboard (last symbol on the right appears at the bottom of the screen. The layout varies slightly depending on the provider: LIDO: Navigraph: *Note: The categories may vary depending on the chosen airfield. Select any chart via the list on the left hand side to display it full on the right side of the display. LIDO: Navigraph: The right-side control pane lets you adjust zoom, refresh current chart, toggle the selection pane, and pan the chart (or drag using the mouse). At the bottom you will find a Page Selector for navigating between pages on charts where applicable. Using charts in the AvionicsTo access charts within the avionics, simply click the DATA button on the relevant display controller. Once on the DATA page, charts relevant to your flightplan and chosen procedures will be accessible via the menu. You can zoom in, zoom out, and click and drag to pan the chart around. Clicking anywhere on the chart will bring up a menu for various functions including a split screen, day/night mode toggle, and re-centering. To select which charts you'd like to view, click anywhere in the chart window to bring up the menu and choose AVAILABLE CHARTS... Once there, a dialogue box will appear asking you to select the chart for each relevant phase of flight. Once selected, that chart will be available in the drop down menu at the top of the page.



-
-
Hi. Testing this right now and the auto switching is working well, but for clarity, BATC doesn't support time compression, which is why you'll see errors after a while.
-
Hi. We look at every project independently and will make the determination at the time so I wouldn't think of anything being a permanent decision unless specifically called out in an official update.
-
Hi. The clickspots are a known issue brought on by some sdk changes implemented in SU5. When we look at the interactions everything is as expected but it's not working properly in the sim so we are searching for a workaround.
-
Simply put, the reference aircraft we had access to had the gauges you see in sim.
-
Just to address the above. It will be best to approach this model with the understanding that its a bit of a "hybrid" of the L1011 variants. As mentioned in the preview videos and dev updates, we have taken liberties with certain features/traits of the Tristar to give options to a wide cross-section of users and allow it's many unique qualities to shine through. It should not be seen as a 1:1 rendition of any particular serial number. Knowing that we hope it will conjure up many great memories of your time with the aircraft even if a fastener or two is not oriented the correct way round 😉
-
-


