iniSteven
Staff
-
Joined
-
Last visited
-
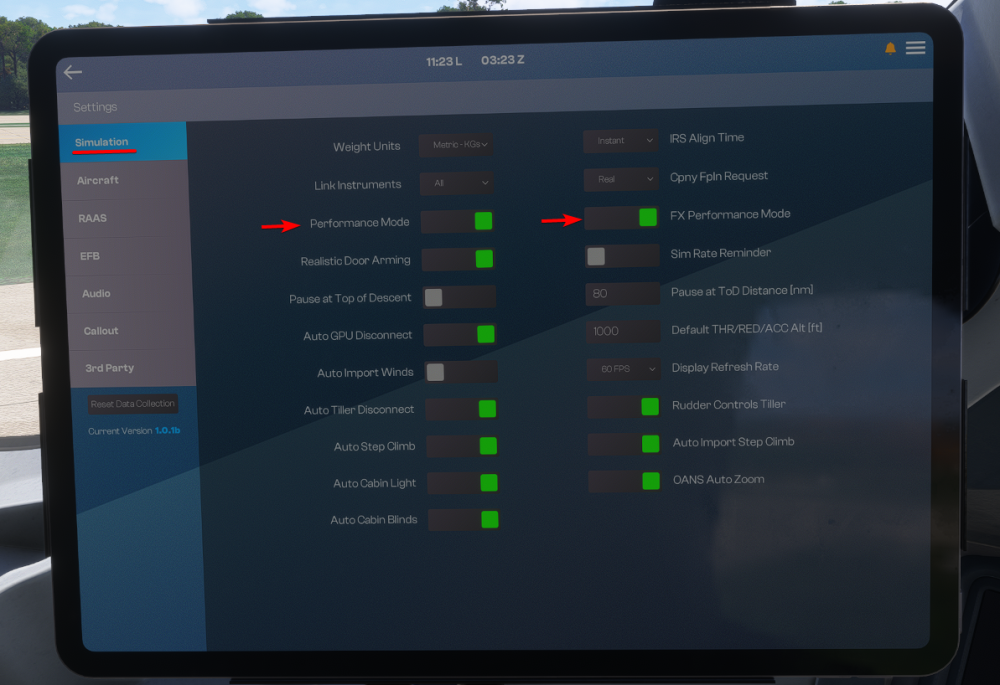
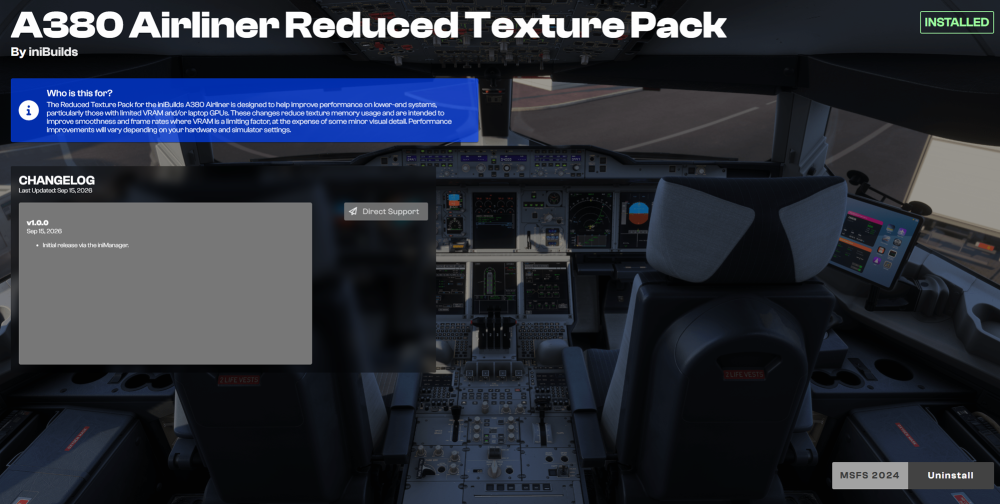
In order to cater the A380 experience to users on as many hardware combinations as possible, we have provided several options to help balance visual fidelity with hardware requirements. Dynamic Performance OptionsIn the Settings app of the EFB, you can find two performance optimization options: Performance Mode hides the cabin model when the cockpit door is closed. If you would like to walk around the cabin, simply open the cockpit door and the cabin will appear. It will disappear again once the door is closed. We consider this a High Performance Impact option. FX Performance Mode turns off particle effects. This includes condensation effects on the wings and engines, as well as smoke effects during start.. We consider this a Low Performance Impact option. Reduced Texture PackThe Reduced Texture Pack is designed to help improve performance on lower-end systems, particularly those with limited VRAM and/or laptop GPUs. These changes reduce texture memory usage and are intended to improve smoothness and frame rates where VRAM is a limiting factor, at the expense of some minor visual detail. Performance improvements will vary depending on your hardware and simulator settings. On PC, you can download this from the iniManager. Search for the free product: A380 Airliner Reduced Texture Pack. On Xbox, this is the default, no additional installation required. (Click to enlarge image) Simulator SettingsRunning complex and highly detailed aircraft in busy environments can be demanding on system resources. Below is a baseline to help maintain smooth performance while retaining visual quality. Adjust as appropriate for your system: Terrain Level of Detail (TLOD): 100-150 (higher values impact GPU load significantly, especially at low altitude) Object Level of Detail (OLOD): 100-150 (controls building/scenery object density) Terrain Vector Data: Medium (reduces CPU load from roads/rivers rendering) Volumetric Clouds: Medium/High (High can cause notable frame drops in dense weather) Texture Resolution: High (has more impact on VRAM than FPS - reduce if VRAM limited) Anisotropic Filtering: OFF (recommended to set via your GPU Manufacturer software) Raytraced Shadows: OFF Glass Cockpit Refresh Rate: Low or Medium Terrain Shadows: 1024 Contact Shadows: Medium/High Characters Quantity: LOW Airport Services Quantity: OFF or LOW Aircraft Traffic Quantity: OFF Parked Aircraft Quantity: OFF Road Traffic: Low Sea Traffic: Low Fauna Density: Low or Medium
-
To be clear, it's important to note that the systems in the A220 were developed by synaptic and not by us, and decisions regarding the method of rendering the screens were made long before the A340 was released. As for the reason, the architecture that Synaptic have used in the A220 requires communication between the screens (rendered natively in the sim using JS) and the underlying flight computer simulations (running in WASM). In order for these two to communicate, they do so over what is called the Commbus. By combining all 5 screens into 1 single rendered frame, the number of back and forth communications required over the commbus is effectively reduced to 1/5th of what would be required if the aircraft rendered all 5 screens individually. Given the nature of the Commbus and the high complexity of the avionics displays in the A220 relative to other airliners, you can hopefully understand that an 80% reduction in the amount of communication happening here is quite significant in terms of stability and performance. Best, Steven
-
https://en.wikipedia.org/wiki/Wagon-wheel_effect
-
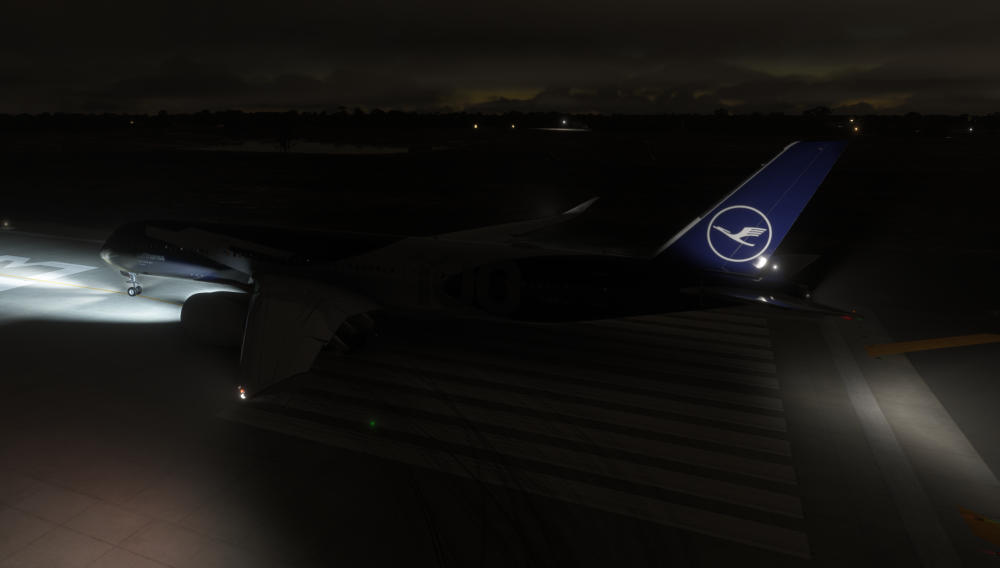
Hi aam, I'm not able to reproduce the issue - see below. Do you have any mods or light enhancements installed? We've had reports of these causing issues for some users.
-
Hi, this should be sorted in the upcoming 1.0.3 patch. Thanks for the reports :)
-
-
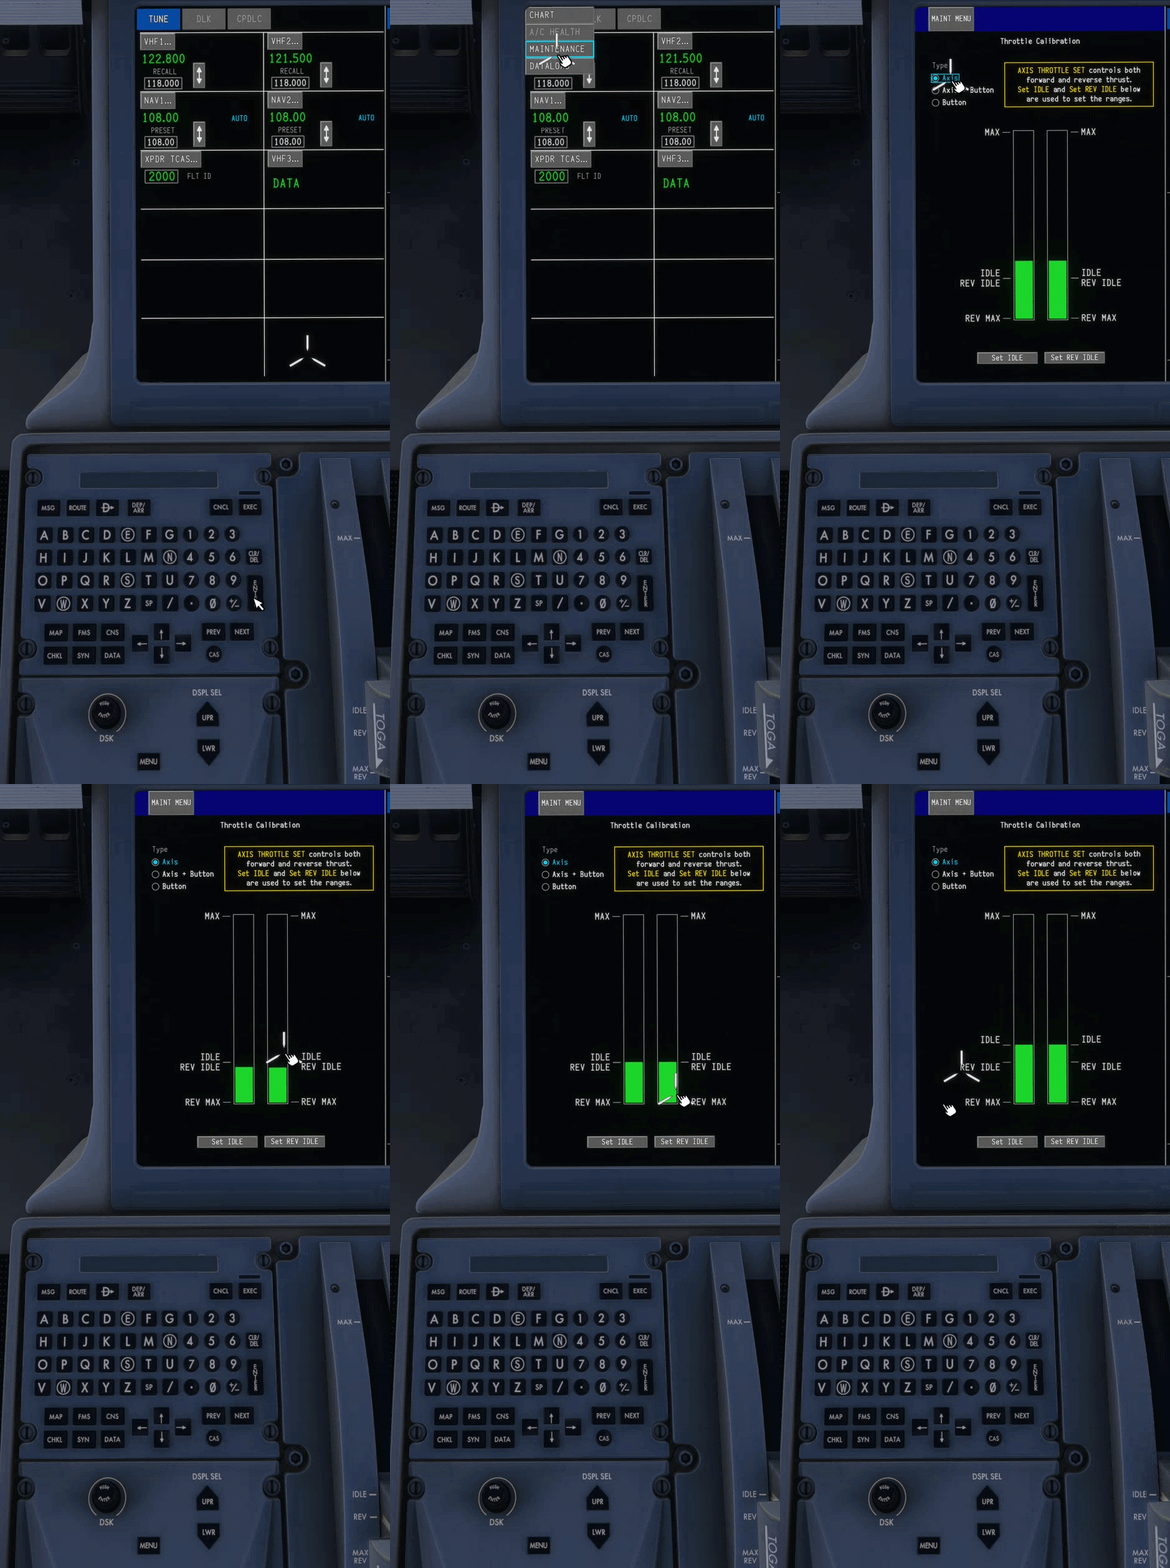
The Synaptic A220 allows you to calibrate your throttles for an optimal experience for your hardware. The Calibration page is located on the Maintenance page in the FMS. To access, press MENU on the Cursor Control Panel (CCP), and then click DATA -> MAINTENANCE. From there, you can access the Throttle Calibration page. Calibrating your ThrottlesChose between AXIS, AXIS+BUTTON or BUTTON depending on your setup. The instructions on the calibration page will walk you through the rest accordingly.
-
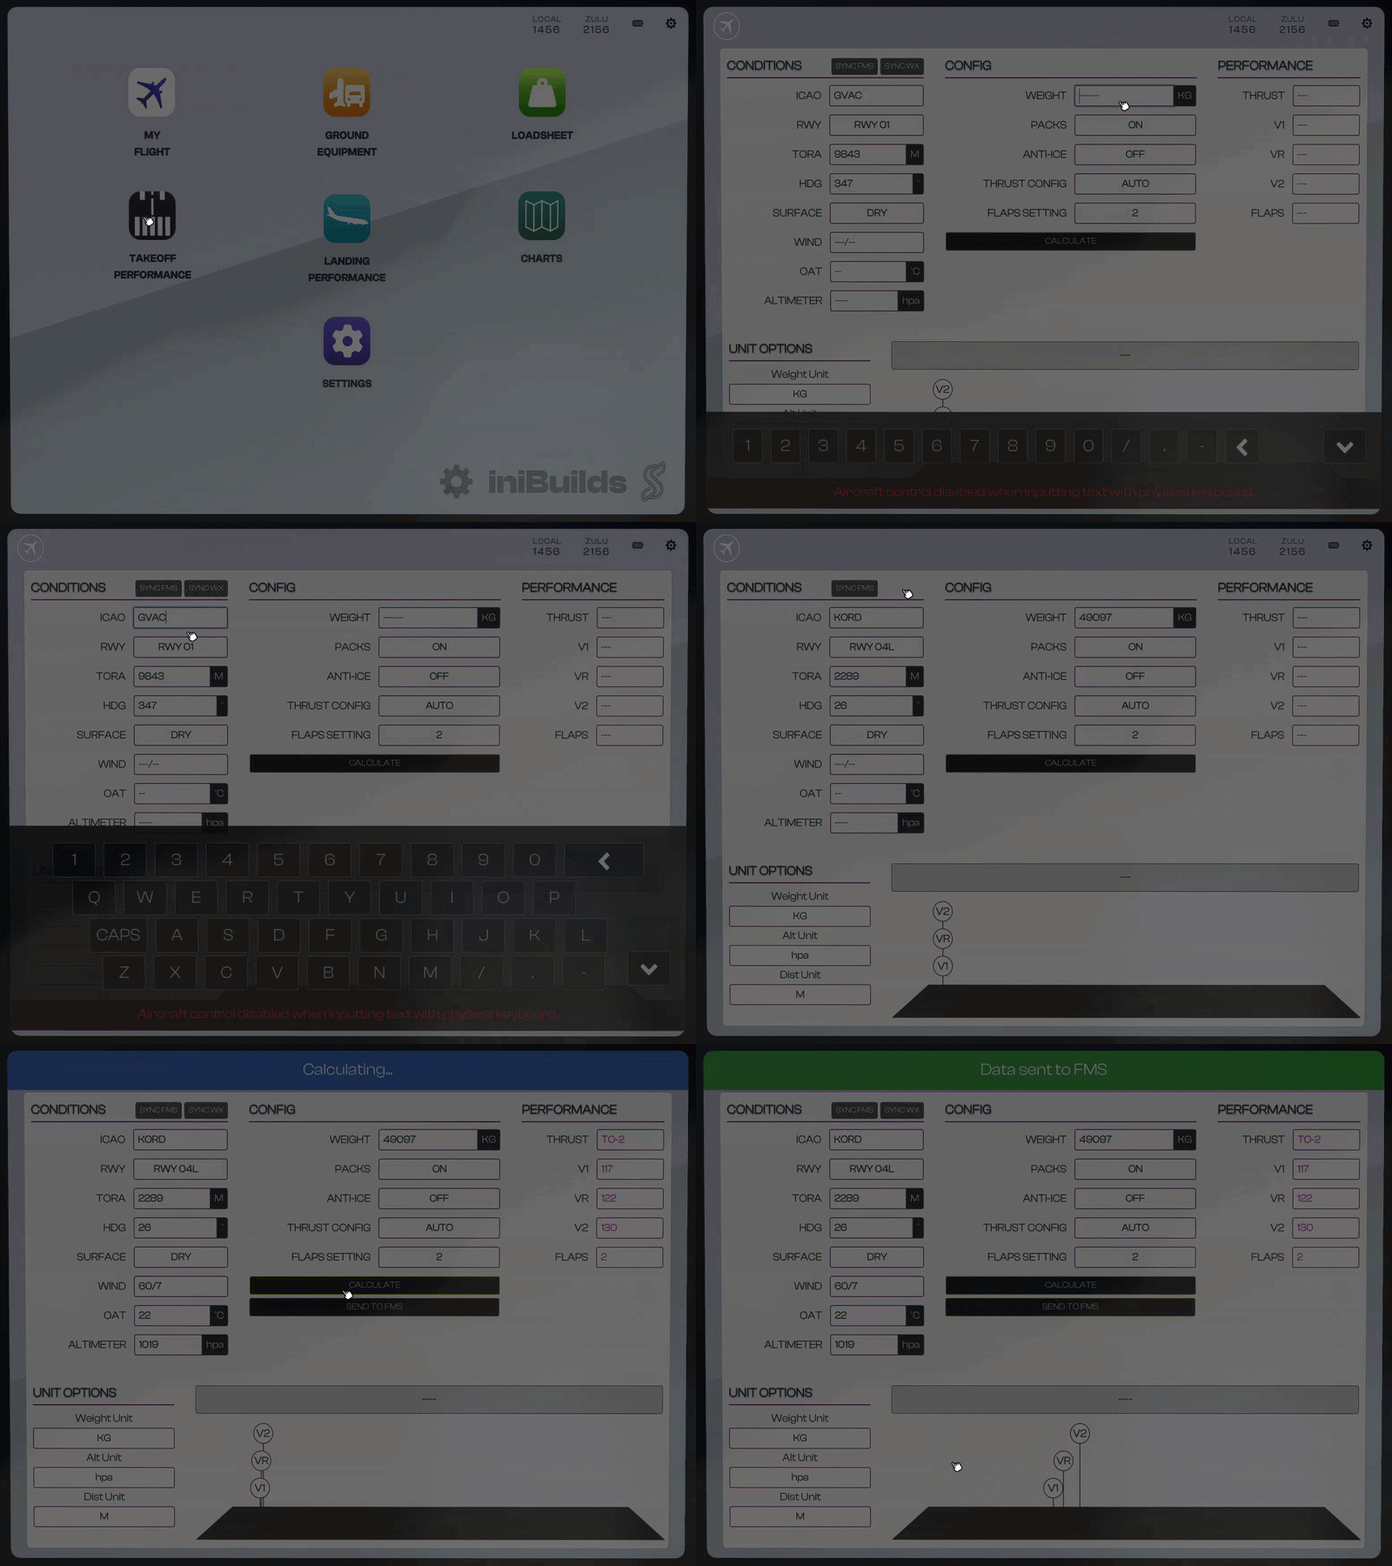
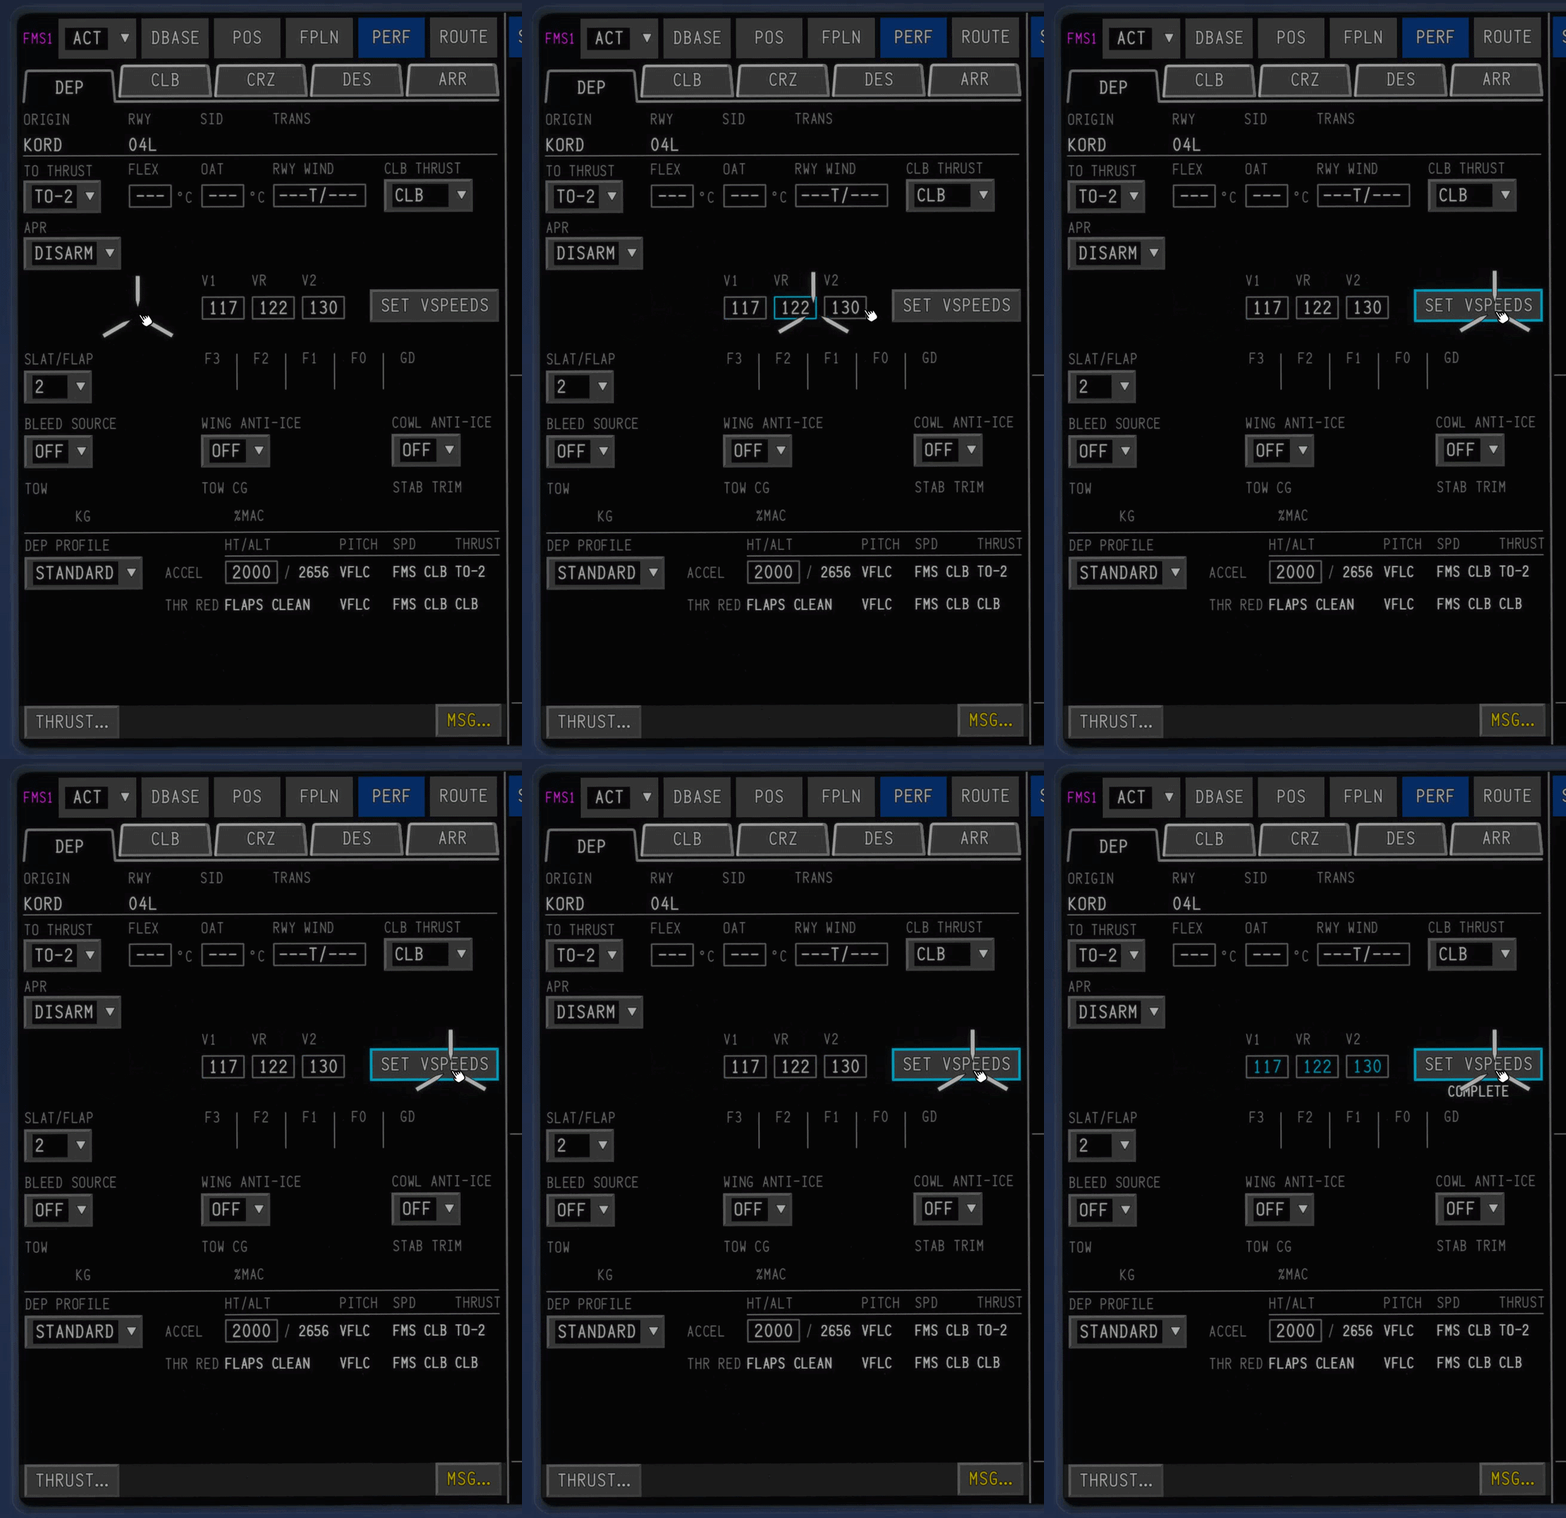
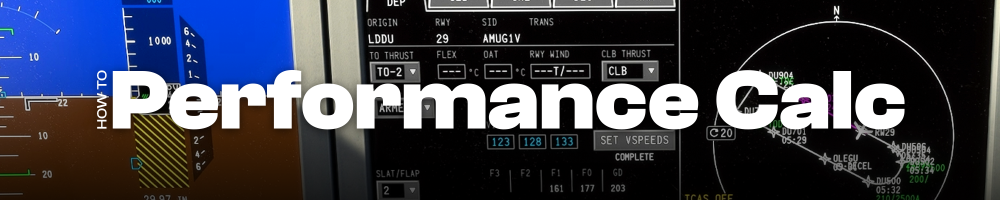
Takeoff and Landing performance calculators are provided in the Electronic Flight Bag (EFB) To access, simply click on the Takeoff Performance App on the home page. Once in the app, you can either enter the relevant data manually, or use the SYNC FMS and SYNC WX options to automatically source the relevant data from the FMS. Once the data has been entered, clicking CALCULATE will run the calculations and provide the relevant takeoff data output. This data can either be entered into the FMS manually or can be sent automatically by pressing the SEND TO FMS button. Once the performance calculations have been entered into the FMS, you MUST press the SET VSPEEDS button to confirm the data and send the information to the flight computer. For landing, the process is the same however the landing data must be entered into the FMS manually.
-
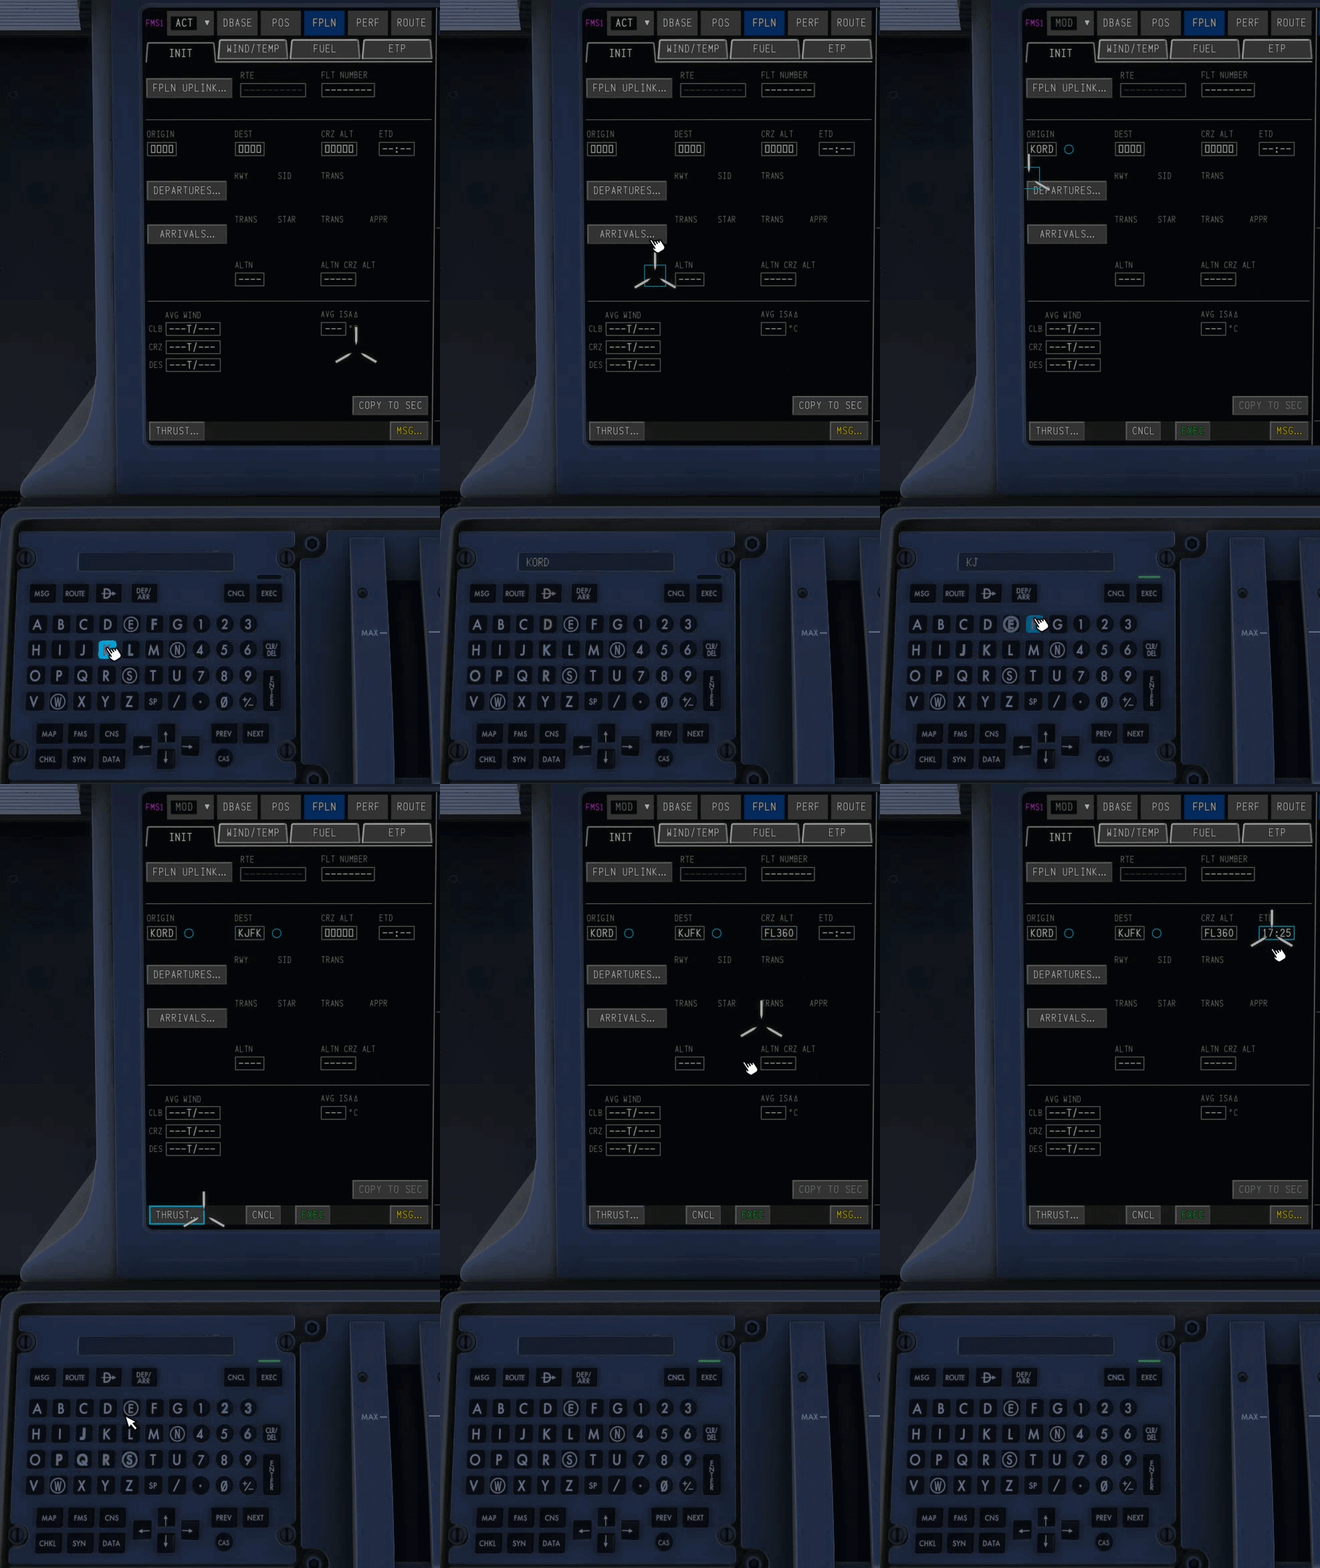
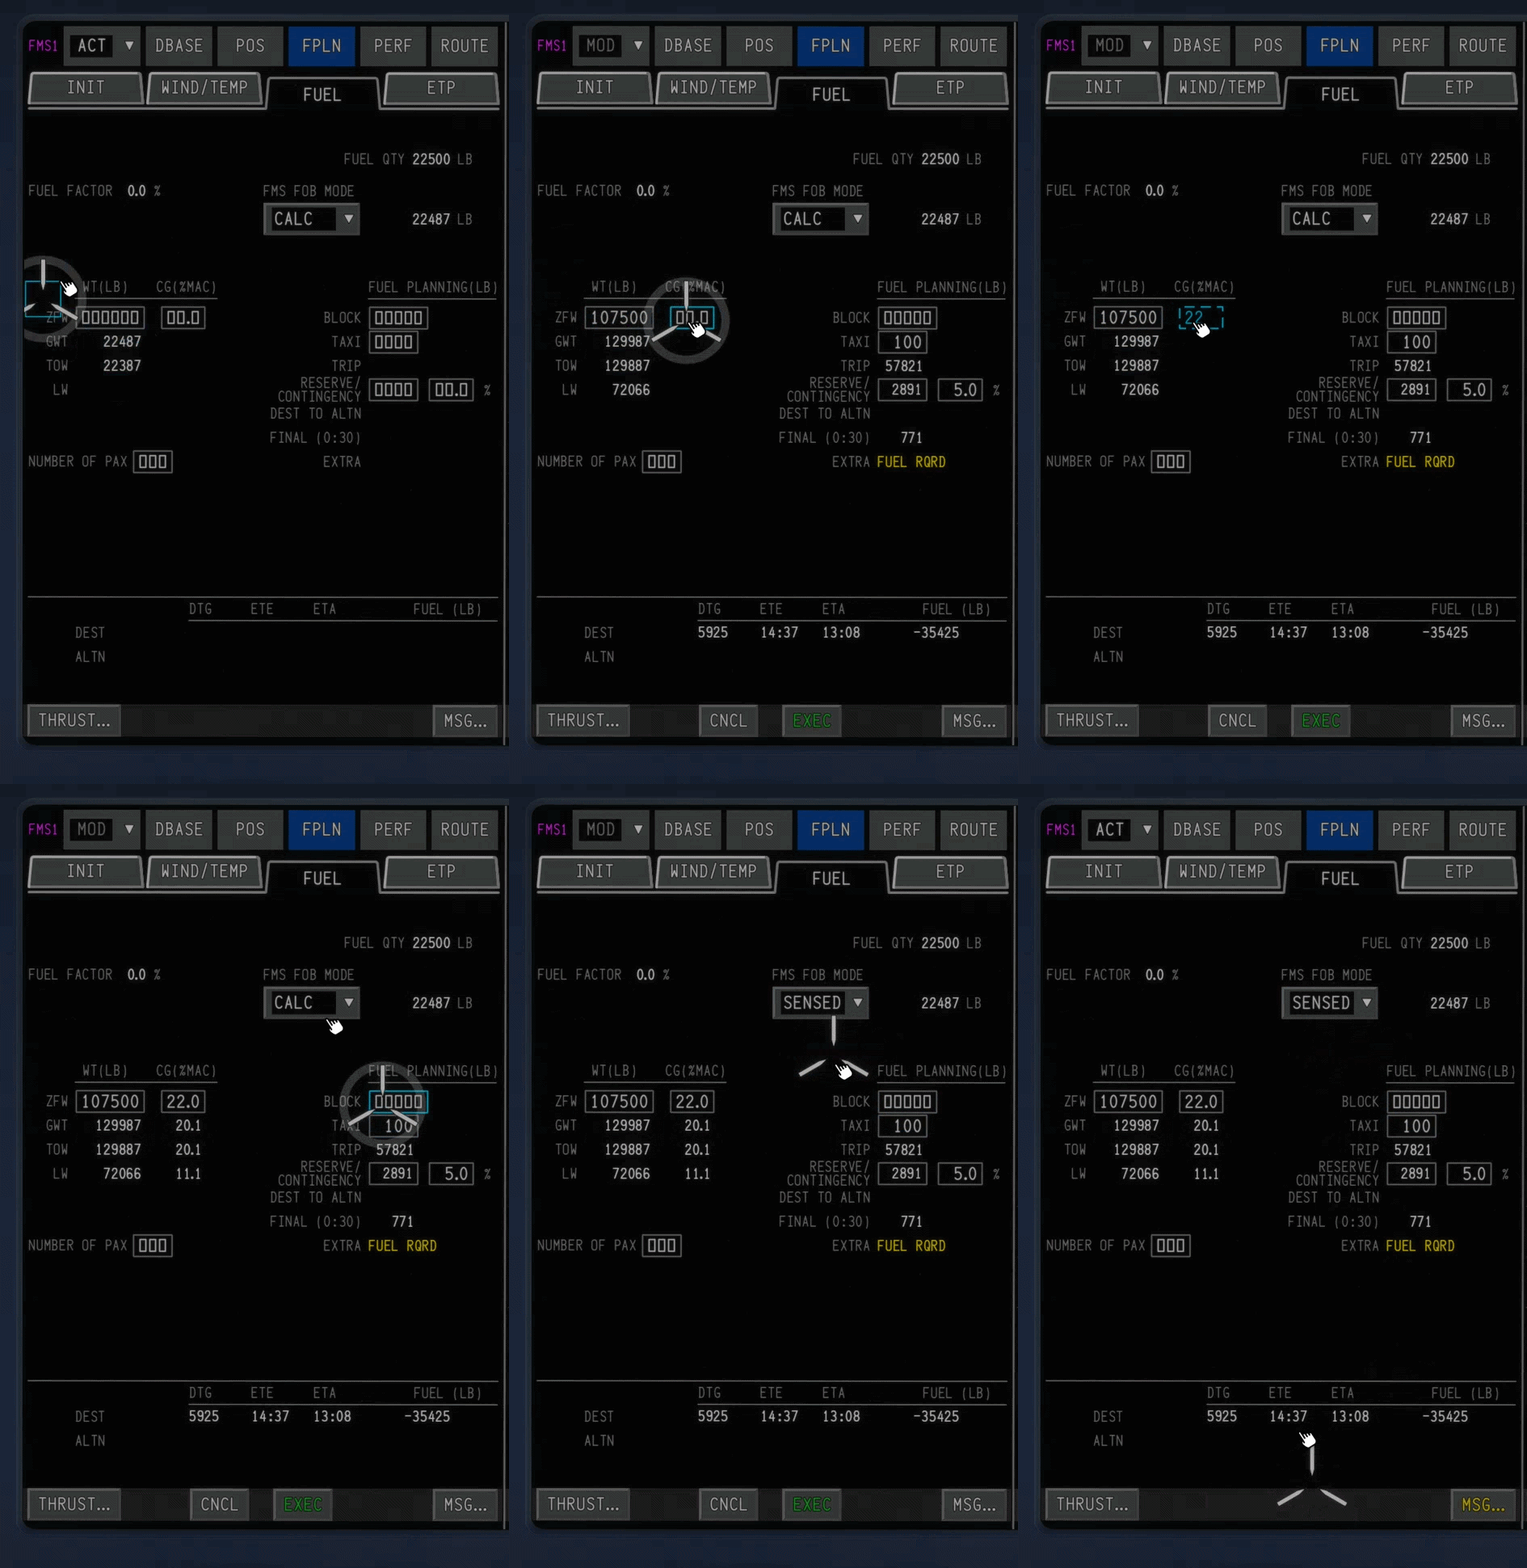
The Proline avionics in the A220 use a unique method of data entry. On the Center Pedestal, each pilot has a Multifunction Keyboard Panel (MKP) with a Scratchpad. When you begin typing on the keyboard, the characters are entered into the scratchpad and a blue square appears on the cursor which you can insert into any data field on a Multifunction Window (MFW) on any of the Display Units (DU). IMPORTANT NOTE: YOU MUST ENTER YOUR WEIGHT AND FUEL IN ORDER FOR THE AUTOFLIGHT SYSTEM TO WORK AS EXPECTED Data Entry – MKP Soft Keys MethodTo enter data into any entry field in the avionics using your mouse/cursor, Use the MKP to type what you want into the scratchpad first On any DU MFW, click on the field you'd like to insert the data. Data Entry – Hardware Keyboard MethodTo enter data into any entry field in the avionics using your physical keyboard, Ensure you have assigned an ENTRY MODE KEYBIND in the EFB via Settings > EFB Settings page. Press the assigned keybind to enable ENTRY MODE, then start typing using your physical keyboard to enter data into the scratchpad first Note: While in “Entry Mode” all other control inputs to the sim are disabled. Exit entry mode to resume functionality. Press the assigned keybind again to exit ENTRY MODE. On any DU MFW, use your mouse/cursor to click on the field you'd like to insert the data. Mandatory DataEntering your weight, CG, and Fuel amount on the FPLN -> FUEL tab is required in order for the aircraft to calculate it's VNAV path and for autoflight to work as expected. To do, simply enter the relevant info as shown:
-
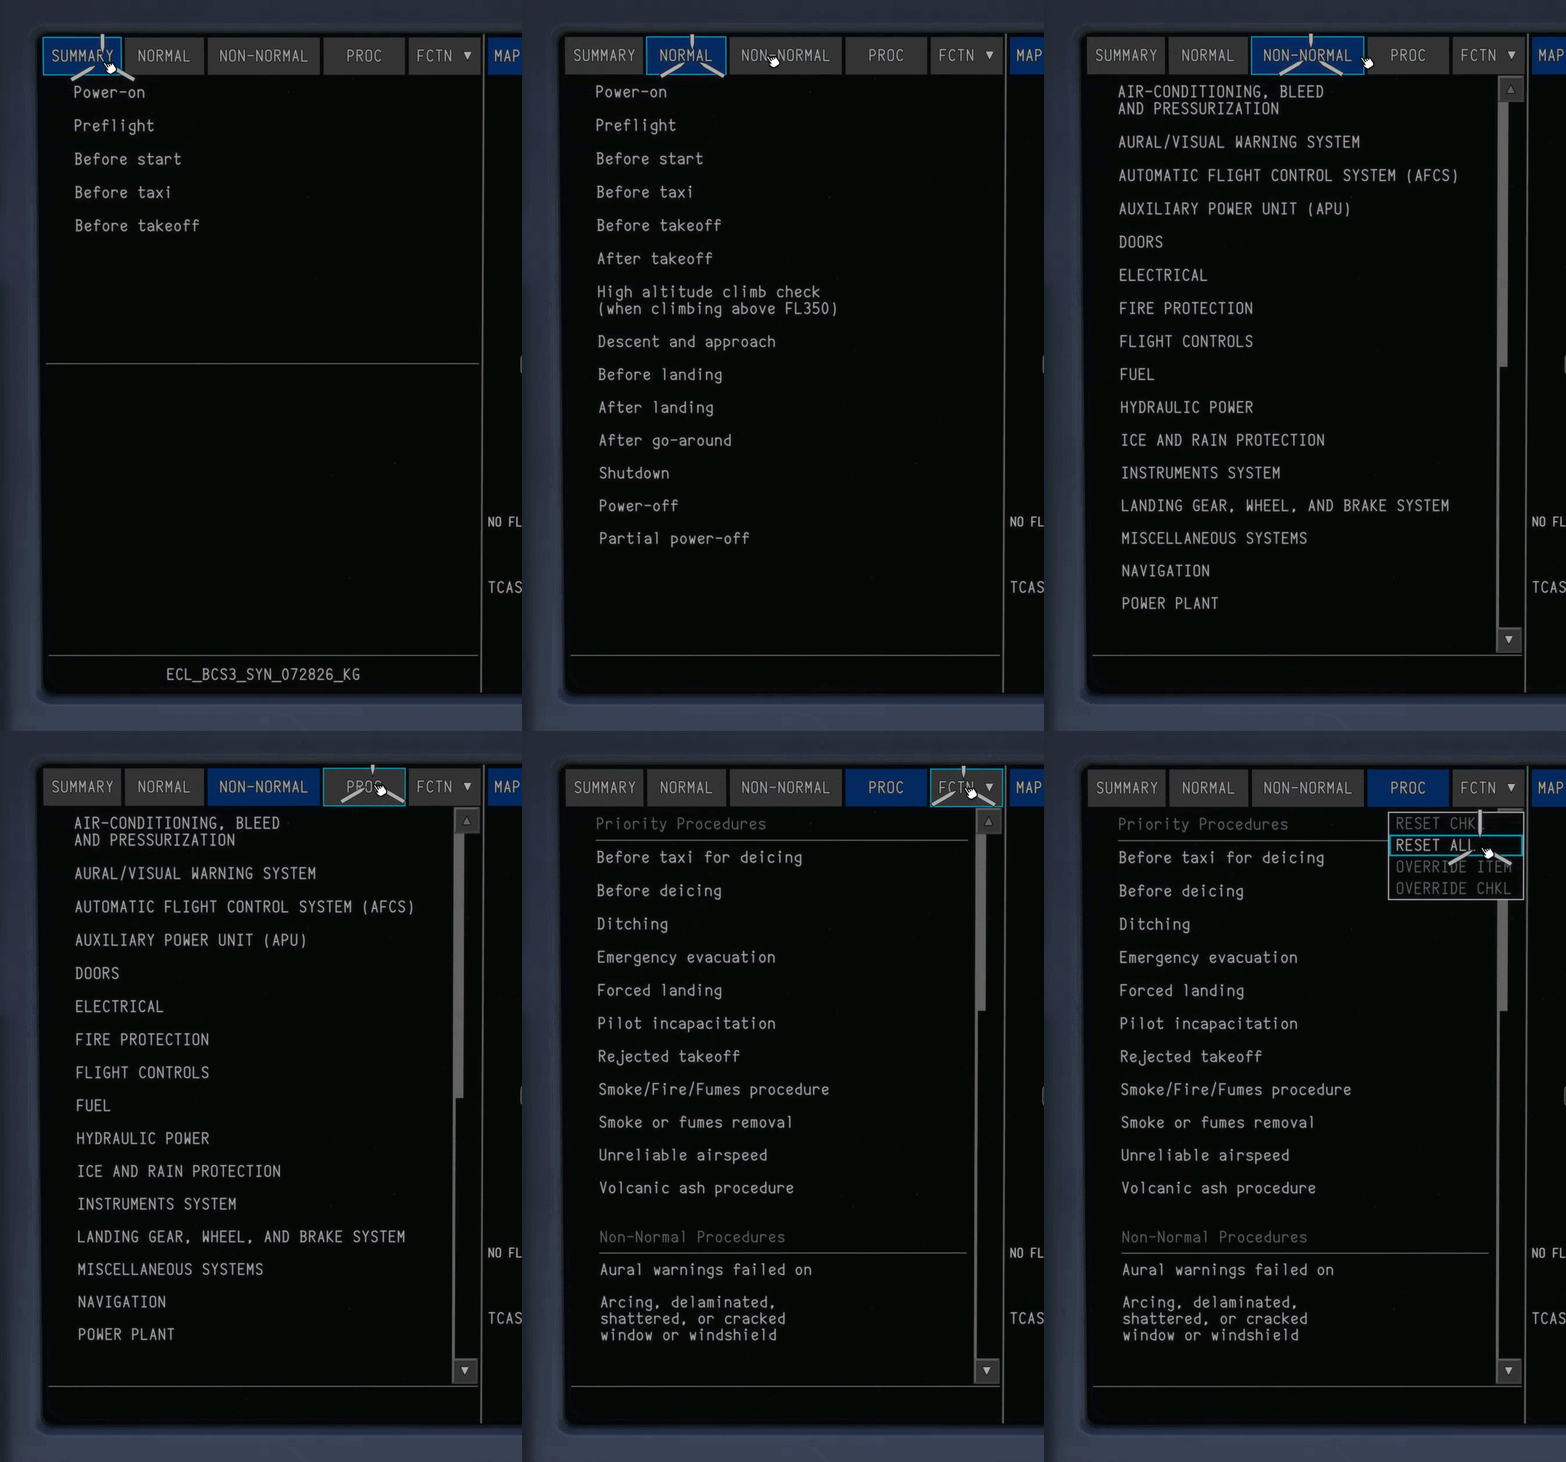
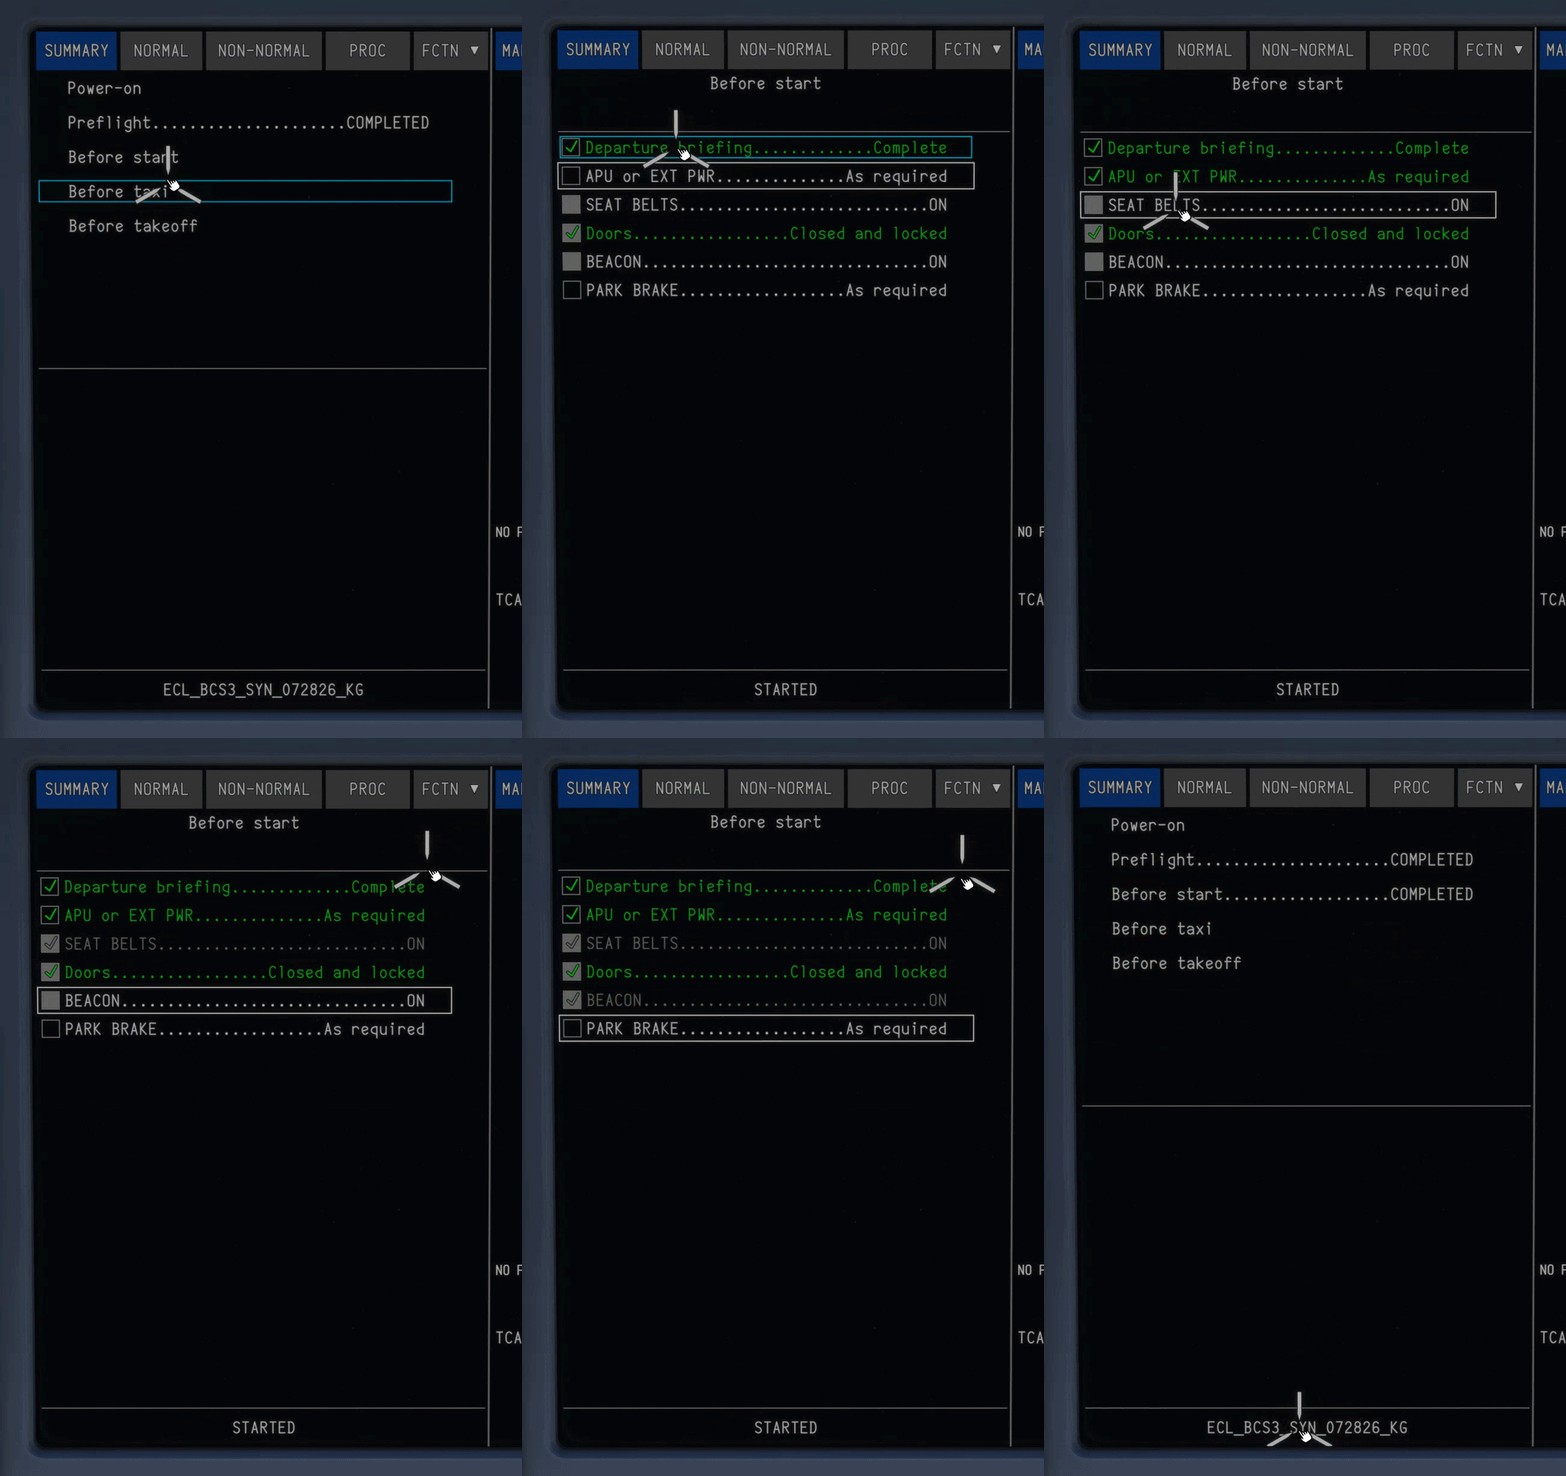
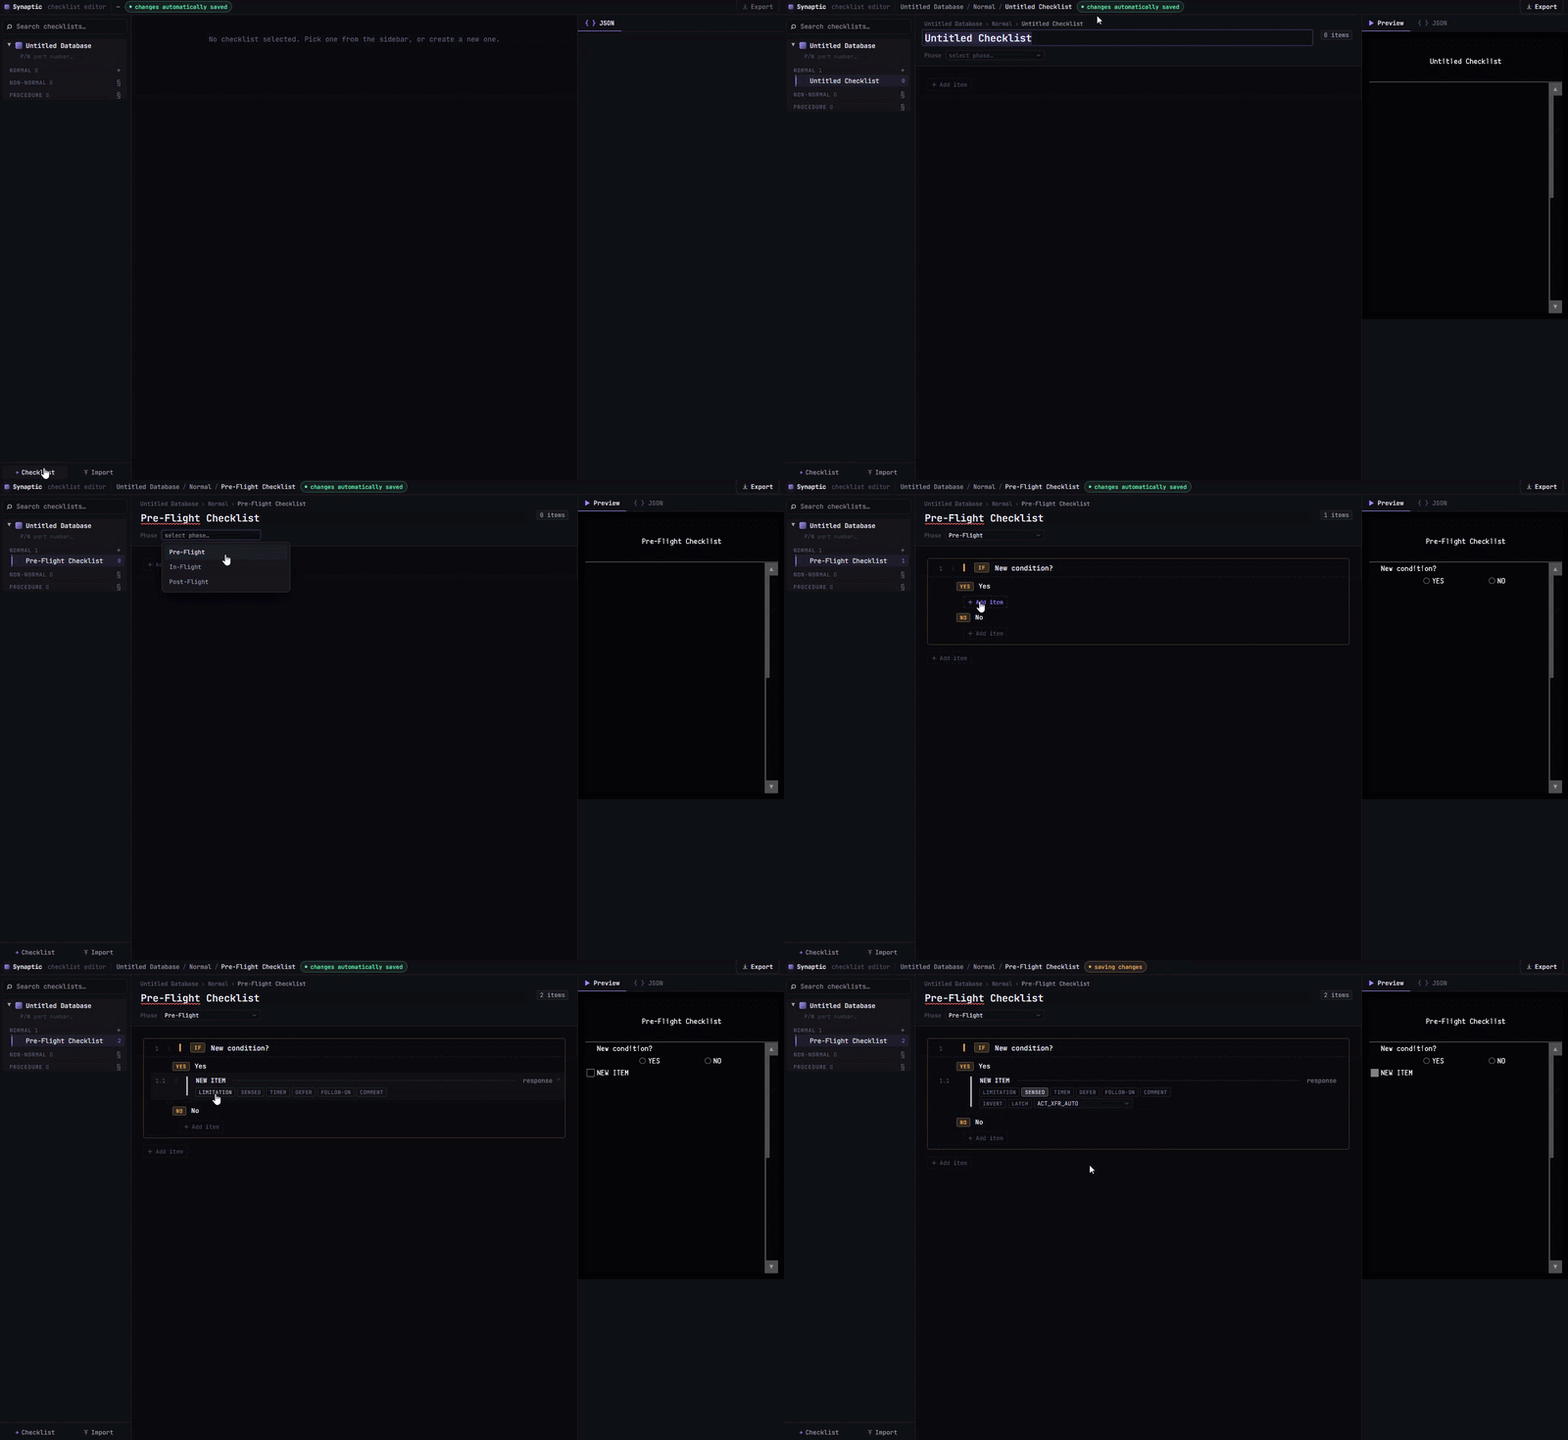
The A220 features fully integrated Normal and Non-Normal avionics checklists, faithfully recreated for an authentic flight experience. To support any operator's SOPs, you can also build and load your own custom checklists. Accessing ChecklistsChecklists can be accessed on any Multi-Function Window (MFW) of Display Units (DU) 2/3 or 5 using their respective CHKL Quick Action Keys (QAK) on the Glareshield or Pedestal accordingly. The checklist display has 4 pages: Summary - Displays relevant checklists for the phase of flight Normal Non-Normal Procedures - Displays checklists for various Normal and Non-Normal procedures for specific situations. Select any checklist from the respective tile to open it. Click on any of tiles to return to the respective checklist menu. Checklists Function (FCTN)Depending on the procedure, some items may be automatically sensed. Sensed items, as well as the entire checklist if desired, can be overriden through the FCTN menu on the top right. Making Your Own Checklists For those who would like to create their own checklists to match specific operators or SOPs, Synaptic have created a checklist builder that be accessed at ecl.synapticsim.com Once exported, the custom checklists.json file can be placed in inibuilds-aircraft-a220\Config\Synaptic For more information check out the Synaptic Guide: https://docs.synapticsim.com/liveries/checklists
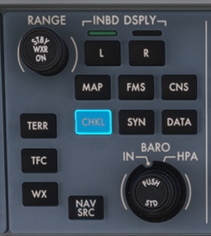
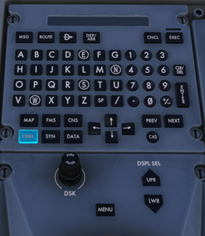
-
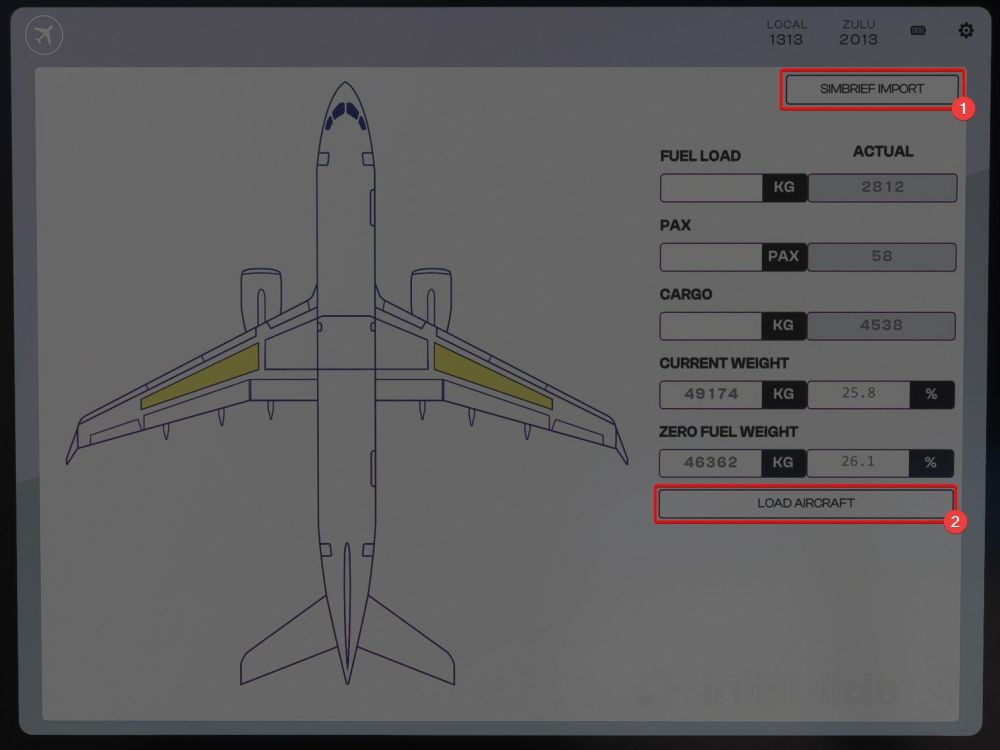
Using the Loadsheet AppLoading and Unloading the A220 is simple. The loadsheet app in the EFB allows you to enter Fuel, Passenger, and Cargo weights or a Zero Fuel Weight value to be loaded in the aircraft. You can also import values from simbrief using the SIMBRIEF IMPORT1 button on the top right. Once you have set the values to your liking, clicking the LOAD AIRCRAFT2 button will send the values to the simulator.

-
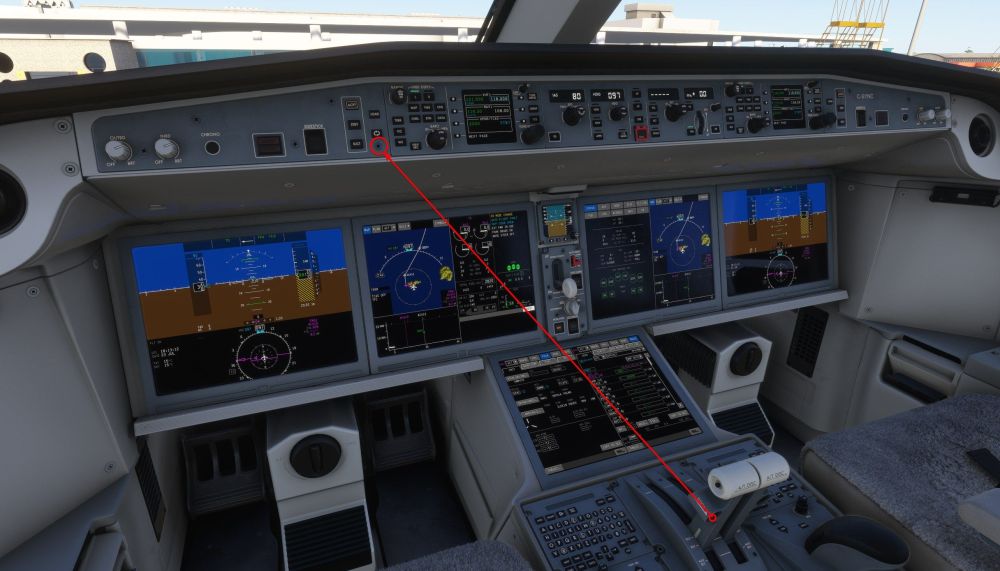
Enabling TO/GA ModeFor your convenience, the TOGA button located on the rear of the throttles has been bound to a screw on the glareshield. This clickspot is mirrored on the First Officer's side of the cockpit as well, should you choose to fly from the right seat. If you would like to bind this button to a keyboard or controller, the in-sim keybind is titled AUTO THROTTLE TO GA

-
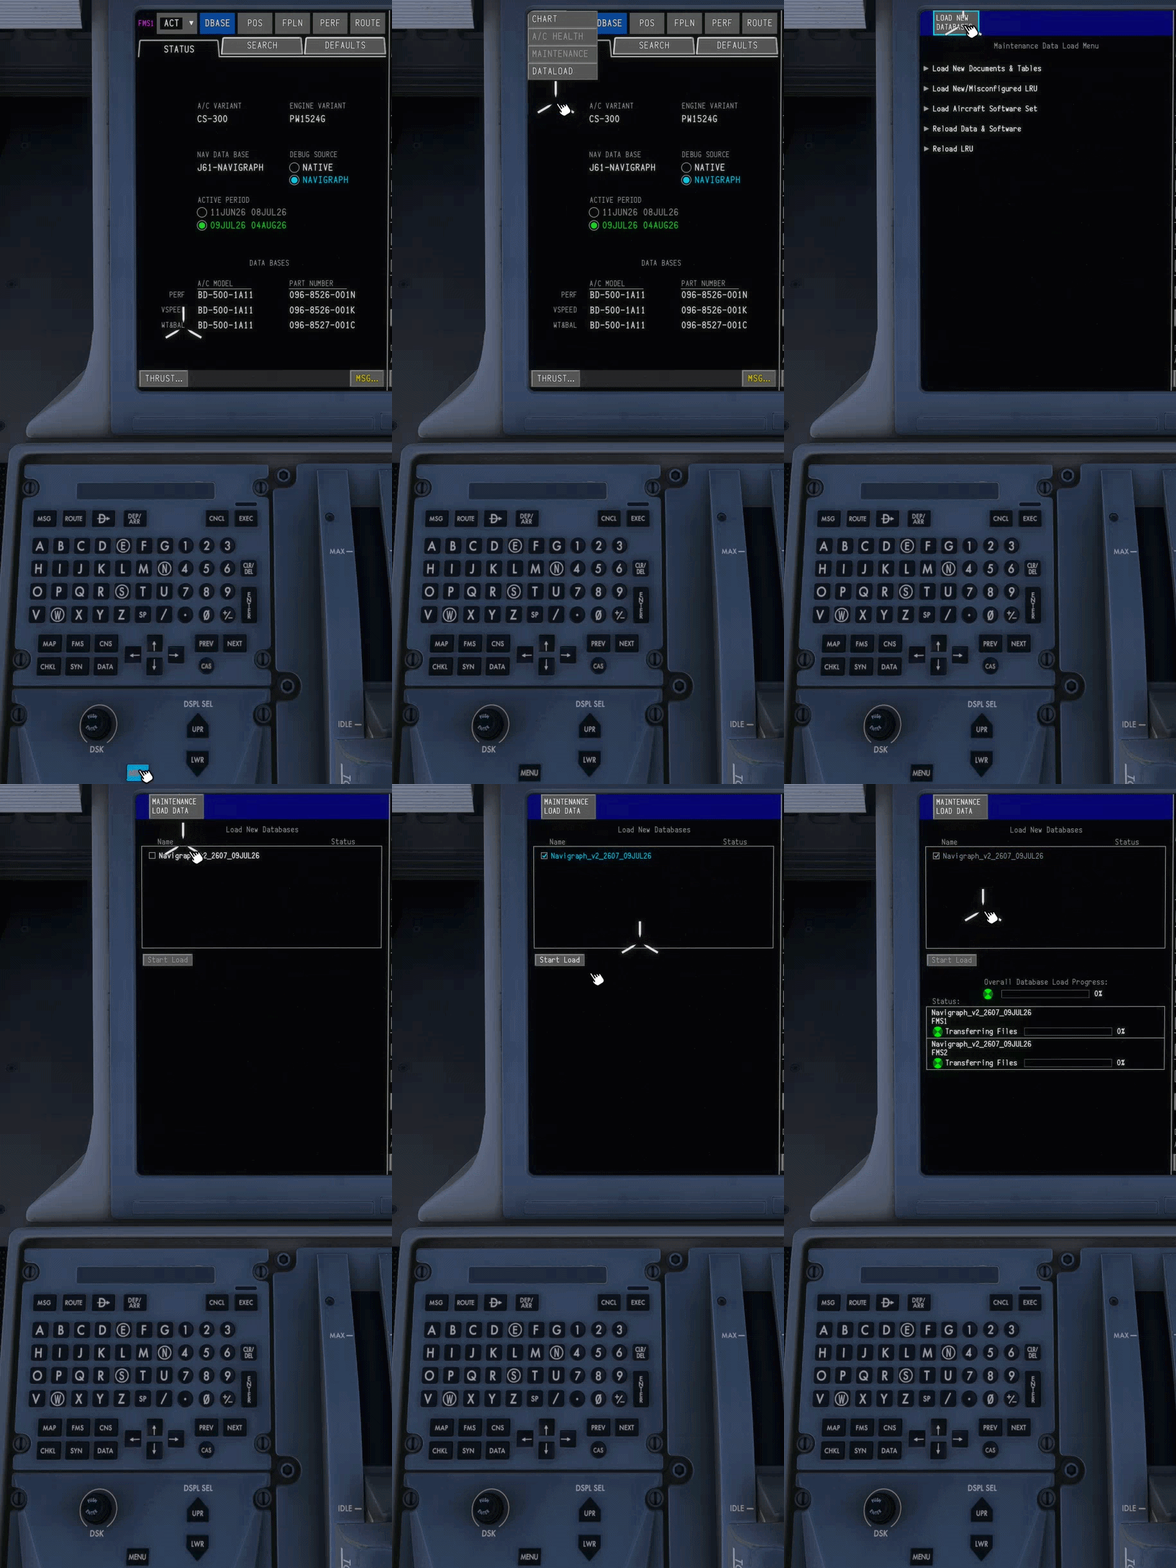
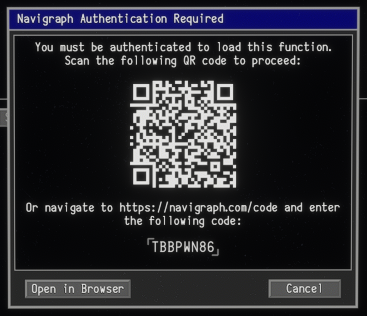
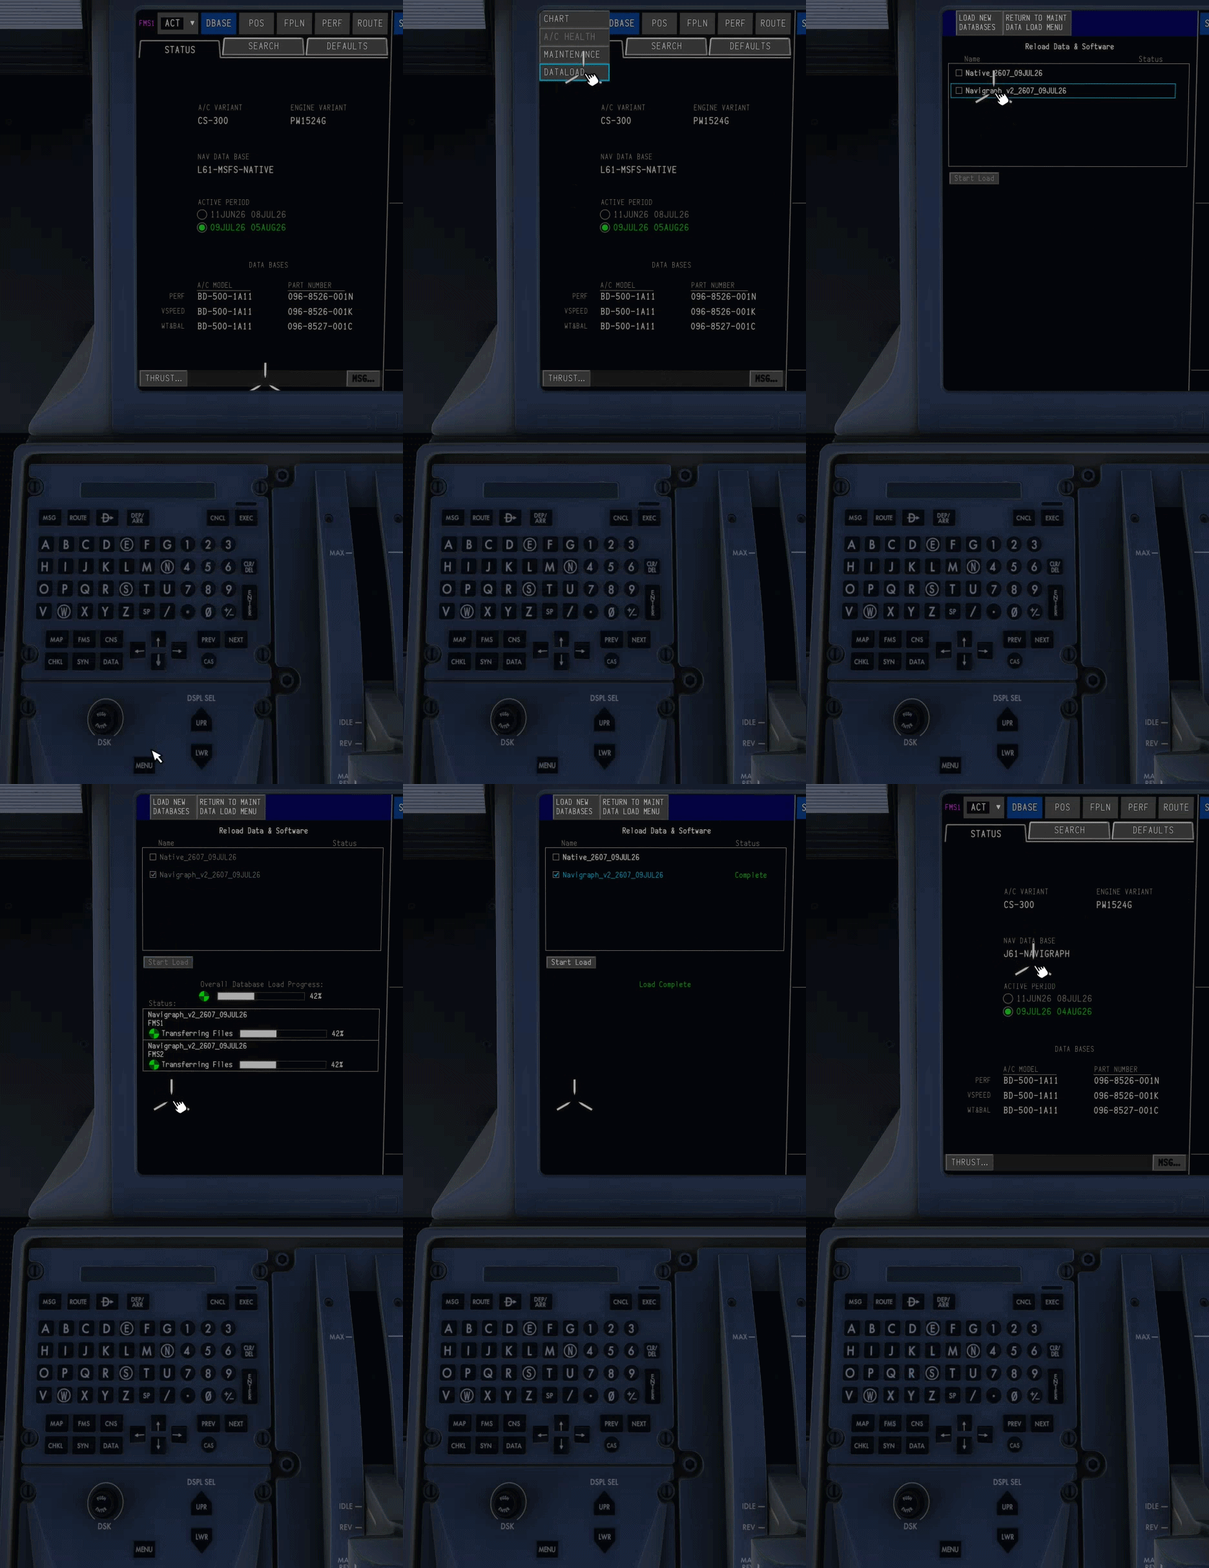
The Synaptic A220 FMS supports two navigation databases: Sim Default: Free and updated automatically via simulator updates. Navigraph: Requires a paid subscription and manual updates each AIRAC cycle. Choosing the Active FMS Navdata SoucePress MENU button on the MKP Select DATA > DATALOAD from the dropdown list Select RELOAD DATA & SOFTWARE Choose NATIVE or NAVIGRAPH as the navdata source for the FMS and click START LOAD Note: Changing sources wipes all FMS data. Do not use when airborne. Updating your Navigraph DatabaseUpdating the navigation database in the A220 is done in a similar fashion to the real aircraft. Press MENU button on the MKP Select DATA > DATALOAD from the dropdown list Select LOAD NEW DATABASES at the top Authenticate Navigraph if not done already Scan or click on Open Browser to approve Navigraph integration. The window will close automatically upon successful connection, To refresh the code go to any other FMS page then repeat steps 1 to 4. Tick the latest database file (e.g. Navigraph_v2_2607_09JUL26) Select START LOAD to begin the uplink. You will see a progress bar at the bottom of the display Upon completion you will see a ‘Load Complete’ message in green Press FMS button on the MKP to return to the FMS pages. Note: Ensure you select Navigraph as the Active FMS Datasource as well to use the updated navdata. Changing sources wipes all FMS data. Do not use when airborne.

-
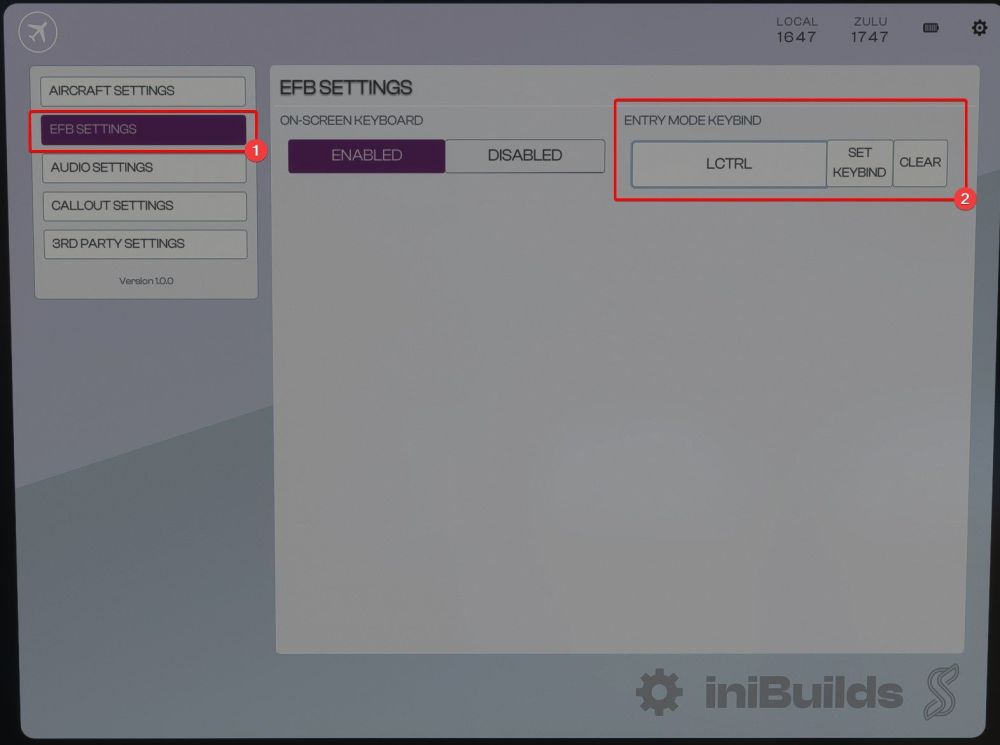
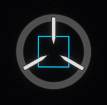
Enabling and Using the Keyboard Entry OptionFor your convenience, the A220 supports adding a keybind to enable and disable keyboard inputs into the FMS Scratchpad. The keybind can be set from the Settings app in the EFB: Once set, you can use this key to enable and disable keyboard input. When keyboard input is enabled, a grey circle will appear around the cursor: When Enabled, Keyboard entry will lockout all other keybinds. Keyboard entry mode will automatically time out after a few seconds to prevent annoyance from being left on accidentally.

-
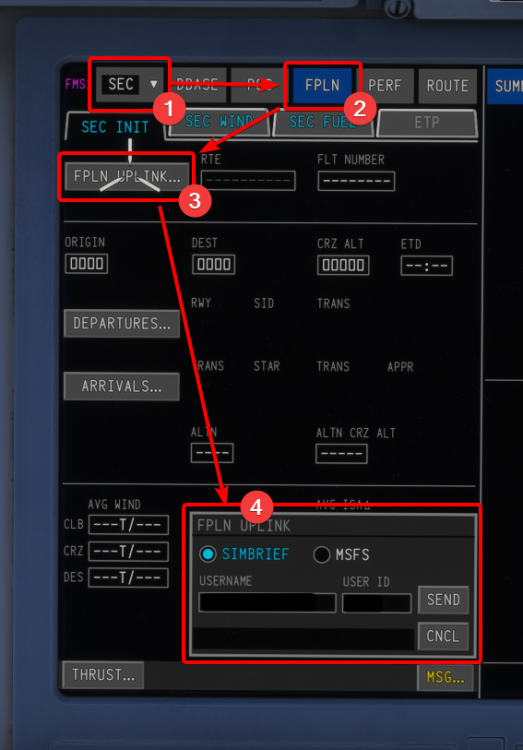
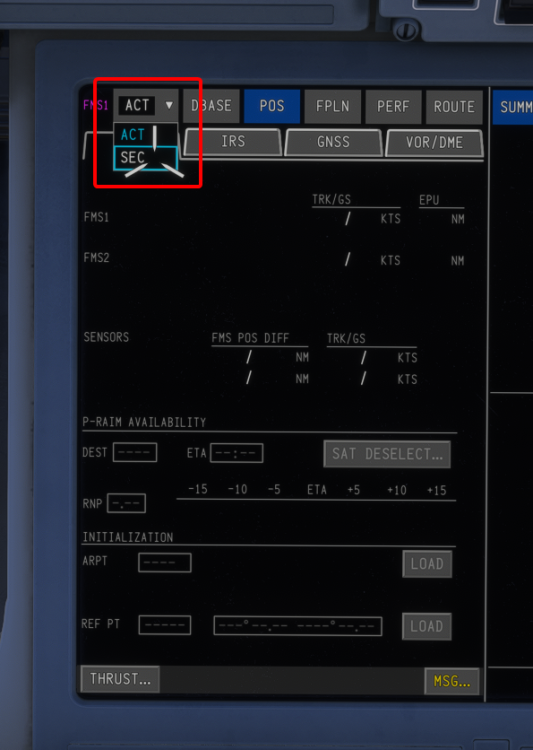
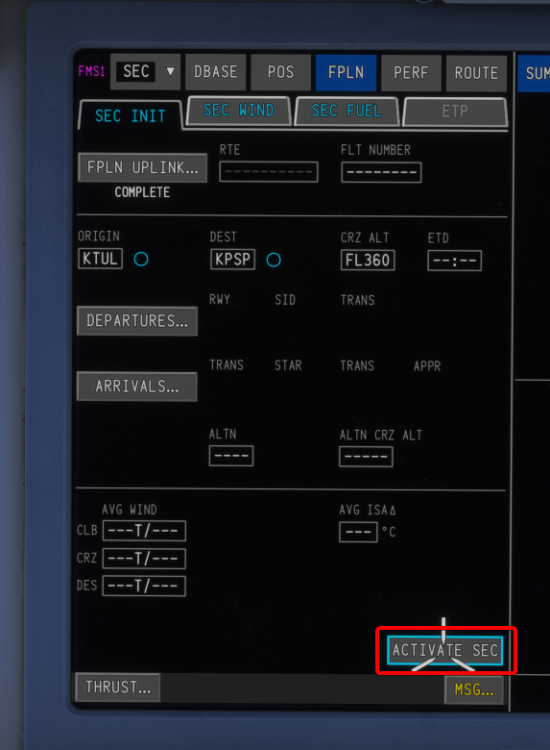
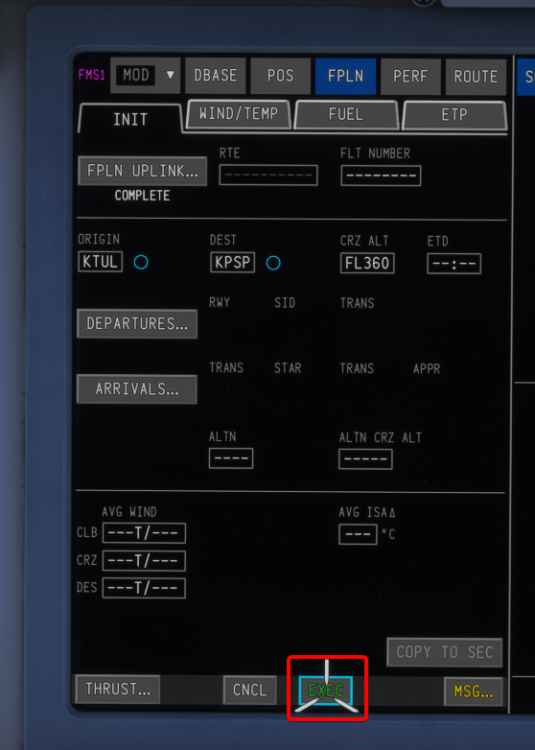
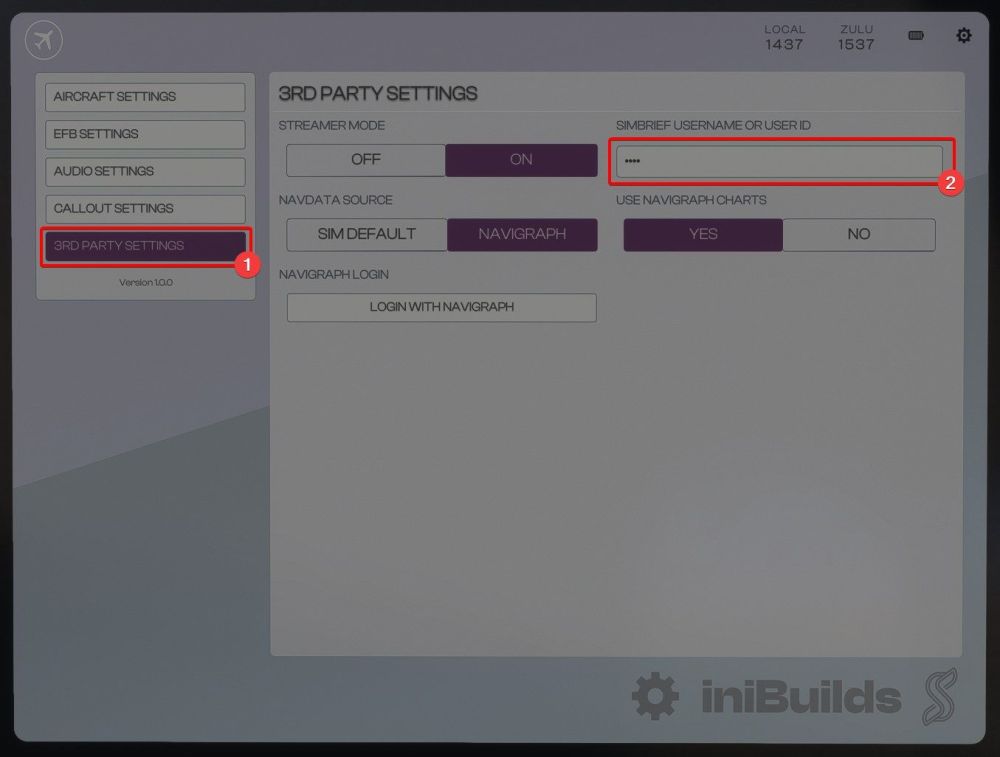
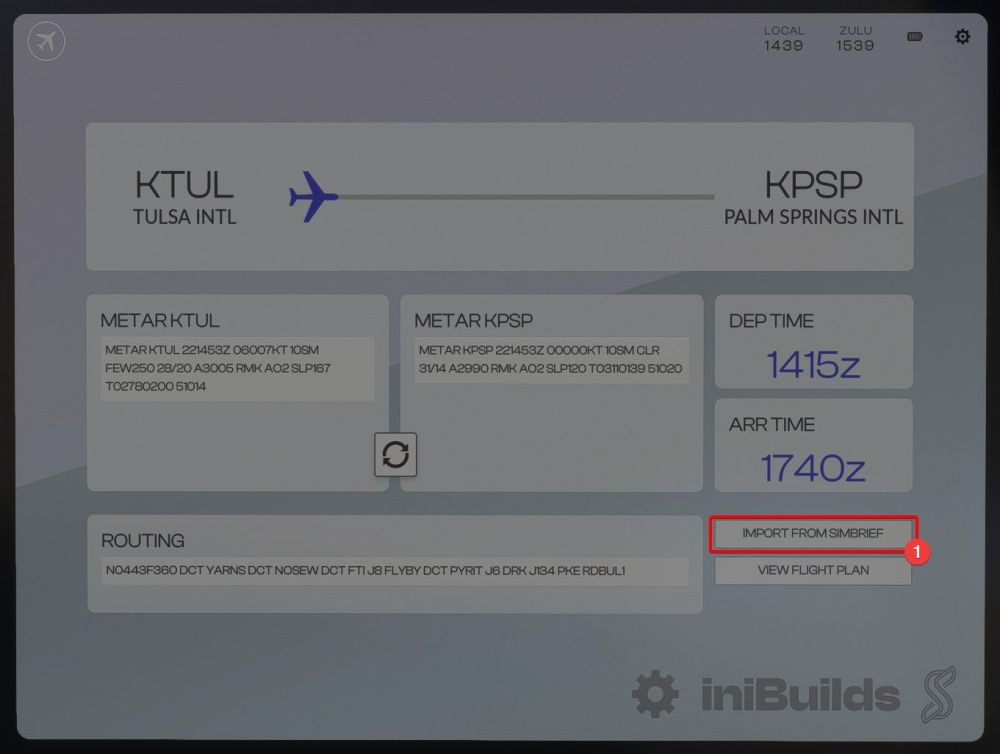
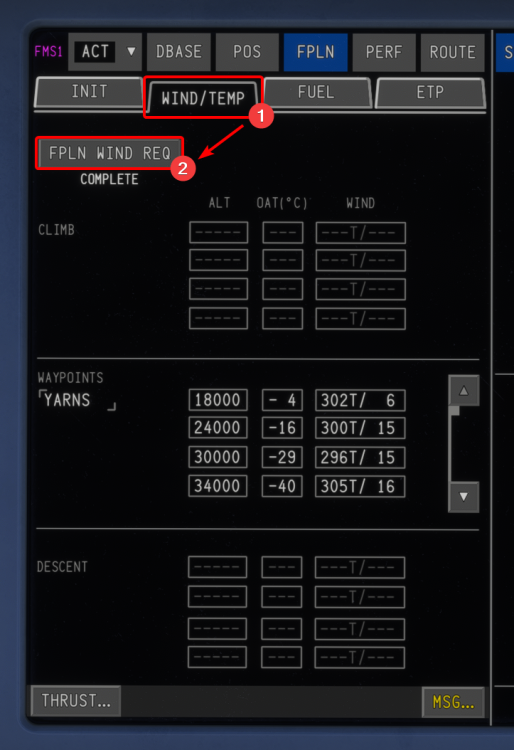
Your planned SimBrief flightplan may be imported directly into the FMS. This flightplan can also be loaded onto the Electronic Flight Bag (EFB) to view the Operational Flight Plan (OFP). Please follow below steps for setting up and using this feature. Importing Route into FMSIn the A220, flight plans are downloaded into the Secondary Flight Plan. To import a flight plan, first navigate to the SEC mode of the FMS page. Next, choose FPLN from the top menu, Click FPLN UPLINK... and follow the instructions in the dialogue box. Note: Your Simbrief User ID is found on the 'Account Settings' page on the Simbrief.com website. Once you are happy with your flightplan, you can click ACTIVATE SEC -> EXEC. This will activate the secondary flightplan and automatically take you back to the active flightplan. Once your flightplan is activated, you can import the Winds Aloft by navigating to the WIND/TEMP tab of the FPLN page and clicking FPLN WIND REQ. Winds will automatically populate within the WAYPOINTS section of the page. Importing into EFB:First, navigate to the SETTINGS app within the EFB. From the 3rd party tab, you can enter your Simbrief User ID which is necessary in order to import your flightplan. Note: Your Simbrief User ID is found on the 'Account Settings' page on the Simbrief.com website. Once your Simbrief User ID is entered, You can import your Simbrief Flight information on the EFB through the MY FLIGHT app. Click on the IMPORT FROM SIMBRIEF button on the bottom-right corner to populate the fields below and add your Operational Flight Plan (OFP) to the OIS. Importing the flightplan into the EFB will automatically populate the charts app with your departure and arrival airports, as well as allow you to view your OFP from within the MY FLIGHT app.