


richboy2307
Staff
-
Joined
-
Last visited
-
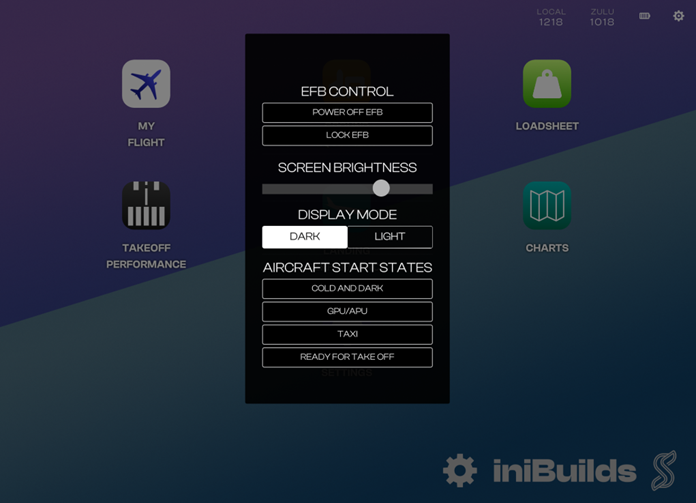
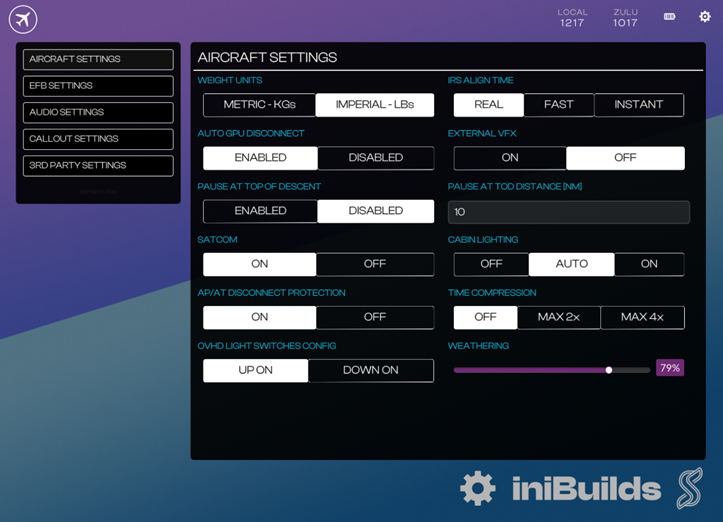
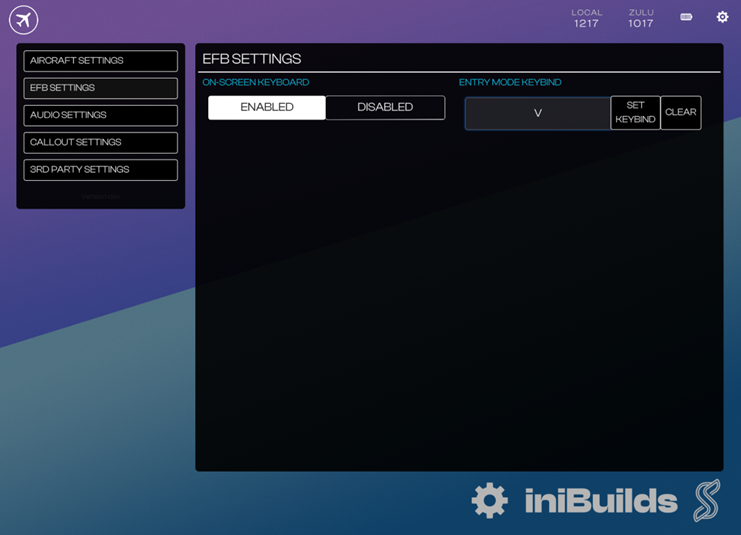
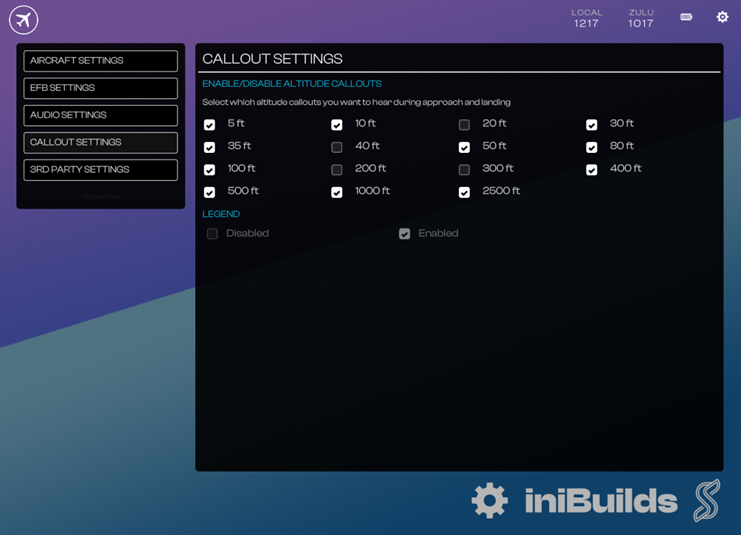
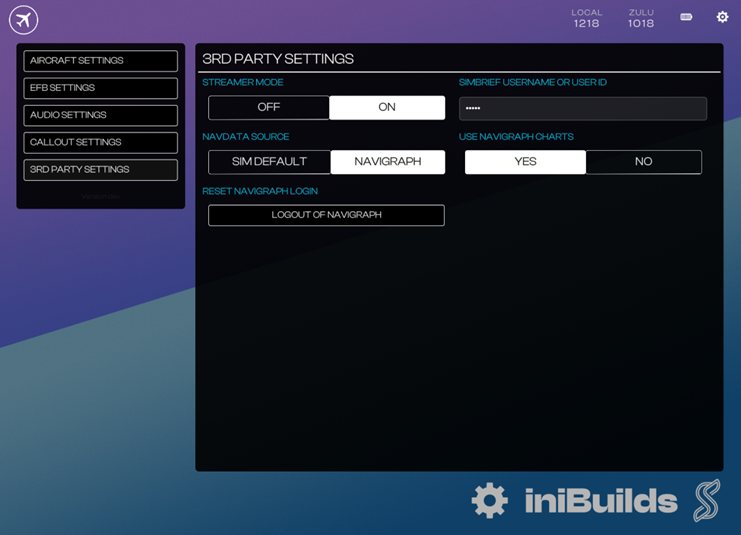
There is an Electronic Flight Bag (EFB) located on both the left and right-side consoles on the A220. EFB Controls MenuPower Off EFB: Click anywhere on the screen to turn back on Lock EFB: Return to Lockscreen Screen Brightness Slider: Adjust brightness of EFB screens Display Mode: Set a DARK or LIGHT theme on the EFB UI Panel States: Select any state to set aircraft systems accordingly Note: Click anywhere on the screen to exit the menu. SettingsSetting menu selector and Version Indicator Settings menu display. Aircraft Settings Weight Units: choose between Metric (KG) and Imperial (LBS) units for Aircraft Systems and EFB. IRS Align Time: choose between Realistic, Fast (60s) and Instant IRS alignment on first power up. Auto GPU Disconnect: automatically disconnects the GPU and Chocks whenever beacon lights are turned on. External VFX: hide any external condensation visual effects for extra performance. Pause at Top of Descent: automatically pauses the sim at the set distance prior to the FMS computed Top of Descent (TOD). SATCOM: toggles the option Satellite Communications equipment on the exterior of the aircraft Cabin Lighting: Allows you to set manual or automatic control of cabin lighting based on time of day. AP/AT Discon Protection: inhibits the automatic disconnection of Autopilot and Autothrust based on excessive turbulence or control inputs. Time Compression: selects the desired simulation rate (upto 4x) OVHD Light Switches Config: chooses whether the switches on the overhead panel should be moved upwards (UP ON) or downwards (DOWN ON) to illuminate the selected exterior light. Weathering: Set desired exterior visual weathering level. EFB Settings On-Screen Keyboard: enables a virtual keyboard when clicking on any data entry fields. Entry Mode Keybind: Set the keybind to toggle Entry Mode Entry Mode allows you to your physical keyboard for data entry into the FMS. Press the same key again to exit Entry Mode Note: While in “Entry Mode” all other control inputs to the sim are disabled. Exit entry mode to resume functionality. Audio Settings Noise Cancellation: to simulate usage of headphones that filter out certain engine and environment sounds, Sliders: To control volume levels of Engine, Environment and Rattle sounds. Callout Settings Select which altitude callouts you want to hear during approach and landing. 3rd Party Settings Streamer Mode: hides your Simbrief ID on the EFB Navdata Source: choose the navigation database used by the FMS Sim Default uses the simulator-provided data updated regularly. Navigraph uses the last installed data that requires an active Navigraph subscription to update. Note: Updates are done via the FMS Maintenance Data Load Menu, which is explained further in the next section. Use Navigraph Charts: toggle between LIDO and Navigraph Charts (MSFS24 Only)


-
Download the A220 Paintkit using the link below: Synaptic A220 Paintkit_1.0.0.rar

-
Download the attached Synaptic x iniBuilds A220 Manual A220_MSFS_Manual_v1.0.0.pdf

-
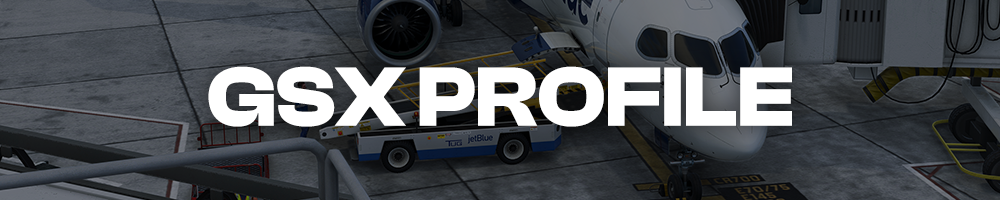
The Synaptic A220 comes with a custom GSX Profile bundled in the Marketplace streamed/downloaded package already. However, if you encounter issues with GSX recognizing the aircraft type, you can install the linked GSX profile manually as a backup. Installation Extract the synaptic_a220 folder to %AppData%\Virtuali\Airplanes Uninstallation Delete the synaptic_a220 folder from %AppData%\Virtuali\Airplanes Synaptic A220 GSX Profile.zip
-
A220-300Click the image to add the airframe to your SimBrief!

-
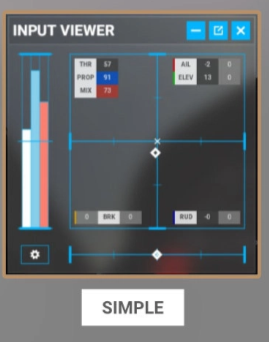
@willwest43 If you have one, that also shows your control inputs simultaneously on screen would be ideal. Also mention the hardware you're using for control. You could use something like the input viewer from your toolbar to show inputs in real time. Enable the "Simple" layout with numbers as well for reference. Thanks!
-
Thanks will pass it on to the team for further evaluation.
-
Yes your submitted reports are under investigation, and any changes are subject to data validation. Changes to engine parameters or cruise pitch angles has effects across all phases of flight. Just to manage expectations don't expect a quick turnaround on this. Things you mentioned falling back on your legacy FSX knowledge are not directly applicable to how things work in MSFS24. (e.g. Table 1506 etc.) Thanks for your patience meanwhile!
-
Thanks will pass it on to the team.
-
Try again in 1.0.8 update and let us know please. Usage of Greater Circle distances is one of the updated items.
-
As mentioned above, we have been trying but don't have any viable workaround at the moment for what appears to be a platform-level bug with how its rendering the clickspots. Should we find one that works, it will be pushed via an update but barring that it remains an issue that needs addressing sim-side. Thanks!
-
A known issue since SU5 Beta, please see:
-
Now you can. Try on v1.0.9. If you do happen to get a crash, please follow this guide to report the CRASH variables as well.
-
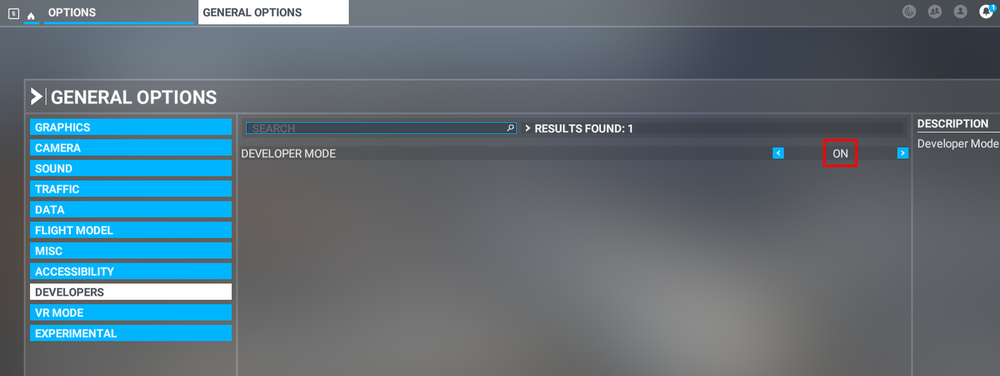
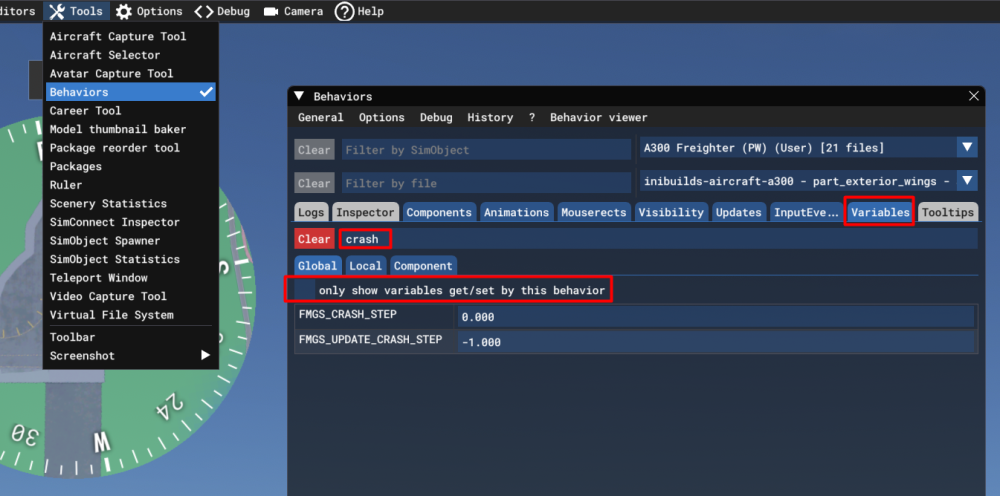
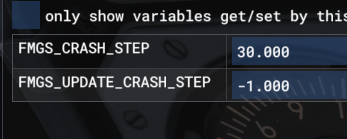
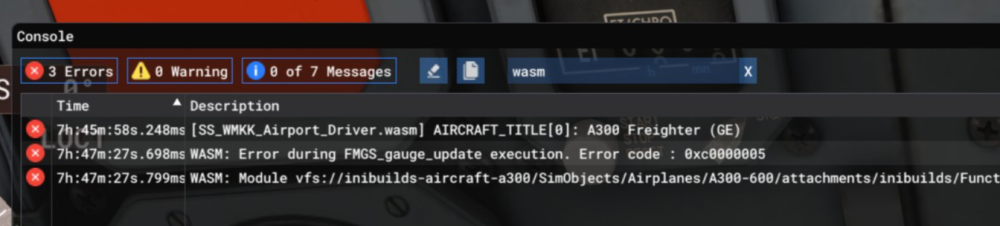
What is WASM?The WebAssembly Module (WASM) is a container for running programmes written in other langauges (eg C/C++) that is then converted to native code ahead of time (as DLLs) during first launch (WASM Compilation). This helps improve performance for subsequent uses but causes longer load times on first launch. his also improves security of the sim and portability of projects across PC / Consoles. In case of issues, only the WASM crashes instead of the rest of the sim along side with it. This is why the sim and some functions may continue to work, however other systems and displays that use WASM on the aircraft become unresponsive or "freeze" in place with a red warning screen. So what to do in case of WASM crash?Do not close the sim/restart flight immediately Verify the WASM error message & crash LVARs Report the WASM error message & crash LVARs with reproduction steps using the guide below. Verify WASM Crash in SimStep 1. Enable Developer Mode FS24 Settings > General > Advanced Options FS20 Options > General Options > Developers Step 2. Enable the Console by pressing "~" key on your keyboard or using the Dev Toolbar at the top of the screen Step 3. Filter the Console by ❌Error messages only by clicking on ⚠️Warning and ℹ️Messages to disable them (remove blue box border around them). Step 4. Type 'WASM' in the search box. Find the WASM Error and Copy the message. Also take a screenshot of this console window for making a report. Step 5. Check the new CRASH LVARs via the Behaviours Menu. Also take a screenshot of this for making a report. Accessing Behaviours Menu FS24 Via the DevMode toolbar at the top, select Tools > Behaviours and navigate to the Variables tab. Uncheck "Only Show Variables get/set....". Type 'CRASH' in the search box and expand their name to display the values. Report WASM Crash on ForumStep 6. Paste the WASM Error message, screenshot of the Console and INI_CRASH LVARs obtained in Step 4 and Step 5 above into a forum post/discord message/ support ticket WASM Crash Report. Step 7. Take note of what you pressed or things you did, just before you noticed this crash happen. Step 8. Verify if you are able to repeat the crash by following those same steps. Step 9. Please provide the following information Aircraft: A300 PW Freighter Simulator: FS2024 Navdata Method: SIM DEFAULT or NAVIGRAPH BASE OFP: Include a PDF of your Operational Flightplan (OFP) if related to FMS/Route Procedures crashes WASM Error: The error you copied in Step 4 above Crash Variables: The variables you screenshotted in Step 5 above Specs: CPU, GPU and RAM of your system. Step 10. Include on your report a Screenshot / Video showing what you pressed/did just before the crash happened to give us more clues. Screenshot of the Crash Variables Steps on how to reproduce the crash so that we can try ourselves with debugging tools to identify the cause of crash. These types of WASM crashes are heavily dependent on the actions taken just before the issue occurs. Detailed reports of the exact steps leading up to the crash are extremely helpful, as if we’re able to reproduce the issue internally using the same sequence, our team can investigate, debug, and resolve it much more effectively.


-
This would be useful yes, along with exactly the airport at which you tried and with what approach. Normally if you're in ALT mode already, arming LOC then ILS should properly set the aircraft up for a GS intercept from below.


